
Overview
I had been wanting to take the Cracking The Perimeter (CTP) course for some time but my schedule was pretty hectic. I finally forced myself to start it at the beginning of the new year and I’m really glad I did. As promised, here is my review…
Prerequisites
Offsec states the following:
Many pre-requisites are required, such as good familiarity with a Ollydbg, and a general mastery of offensive network security techniques.
Definitely sound advice. Here are my additional recommendations:
1) Have a working knowledge of one or more scripting languages.
You should be able to write your own exploits, scripts, and tools from scratch. Knowledge of either Perl or Python is suitable. I tend to gravitate more towards Python but I’m comfortable with both which definitely helped.
2) Understand Assembly and using a Debugger.
In my OSCP review I said this was probably one of the least important recommendations for that course. In this case, it’s one of the most important. You will be expected to write custom shellcode and you will live in a debugger for the duration of the course. As such, you will be staring at / deciphering / writing Assembly instructions and intimate knowledge of Ollydbg or Immunity debugger is going to help you immensely. There are plenty of free online resources to learn Assembly. If you prefer video format, you might consider the videos over on SecurityTube.
3) Get some experience with a fuzzer such as Spike or Sulley.
You will be expected to be able to discover vulnerabilities before exploiting them. Both Spike and Sulley are free. Spike is included on Kali, though I’m partial to Sulley because it’s written in Python. The course will give examples on use of Spike so intimate knowledge is not required but it certainly will help.
4) Understand stack-based buffer overflows and be able to develop exploits that target them.
You won’t be expected to know some of the slightly more advanced topics like developing venetian shellcode to target Unicode-based exploits but you should be very comfortable with exploiting basic / SEH overflows. If you don’t have regular experience developing exploits I would strongly suggest reviewing some online tutorials or books on the subject. Corelan has some nice, in-depth tutorials, I have created my own, and there are plenty of other free online resources as well.
5) Have a good understanding of web technologies and vulnerabilities such as Cross Site Scripting.
A working knowledge of PHP and MySQL and more advanced methods of exploiting XSS (beyond alert(1)) will help you with some of the web-based modules.
Am I ready?
I get asked via my OSCP review all of the time questions like “I have background X with Education Y and skillset Z…am I ready to take the course?” They can be difficult for me to answer because everyone has different learning styles and different rates at which they pick up new concepts. Obviously this is a course designed to teach you so the expectation is not that you know everything walking in to it. That said, it’s definitely not a beginner’s course. If you’re just getting interested in exploit development but haven’t had any hands on experience, you’re probably not ready. If you’ve just completed the OSCP and you enjoyed the section on buffer overflows, but haven’t spent any additional time studying and practicing them, you’re probably not ready.
If you’re still unsure, my overall recommendation is this…assuming you have working knowledge of the above topics, get on exploit-db.com, find some buffer overflow exploits, download the vulnerable applications, break out your fuzzer, debugger, and favorite scripting language, and start replicating the exploits from scratch. Once you feel comfortable with finding and exploiting basic buffer overflow vulnerabilities you should have the knowledge necessary to tackle the course.
In the sections that follow, I will take a quick look at the course registration process and then walk through the course syllabus which you can find here: https://www.offensive-security.com/documentation/cracking-the-perimiter-syllabus.pdf
Course Registration
Unlike the OSCP, before you can take the course you need to complete a small challenge to unlock the registration code and secret key.
You won’t get any help from me here. If you can’t pass this challenge on your own, you’re not ready for the course so do yourself a favor and study a bit more. Once you’ve completed the challenge and unlocked the registration code you can choose from a 30 day or 60 day lab time. I chose 60, because I knew I wouldn’t be able to devote as much time on nights and weekends as I had with the OSCP and because my goal was to get as much out of the course as possible. You’ll get out of the course what you’re willing to put in and for me that meant taking the extra time.
I received my email on 3 January and so it began…
The Course
I’m going to briefly walk through each of the modules listed on the syllabus but before I do I want to give you my overall strategy. The CTP course is set up in the same manner as the PWB/K. You’re given a PDF course guide with written tutorials and exercises along with accompanying videos. As such, my approach was very similar…watch the video(s), read the course module, and complete the exercise(s).
However, as I said, my goal was to get as much as possible from the course and this meant “Trying Harder”. If you’re a prior OSCP student, you probably cringed when you read those words, but I think the “Try Harder” motto means more than just putting in more effort when you fail. To me, it means putting in more effort even when you succeed. In other words, don’t just go through the motions and replicate what’s in the course material. Explore the topics in-depth using additional resources and come up with new or novel ways to apply it. Develop custom scripts, experiment with additional applications. Yes, you may be able to get by just replicating the modules and exercises if your only goal is to get the certification. Just remember, the value you get out of a course like this is not from the cert … its from the knowledge you gain as a result.
Alright, that’s my two cents. Now, here’s a walkthrough of each module and examples of how I Tried Harder. I won’t be giving too much away and I won’t be posting any of my scripts this time because the whole point of the course is to develop your own.
The Web Application angle
The first module walks through some real-world attack scenarios to steal cookies, modify account settings, and obtain shell via Cross Site Scripting. I won’t divulge the specific application or vulnerability, but while fairly straightforward, these are great illustrations as to why XSS can pose such a high risk.
The second module walks through a real-world directory traversal exploit that ultimately results in shell access to the target machine. This particular exploit requires multiple steps starting with the directory traversal vulnerability which is used to access files hosted on the web server in order to extract pertinent data, gain access to the web application, and upload and execute a reverse shell.
The course guide and videos explain how to execute each of these steps of the attack manually, but to take it to the next level (Try Harder!!!), I opted to automate all of it via a single script:
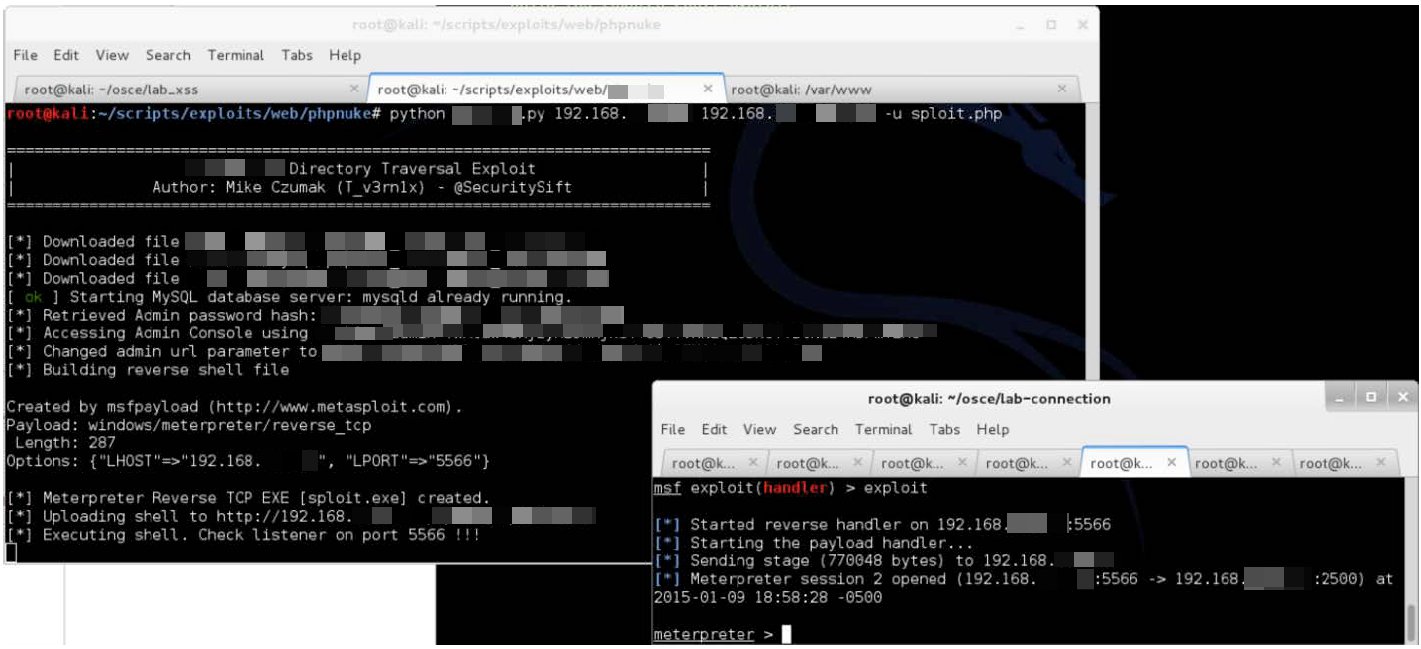
Forcing yourself to automate a multi-step attack via your favorite scripting language is a great way to sharpen your skills and truly understand all of the moving parts of an exploit. Yes it takes extra time but I promise it will be worth it if your goal is to increase your knowledge.
The Backdoor angle
These modules cover how to backdoor files in a Windows Vista environment by creating code caves. Yes, Vista is old news but the fundamental concepts covered here are still relevant and should be understood. When this module was originally written, Metasploit generated shellcode instructions a bit differently. If you find yourself struggling with shellcode that fails to execute without terminating / crashing the program I’ll give you small hint: pay attention to the call for WaitForSingleObject and to how your shellcode exits. Ok, no more details…you’ll have to figure out those on your own!
Once you cover the mechanics on how to create a backdoor, you’ll be asked to recreate the steps using a program of your choosing. Again, these steps are executed manually in the course material, but I opted to take it a step further and automate the process with a script I dubbed peSploit.py which takes a target executable and automatically inserts a code cave backdoor. While it may sound fairly straightforward, getting it to work reliably (while still having the original executable function as intended) can be a bit of a challenge to automate. I won’t provide that code here, but I based it off of peCloak.py which I’ll cover next.
After you learn the fundamentals about backdoors, you’re taught some basic antivirus evasion techniques which involves utilizing code caves and some rudimentary XOR encoding. You’re then challenged with attempting to bypass some alternative AV vendor software using similar techniques. While AV technology has evolved to some degree since this course was originally created, I was curious just how easy it would be to apply these basic concepts to bypass an assortment of AV products on the market today. So I once again took it beyond the course material and wrote a script I dubbed peCloak.py which not only automates the process of cloaking a Windows executable, but adds some additional functionality such as dynamic encoding generation and rudimentary sandbox bypass routines.

I won’t rehash the details of how it works here, but I do provide an in-depth explanation in this post: http://www.securitysift.com/pecloak-py-an-experiment-in-av-evasion/.
A word of warning…although I did provide the full source for peCloak in the above post, do not reuse my code for this course or you may risk not getting credit!
Advanced Exploitation Techniques
In this module, you’ll be asked to revisit MS07-017 on Windows Vista, specifically to bypass ASLR protections that were introduced with that OS. Again, these protections have long since been addressed in Windows 7 and beyond, but it is always a good idea to fully understand how these attacks worked before tackling more advanced methods.
As with most of the example exploits provided in the course, I opted to rewrite mine from scratch (without much reference to the originals). I recommend you do the same if you want to hone your scripting skills or better understand how the exploit works.
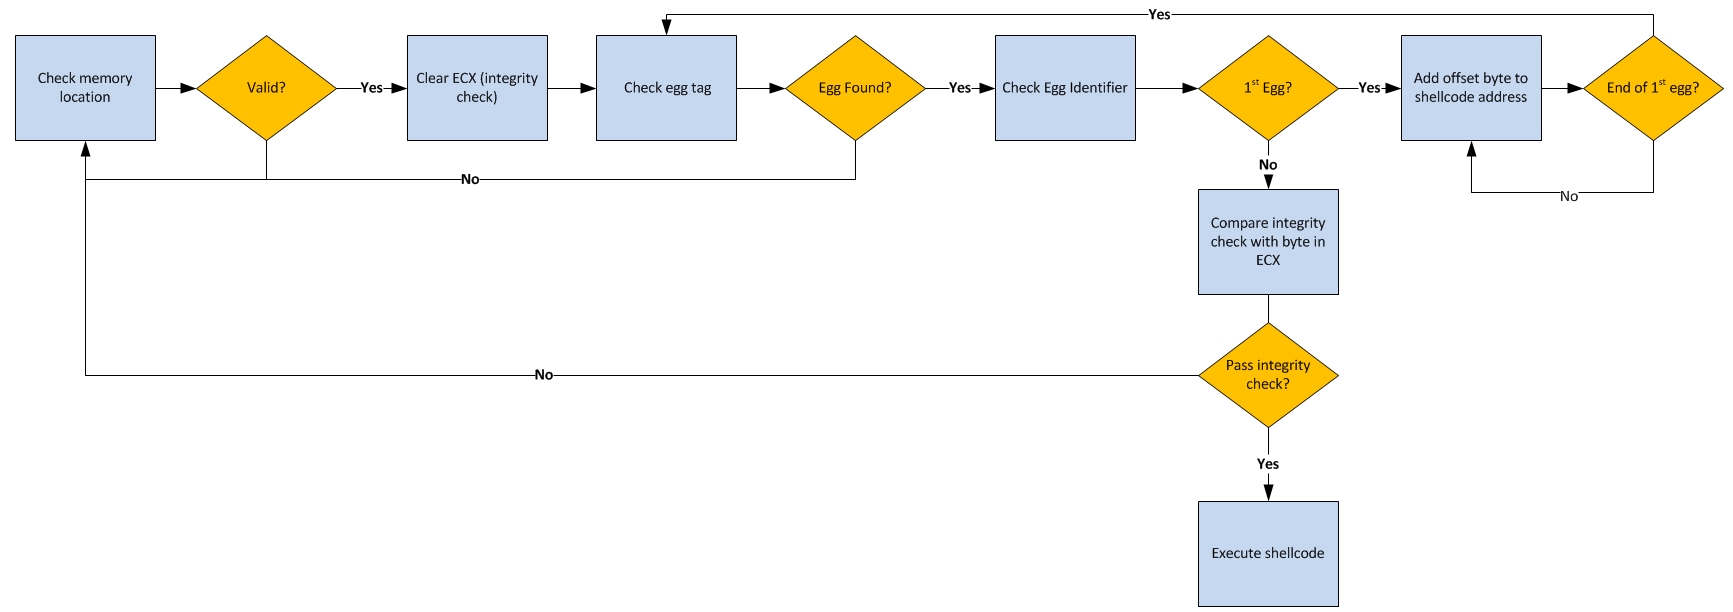
Cracking the Egghunter
This modules introduces the concept of an egghunter and its role in executing otherwise unreachable shellcode in memory, typically due to available buffer size restrictions. Again, I took the opportunity to rewrite the exploit provided (rather than simply modify the existing code). In addition, because I was very familiar with egghunters already, I opted to use this opportunity to improve upon an integrity-checking egghunter concept I had developed a while back that I dubbed the EggSandwich which essentially tackles the issue of shellcode execution failure due to in-memory corruption.
I also wrote a separate post on this concept here: http://www.securitysift.com/eggsandwich-egghunter-integrity/
The 0Day angle
The modules in this section walk you through a couple of real-world 0day exploits starting with one that targets a Windows TFTP Server. You’ll be expected to recreate discovery of this vulnerability using a fuzzer and subsequently reproduce the resulting exploit. The course walks you through using the Spike fuzzer but if you’re already familiar with it or would like to challenge yourself further, I would recommend replicating it using another fuzzer such as Sulley.
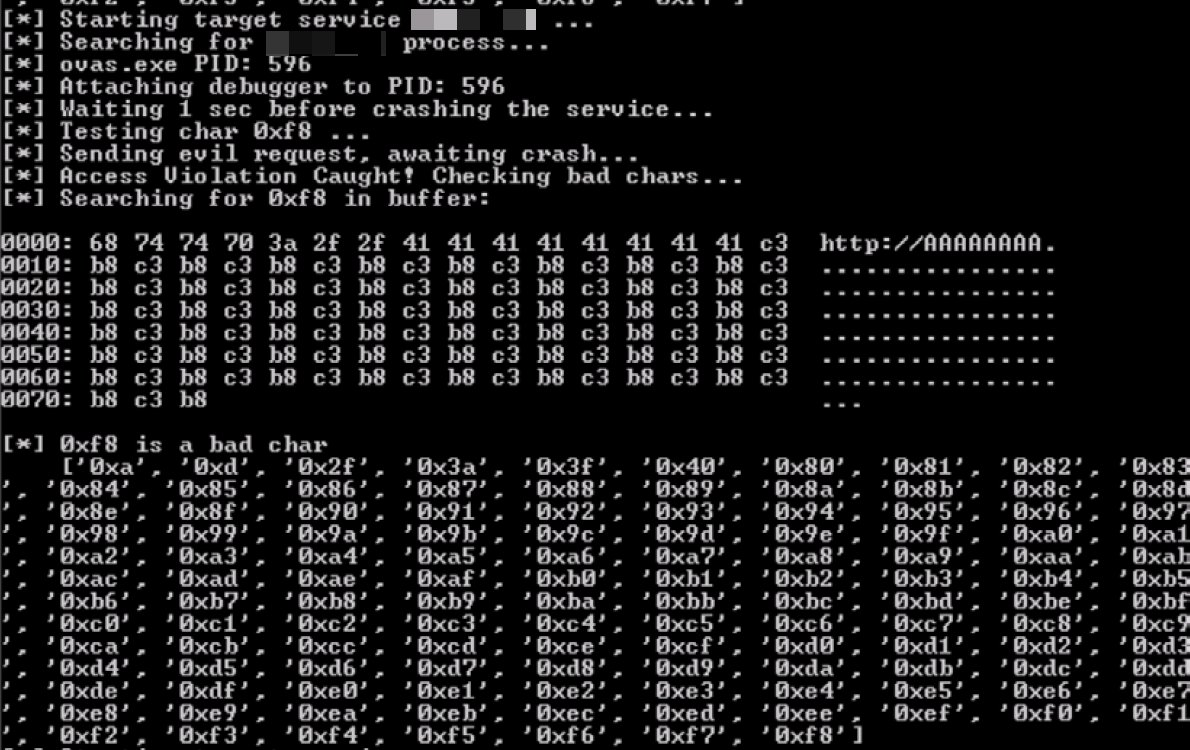
The other module in this section examines a vulnerability discovered in HP Openview NNM. One of the challenges presented in this module is overcoming “bad characters” or those which will cause your shellcode to fail (due to the way the application processes/modifies them). The course module illustrates the method used to discover bad characters for this particular exploit and provides the resulting list, but I wanted to replicate the findings from scratch, so I heavily modified the provided code, installed the required dependencies on the test box, and reproduced the findings exactly.
Of course, once you’ve identified a list of bad characters, you somehow need to encode your shellcode to avoid them. Quite often, out-of-the-box Metasploit payload encoding cannot exclude all of the characters you desire. The course illustrates a method on how to manually create custom encoded shellcode, but like anything I do, I wanted to automate it! So, I took the time to develop a python script I dubbed alpha_shell.py that takes a list of allowed characters and encodes shellcode of my choosing (using some simple sub instructions) to avoid any character not in that list. Here’s a modified view of that script’s output so you can get a sense of what I did:
root@kali:~/osce# python alpha_shell.py -d 4
=========================================================================
|                             alpha_shell.py                            |
|                     Custom alpha shellcode generator                  |
|                                                                       |
|                Author: Mike Czumak | T_V3rn1x | @SecuritySift         |
|                Usage: alpha_shell.py [options] (-h or --help)         |
=========================================================================
[*] Verified shellcode is divisible by four
[*] Encoding shellcode:
        [+] 6681caff0f42...
[*] Breaking shellcode up into four byte chunks in reverse order
        [+] e7...
        [+] af...
        [+] fa...
        [+] 30...
        [+] 74...
        [+] 2e...
        [+] 6a...
        [+] ff...
[*] Cycling through shellcode in reverse order, 4 bytes at a time to generate alpha encoder
[*] Starting depth set to 4
[*] Attempting to generate encoder for chunk 1 (e7...)
[*] Trying to find usable subtrahends starting with good char: 0x7f
[*] Instructions to get e7... (chunk 1) are:
        [+] sub 7f...
        [+] sub 7f...
        [+] sub 19...
[*] Attempting to generate encoder for chunk 2 (af...)
[*] Trying to find usable subtrahends starting with good char: 0x7f
[*] Instructions to get af... (chunk 2) are:
        [+] sub 7f...
        [+] sub 7f...
        [+] sub 51...
[*] Attempting to generate encoder for chunk 3 (fa...)
[*] Trying to find usable subtrahends starting with good char: 0x7a
[*] Instructions to get fa... (chunk 3) are:
        [+] sub 7a...
        [+] sub 7a...
        [+] sub 10...
[*] Attempting to generate encoder for chunk 4 (30...)
[*] Trying to find usable subtrahends starting with good char: 0x28
[*] Instructions to get 30... (chunk 4) are:
        [+] sub 28...
        [+] sub 28...
        [+] sub 7f...
[*] Attempting to generate encoder for chunk 5 (74...)
[*] Trying to find usable subtrahends starting with good char: 0x06
[*] Instructions to get 74... (chunk 5) are:
        [+] sub 06...
        [+] sub 06...
        [+] sub 7f...
[*] Attempting to generate encoder for chunk 6 (2e...)
[*] Trying to find usable subtrahends starting with good char: 0x29
[*] Instructions to get 2e... (chunk 6) are:
        [+] sub 29...
        [+] sub 29...
        [+] sub 7f...
[*] Attempting to generate encoder for chunk 7 (6a...)
[*] Trying to find usable subtrahends starting with good char: 0x0b
[*] Instructions to get 6a... (chunk 7) are:
        [+] sub 0b...
        [+] sub 0b...
        [+] sub 7f...
[*] Attempting to generate encoder for chunk 8 (ffc...)
[*] Trying to find usable subtrahends starting with good char: 0x77
[*] Instructions to get ff... (chunk 8) are:
        [+] sub 77...
        [+] sub 77...
        [+] sub 11...

[*] Encoded shellcode:
254a4d4e55253532312a54582d664d55552d664b55552d6a505555505c254a4d4e55253532312a2d457f7f7f2d457f7f7f2d011a011950254a4d4e552535...

[*] Sploit-ready encoded shellcode:
"\x25\x4a\x4d\x4e\x55\x25\x35\x32\x31\x2a\x54\x58\x2d\x66\x4d\x55"
"\x55\x2d\x66\x4b\x55\x55\x2d\x6a\x50\x55\x55\x50\x5c\x25\x4a\x4d"
"\x4e\x55\x25\x35\x32\x31\x2a\x2d\x45\x7f\x7f\x7f\x2d\x45\x7f\x7f"
"\x7f\x2d\x01\x1a\..."

[*] Total Elapsed Time: 170.569671869
The Networking Angle – Attacking the Infrastructure
This section of the course examines bypassing Cisco Access Lists using Spoofed SNMP Requests and using that access to modify router configurations which ultimately allows you to reroute and sniff previously unreachable traffic. This was an interesting section, though I didn’t deviate much beyond the course material.
The Exam
Ah yes, the portion of the review that I’m sure people are the most interested in…what was the exam like? Well, I can tell you I found it to be very relevant to the course material and quite challenging. In total you’re given 47 hours and 45 minutes to complete the exam. I opted to take it a week before my course time ended because I felt I was as prepared as I could be.
As with the OSCP, I organized my materials (scripts, notes, etc) that I created during the course prior to attempting the exam. I didn’t do any additional studying or preparation because I was comfortable with the exploit concepts presented in the course and I felt the extra work I put in was prep enough.
Also in line with the PWB/K exam, you are provided with a number of targets, each with varying point values. You don’t need to achieve all target objectives to gain enough points to pass the exam but the points are divided in such a way that you need to get most. I won’t provide many details of the exam itself but I will say it does a great job of testing the concepts presented in the course. If you’ve mastered them, you should be ready.
Day 1
I started the exam at 9:00 am and conquered two of the targets relatively quickly (within a few hours) but being they had the lowest point values, I had nowhere near enough points to pass. I then spent a lot of time on one of the two remaining targets looking in the wrong place for something I knew existed. I wasted hours on this one issue which definitely set me back (both mentally and in terms of time). In fact, although I did spend some time switching back and forth between the two remaining targets, this pretty much burned up the rest of my first day. I was taking the exam at my office and ultimately decided at 3 am that I would go home, catch a few hours sleep, and pick up again in the morning.
Day 2
After about 4 hours of rest and a quick breakfast, I headed back to the office and resumed the exam at around 10 am. Having ended day 1 with no idea on how to proceed with one of the remaining objectives, I decided to switch to the other target and spent the majority of day 2 attempting to overcome the limitations presented by that exploit. It was equally as frustrating as the other target because I knew exactly what the issue was and what I wanted to do, but every attempt I made fell short. After most of the day had passed, I decided to switch back to the other target. I’m not sure if it was the break I took from it or not, but almost immediately I found what I had spent so much of the prior day looking for and within another hour or so, I had completed the objective and collected full points for that target. It was a great mood booster, but I still didn’t have enough to pass the exam.
The goal of the last remaining target was to get a remote shell. By now it was about 4 in the morning, I had only taken a few short breaks since the exam started, and I was starting to get a bit worried that I wouldn’t conquer this one. After about another two hours, I had finally achieved command execution but couldn’t get the shell working. I knew I was very close and after another couple of hours, had an idea of what I wanted to do but I couldn’t write the code fast enough and ultimately ran out of time. Given that I had collected full points on the other three targets and gotten nearly to the end of the last, I was hopeful that I had gained enough points to pass.
I rested for the remainder of the day and finalized/submitted my report later that evening. The next morning I had a revelation and ended up writing out the working copy of the shell exploit for the final target on a notepad. Of course it was too late to submit, but it validated the fact that I was so close and made me more confident that I had collected enough points.
Thankfully, later that day I received confirmation that I has successfully passed the exam. Whew!
Conclusion
The course, although written several years ago, presents material and concepts that are still relevant and fundamental to current exploit techniques. It’s up to you to determine how far you want to go to master them.
The exam does a great job at testing your application of the course material and although there were several times I simply wanted to give up due to sheer frustration, I’m glad I didn’t. Had I not been derailed for so long looking in the wrong place on the one target, I know I could have completed all of the objectives well within the allotted time and not left my passing of the exam up to a point tally. As in real-world penetration testing engagements, sometimes you get your target quickly and sometimes you’re stumped for hours (often on the silliest of issues).
Regardless, I had achieved what I set out to do which was learn and challenge myself as much as possible and I earned the certification along with it. In the end I think the course was definitely worthwhile and I would recommend it to anyone interesting in honing and testing their exploit skills. If you decide to tackle it, just remember to Try Harder!
Until next time,
Mike